Reseating the MP760 print head
| Article ID: ART160018 |
| |
Date published: 06/09/2015 |
| |
Date last updated: 08/18/2015 |
Description
Reseating the MP760 print head.
Solution
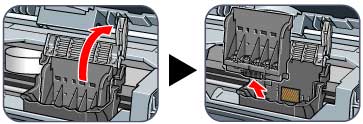
Reseating the Print Head
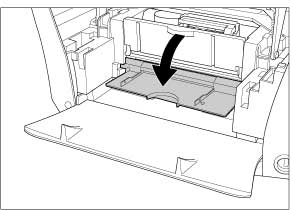
- Load A4-or letter-size plain paper in the Paper Support.
- In either COPY, PHOTO, or FILM menu, press the <Menu> button.
- Press the < (left) or > (right) arrow to select [Maintenance/Settings], then press <OK>.
- Use < or > to select [Maintenance] and the press <OK>.
- Press the up or down arrow to select [Auto Head Align], then press <OK>.
- When prompted to start [Auto Print Head Alignment], press the up arrow to select <Yes> and then press <OK>.
- Check the printed pattern.
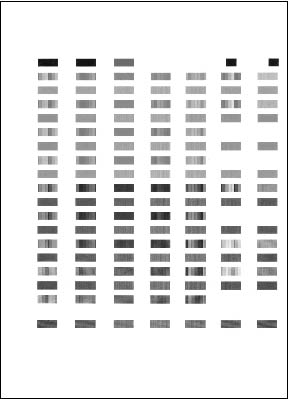
If the printed pattern matches the illustration, the print head position alignment is complete.
- Load A4- or letter-size plain paper in the paper support or cassette.
- Press <Feed Switch> button to select the paper source.
- In either COPY, PHOTO, or FILM menu screen, press <Menu> button.
- Press the left or right arrow to select [Maintenance/Settings], then press <OK>.
- Use left or right arrow to select [Maintenance] and press <OK>.
- Use up or lower arrow to select [Manual Head Align], then press <OK>.
- When prompted to print the horizontal pattern, use up arrow to select [Yes] and then press <OK>.
A horizontal pattern is printed.
- Beginning from column A on the printout, enter checkmarks in the patterns that have the most solid image.

(1): Bad example (Least solid box)
(2): Good example (Most solid box)
- Use left or right arrow to select the pattern number that you checked in column A on the printout in step 8.
- Use the down arrow to begin setting the appropriate value for column B.
- Repeat steps 9 and 10 to adjust columns B to L.
- After all columns have been adjusted, press <OK>.
- When prompted to print a vertical pattern, use the up arrow to select [Yes] and then press <OK>.
A vertical pattern is printed.
- Beginning from column M on the printout, enter checkmarks in the patterns that have the most solid image.

(1): Bad example (Least solid box)
(2): Good example (Most solid box)
- Use left or right arrow to select the pattern number that you checked in column M on the printout in step 14.
- Use the down arrow to begin setting the appropriate value for column N.
- After all columns have been adjusted, press <OK>.