Names and Functions of Parts
This section describes the name and function of each part. Make sure to read this section and familiarize yourself with the parts of the scanner before using the scanner.
Front View/Right-Side View

(1) Document Feed Tray
Open to place documents.
(2) Document Eject Area
Scanned documents are output here.
(3) Stop Button
Press this button to stop scanning before it is complete or to end panel-feeding.
(4) Start Button
Press this button to start scanning. Its function can be assigned with CaptureOnTouch.
(5) Power Button
Press this button to turn the scanner ON and OFF.
(6) Power Indicator
This indicator lights blue when the scanner is turned ON.
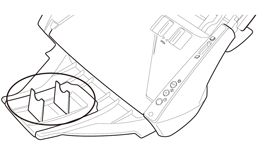
Front View (With the Document Feed Tray and Eject Tray Open)

(1) Front Unit
Open when clearing paper jams and cleaning the scanner.
(2) OPEN button
Use to open the front unit.
(3) Document Feeder
Place the document to scan here.
(4) Document Guides
Adjust these guides to fit the width of the document.
(5) Document Eject Tray
Open this tray when you want to stack output documents.
(6) Extension Tray
Pull this tray out if the document hangs over the edge of the document eject tray.
Back View
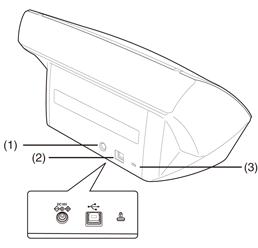
(1) Power Connector
Connect the supplied AC adapter to this connector.
(2) USB Connector
Connect a USB cable that supports Hi-Speed USB 2.0 to this connector.
(3) Theft Prevention Hole (Security Slot)
Attach a key chain, etc. here to prevent the scanner from being stolen.
Feed Selection Lever
Use this lever to change the way documents are fed.
Push it up to feed scan documents one at a time (Normal mode).
Push it down to feed scan documents that are fastened together, such as invoices, without separating them (Bypass mode).
Paper Eject Stopper
The paper eject stopper prevents scanned documents from sliding off the eject tray. Use the paper eject stopper that corresponds to the length of the documents you want to scan.