Printing with Easy Setup
In this machine, there are two paper sources, a rear tray and a cassette.
The position where the paper is set differs depending on the paper type to be printed.
The procedure for setting the basic print setup, which is necessary to print data properly, is as follows:
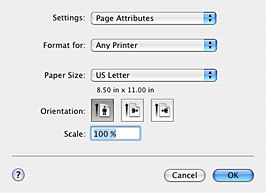
- Select Page Attributes from the pop-up menu on the Page Setup dialog box, and select your model from the Format for menu.
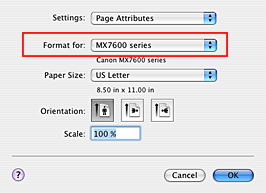
- Select the size of the paper to be used for printing from the Paper Size menu, and click 'OK'.
- Select Quality & Media on the pop-up menu in the Print dialog box. Then for Media Type, select the same paper type loaded in the machine.
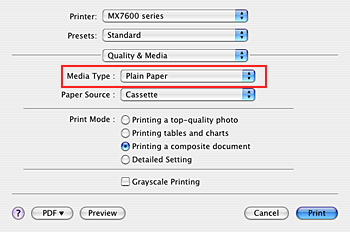
The paper feeding method is changed automatically. Check the paper feeding position.
Depending on the paper type used, a paper feed method may appear grayed out and may not be available.
Note:
* If Plain Paper is selected for Media Type, paper is fed from the Cassette.
* If a setting other than Plain Paper is selected for Media Type, paper is fed from the Rear Tray.
- For Print Mode, select Printing a top-quality photo, Printing tables and charts, or Printing a composite document, according to your purpose.
To change the balance and halftone expression methods for print quality and print speed, select Detailed Setting.
- Click 'Print'.
Now you are finished with the basic print setup. When you execute print, the document will be printed in accordance with the type of media used.
Page Setup
To open the Page Setup dialog box, you typically select Page Setup... from the File menu of your application software.
Settings
In Mac OS X v.10.3.9, click the pop-up menu to switch the display, and then select the following items.
Page Attributes
Set the paper size or scaled printing.
Custom Paper Size
In Mac OS X v.10.3.9, set any vertical and horizontal values for the paper size.
Summary (Page Setup dialog box)
In Mac OS X v.10.3.9, the information that was set in the Page Setup dialog box is displayed.
Format for
Select the model to be used for printing.
Paper Size
Select the size of the paper to be used for printing.
To set a non-standard size, select Manage Custom Sizes….
Note: To set a non-standard paper size in Mac OS X v.10.3.9, select Custom Paper Size from the Settings pop-up menu.
Orientation
Select the print orientation.
For landscape printing, you can select the top and bottom of the paper to match the paper to be printed.
Scale
Set the scaling percentage.
You can expand or reduce the size of the document when printing.
Return to step 1
Print
To open the Print dialog box, you typically select Print... from the File menu of your application software.

Printer
Select the model to be used for printing.
Selecting Add Printer... launches the Printer Setup Utility.
Presets
You can save or delete the settings of the Print dialog box.
You can switch between pages in the Print dialog box by the pop-up menu. You can choose one of the following items from the pop-up menu.
Copies & Pages
You can set the number of copies to be printed, collated printing, and the print range.
Layout
You can execute page layout printing.
Output Options (Mac OS X v.10.3.9)
A document can be saved as a PDF file or a PostScript file.
Scheduler
Print start time and print priorities can be set.
Paper Handling
You can set the pages to be printed on paper and the print order.
ColorSync
You can use ColorSync to adjust the colors.
Cover Page (Mac OS X v.10.4.x and later)
You can output cover pages before and after a document.
Quality & Media
You can set basic print settings that match the machine.
Color Options
You can adjust the print colors as you desire.
Special Effects
You can edit and adjust image data such as photos.
Borderless Printing
You can set the amount of original that extends off the paper when performing borderless printing.
Duplex Printing & Margin
You can print on sides of the paper and set the stapling direction and the width of the stapling margin.
Summary (Print dialog box)
The selected items in the Print dialog box are displayed.
PDF (Save as PDF)
You can save a document in PDF (Portable Document Format) format.
Preview
You can check the actual appearance of a document when it is printed in the Preview screen before the document is printed.
Return to step 3
