|
The function to copy images is for transferring images to a computer or other devices. Even if you copy images to a card and insert the card into the camera/ camcorder, the camera/camcorder cannot display those images.
IMPORTANT
- When copying to a card, use an SDXC card or CF card. An SD card or SDHC card cannot be used for copying images with Connect Station.
- Use a card or external hard disk formatted with exFAT.
- The card or external hard disk may be formatted. Do not use a card or external hard disk storing images or data that you do not want to delete.
- Use a self-powered external hard disk with a capacity within 2 TB.
- An external hard disk for copying images cannot be used for backup.
- If there is a DCIM folder in a destination, the destination cannot be selected. Use a computer or other devices to delete the DCIM folder.
- Even if you perform [Delete multiple images], protected images will not be deleted.
- When images are copied to a card or external hard disk from Connect Station, you cannot import them again to Connect Station from that card or external hard disk.
- If a card or external hard disk formatted with a file system other than exFAT is used, a screen for initializing the card or external hard disk appears.
- Update the Connect Station firmware to the latest version.
NOTE
- [Copy multiple images] is not available when a card is not inserted in Connect Station or when an external hard disk is not connected to it.
- If you perform [Copy multiple images] for images of 64 GB in total, it takes approx. 3 hours to complete the copying. However, depending on the operation status of Connect Station and the conditions (size, number, etc.) of the images to be copied, it may take 3 hours or longer to complete the copying.
- To use an SDXC card or CF card that has been formatted with Connect Station for shooting, format the card using the camera/camcorder.
Getting Started You can use the Connect Stationâs remote control to perform operations while using a TV as a monitor.

| Power button | Turn on the power or put Connect Station into the standby state. |
|

| Cross keys |

| Menu button | Menu screen appears. |

| Back button | Previous screen reappears. |

| Set button | Selected item takes effect. |

| Home button | Home screen appears. |

| Remote control transmitter |
Saving Images to a Memory Card To save images to a memory card, specify images by a shooting month, and copy them to a card at once. You can also select images one by one from the displayed images.
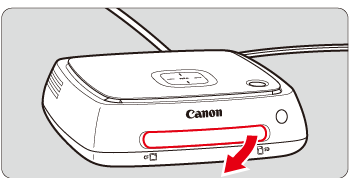
1. Remove the card slot cover in advance.
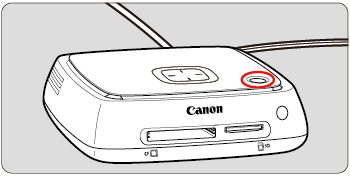
2. Press the power button on Connect Station with its power off, the power lamp will light up in orange. The light will turn green when Connect Station starts. (It takes approx. one minute before Connect Station starts.)
| Connect Station Status | Power Lamp Indicator |
| Power off |
 (Lamp off)
 |
| Standby |
 Orange (lamp on)
 |
| Power on |
 Green (lamp on)
 |
NOTE
- If you do not operate Connect Station for 30 minutes while the power is on, it will go into standby mode (except during image playback).
- Images can be imported even when Connect Station is standing by.
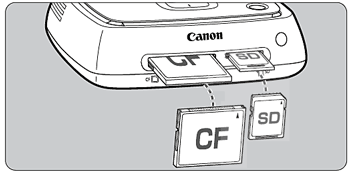
3. Insert the card into the memory card slot.
CAUTION
- Insert an SD card with its front side facing upward until it clicks in place.
- Insert a CF card with its front side facing upward so that the end where tiny holes are aligned goes inside. Inserting the card in the wrong direction will damage Connect Station.
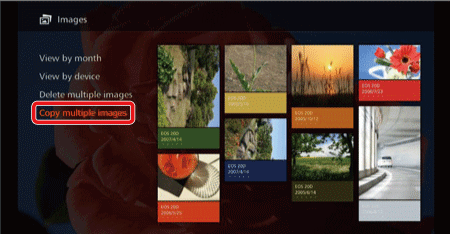
4.Select [Images] on the Home screen and press the [SET] button.

5.Select [Copy multiple images] and press the [SET] button.
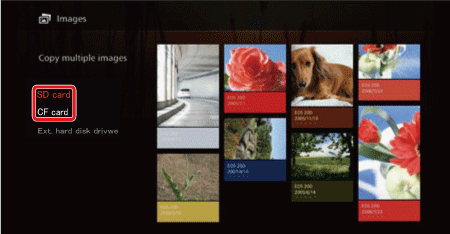
6.When you select [Copy multiple images], the card selection screen will appear first. Press the [  ] or [  ] keys to select the card to which to copy images and press the [SET] button.
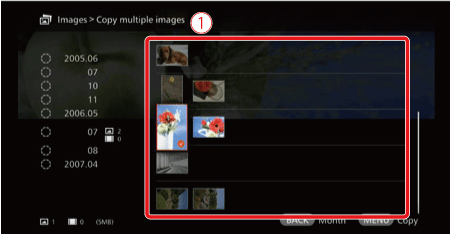
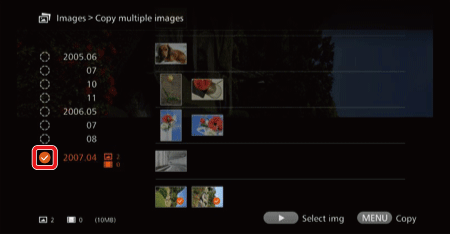
7.Sort the target images by a shooting month and append [  ] for the images to be copied. Select a shooting month in the left-side area and press the [SET] button to append [ ] for all the target images.
NOTE
Press the [  ] key to select images in the thumbnail area. Select an image and press [SET] to append [ ] for that image.
 : thumbnail area
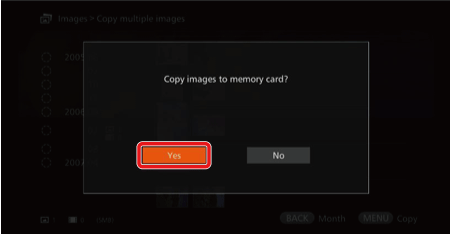
8.After selecting images for copying, press [MENU], select [YES] and press the [SET] button to save images to a memory card.
This completes the steps for selecting desired images from Connect Station and saving them to a memory card.
Saving Images to an External Hard Disk (Version 2.0 or later firmware) To save images to an external hard disk, specify images by a shooting month, and copy them to an external hard disk at once. You can also select images one by one from the displayed images.
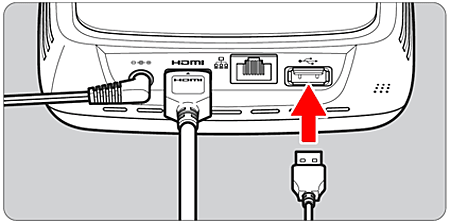
1.Connect the USB terminal on Connect Station to an external hard disk.
2.If you press the power button on Connect Station with its power off, the power lamp will light up in orange. The light will turn green when Connect Station starts. (It takes approx. one minute before Connect Station starts.)
| Connect Station Status | Power Lamp Indicator |
| Power off |
(Lamp off) |
| Standby |
Orange (lamp on) |
| Power on |
Green (lamp on) |
NOTE
- If you do not operate Connect Station for 30 minutes while the power is on, it will go into standby mode (except during image playback).
- Images can be imported even when Connect Station is standing by.
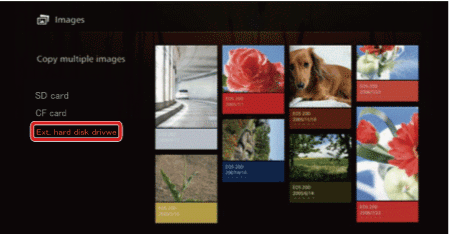
3.Select [Images] on the Home screen and press the [SET] button.
4.Select [Copy multiple images] and press the [SET] button.
5.When you select [Copy multiple images], the external hard disk selection screen will appear first. Press the [ ] or [ ] keys to select the external hard disk to which to copy images and press the [SET] button.
6.Sort the target images by a shooting month and append [ ] for the images to be copied. Select a shooting month in the left-side area and press the [SET] button to append [ ] for all the target images.
NOTE
Press the [ ] key to select images in the thumbnail area. Select an image and press [SET] to append [ ] for that image.
: thumbnail area
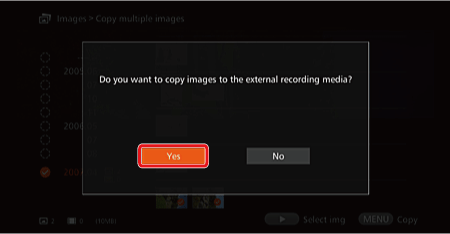
7.After selecting images for copying, press [MENU], select [YES] and press the [SET] button to save images to an external hard disk.
This completes the steps for selecting desired images from Connect Station and saving them to an external hard disk.
|