Setting How to Handle Documents with Forwarding Errors
You can set how the machine handles the documents that failed to be forwarded.
The default settings are as follows:
- <Store Image to Memory>: Off
note:
- If a forwarding error occurs when all of <Print Image>, <Store Image to Memory>, and <Memory Lock Settings> are set to <Off>, the received documents will be lost.
- If <Memory Lock Settings> is set to <On>, forwarding error jobs are not printed even if <Print Image> is set to <On>. These jobs are printed when <Memory Lock Settings> is set to <Off>.
1. Press

(Main Menu).
2. Press the right Any key to select <Additional Func.>.

3. Use [

] , [

] or

(Scroll Wheel) to select <System Management Set.>, then press [OK].
If the System Manager ID and System Password have been set, enter the System Manager ID and System Password using  -
-  (numeric keys), then press
  (Log In/Out).

4. Use [
] , [
] or
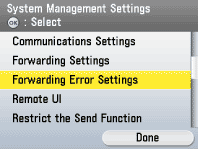
(Scroll Wheel) to select <Forwarding Error Settings>, then press [OK].
5. Use [
] , [
] or
(Scroll Wheel) to select <Print Image>, then press [OK].

6. Use [ ] , [ ] or (Scroll Wheel) to select <Off> or <On>, then press [OK].
- <Off>: Does not print the image.
- <On>: Prints out the image if forwarding fails.

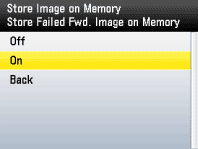
7. Use [ ] , [ ] or (Scroll Wheel) to select <Store Image to Memory>, then press [OK].

8. Use [
] , [
] or
(Scroll Wheel) to select <Off> or <On>, then press [OK].
- <Off>: Does not store the image.
- <On>: Stores the image in memory if forwarding fails.
note:
If you set <Store Image to Memory> to <On>, you can resend the jobs with forwarding errors to registered destinations in the Address Book.
9. Press
(Main Menu) to return to the Main Menu screen.
Resending Documents with Forwarding Errors
You can resend the e-mail/I-fax documents that the machine failed to forward.
note:
Documents with forwarding errors are stored in memory only if <Store Image to Memory> is set to <On> in <Forwarding Error Settings> in <System Management Set.>.
1. Press

(Status Monitor/Cancel).
2. Use [
] , [
] or
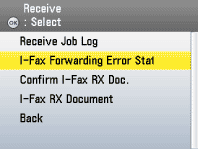
(Scroll Wheel) to select <Receive>, then press [OK].
If there is any job that you can check or forward, the job is marked by a blue icon.

3. Use [
] , [
] or
(Scroll Wheel) to select <I-Fax Forwarding Error Status>, then press [OK].
4. Use [
] , [
] or
(Scroll Wheel) to select the job you want to transfer.

5. Press the right Any key to select <Menu>.

6. Use [
] , [
] or
(Scroll Wheel) to select <Forward>, then press [OK].

7. Use [
] , [
] or
(Scroll Wheel) to select the destination, then press the right Any key to select <Start>.

note:
- You can use [
 ] or [
 ] to restrict the displayed range of destinations.
- To be able to select a forwarding destination, it is necessary to register destinations in the Address Book beforehand.
- If the transfer is successful, the document is erased from memory.
- You cannot select a group address for transferring the document.
8. Press
(Main Menu) to return to the Main Menu screen.
Checking/Changing the Status of Documents with Forwarding Errors
You can check the details of e-mail/I-fax documents that the machine failed to forward. You can also erase and print those documents.
note:
Documents with forwarding errors are stored in memory only if <Store Image to Memory> is set to <On> in <Forwarding Error Settings> in <System Management Set.>.
1. Press
(Status Monitor/Cancel).
2. Use [
] , [
] or
(Scroll Wheel) to select <Receive>, then press [OK].press [OK].
If there is any job that you can check, erase or print, the job is marked by a blue icon.

3. Use [
] , [
] or
(Scroll Wheel) to select <I-Fax Forwarding Error Status>, then press [OK].

4. Use [
] , [
] or
(Scroll Wheel) to select the job you want to check.

5. Press the right Any key to select <Menu>.

6. Use [
] , [
] or
(Scroll Wheel) to select <Details>, <Erase>, or <Print>, then press [OK].

7. If you select <Details>, check the details of the selected job, then press the right Any key to select <Done>.

8. If you select <Erase>, use [
] , [
] or
(Scroll Wheel) to select <No> or <Yes>, then press [OK].

note:
To erase multiple documents from memory, select and erase documents one by one.
9. If you select <Print>, use [
] , [
] or
(Scroll Wheel) to select <No> or <Yes>, then press [OK].

note:
To print multiple document, select and print documents one by one.
10. Press
(Main Menu) to return to the Main Menu screen.
