Adjusting Output (Scan) Resolution
By changing the resolution, you can set how clear the image is going to be.
The higher the resolution, the clearer (but the larger) the scanned image is.
The resolution can be changed before scanning.
Note:
- If the resolution is doubled, the image data will be quadrupled.
- If the data is large, problems such as slow processing speed or lack of memory may occur.
To change standard scan settings using MP Navigator EX, click here
To change more advanced scan settings using the scanner driver, click here
To scan using MP Navigator EX:
The following is explained using MP Navigator EX 3.0 procedures.
-
Launch MP Navigator EX.
- Open the Applications folder on the hard disk on which MP Navigator EX is installed.
- Double-click the 'Canon Utilities' folder to open it
- Double-click the 'MP Navigator EX' icon.
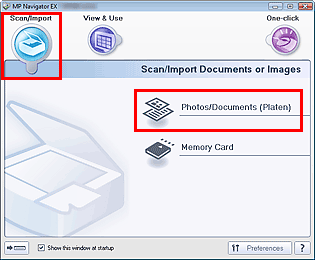
- Point to Scan/Import and click 'Photos/Documents (Platen)'.
*Display varies according to the printer model.
- From the Document Type pull down, select the type of document to scan.
Scanning photos: Color Photo or Black and White Photo
Scanning text documents: Color Document, Black and White Document or Text(OCR)
Scanning magazines: Magazine(Color)

Note:
* When you select Magazine(Color), the Descreen function will be enabled and scanning takes longer than usual. To disable the Descreen function, deselect the Descreen checkbox in the Scan Settings dialog.
* Select Text(OCR) to extract the text in the image and convert to editable text data using MP Navigator EX.
- Click 'Specify'.

*Display varies according to the printer model.
- Select the preferred resolution in Scanning Resolution, and click 'OK'.

*Display varies according to the printer model.
- Click 'Scan' to start scanning.
To scan using the scanner driver:
-
Launch MP Navigator EX.
- Open the Applications folder on the hard disk on which MP Navigator EX is installed.
- Double-click the 'Canon Utilities' folder to open it
- Double-click the 'MP Navigator EX' icon.
- Point to Scan/Import and click 'Photos/Documents (Platen)'.
*Display varies according to the printer model.
- Select the Use the scanner driver checkbox, then click 'Open Scanner Driver'.

- Change the resolution.
According to your purpose, set the resolution in Basic Mode with ease, or in Advanced Mode with a detailed setting.
- To set the resolution in Basic Mode:
(1) Select the 'Basic Mode' tab.
(2) Select the output resolution from the Destination pull-down menu.
If necessary, set other items.

- To set the resolution in Advanced Mode:
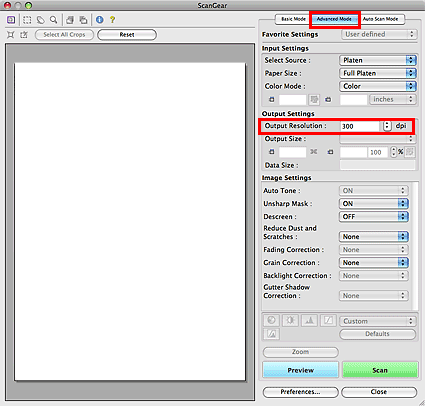
(1) Select the 'Advanced Mode' tab.
(2) In Output Resolution, select the resolution, and click 'Scan'.
If necessary, set other items.
Note:
The higher the resolution (the larger the number), the clearer the scanned image is.
The resolution can be set by selecting one of the preset resolutions in the pop-up menu or entering the number from 25 to 19200 (unit:dpi).
- Click 'Scan' to start scanning.
