Saving Photos on a Computer (XA25 / XA20)
| Article ID: ART140326 |
| |
Date published: 05/13/2015 |
| |
Date last updated: 08/17/2015 |
Description
Saving Photos on a Computer (XA25 / XA20)
Solution
| Saving Photos on a Computer (XA25 / XA20) ID : 8201851200 _ EN _ 1 |
| Solution | If your computer is installed with one of the following operating system, you can save your photos simply by connecting the camcorder to the computer using the supplied USB cable: Windows 8, Windows 7, Windows Vista, Windows XP, or Mac OS X NOTE The procedure is shown in Windows 7 for the purposes of explanation. The setting procedures and screens displayed may differ depending on your computers operating system.
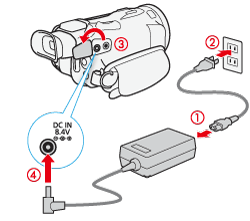
1. Camcorder: Power the camcorder using the compact power adapter.
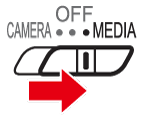
 2. Set the power switch to <MEDIA>.
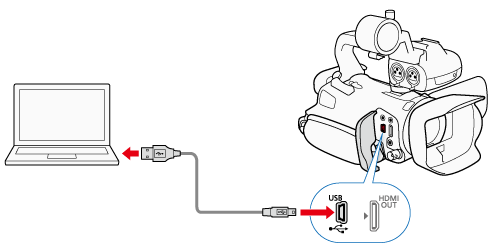
 3. Connect the camcorder to the computer using the supplied USB cable. Camcorder: Touch [All (for PC only)].
 4. The camcorder will appear as a new device (or drive). - Your photos can be found under [Removable Storage] > [DCIM] > [xxxCANON], where "xxx" is a folder number between 101 and 998.
5. Save the photos onto the computer.
IMPORTANT - Observe the following precautions while the ACCESS indicator is on or flashing. Failing to do so may result in permanent data loss.
- Do not open the double memory card slot cover. - Do not disconnect the USB cable. - Do not turn off the camcorder or the computer. - Do not change the camcorders operating mode. - The software may not operate correctly depending on the specifications/settings of your computer.
- If you wish to use the recordings on your computer, make copies of them first. Use the copied files, retaining the originals.
- The following image files may not be displayed correctly.
- Images not recorded with this camcorder. - Images edited on a computer. - Images whose file names have been changed.
|
