|
This section describes how to connect the camera to a computer when importing images to the computer or specifying the camera settings from the computer.
IMPORTANT
If [  : Wi-Fi/NFC] is set to [Enable], the camera cannot be connected to a computer. Set [Wi-Fi/NFC] to [Disable], then reconnect the camera to a computer with an interface cable.
1. Confirm that the camera is not connected to the computer, and then flip out the camera’s monitor and set the camera's power switch to [ON].
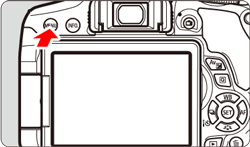
2. Press the [MENU] button to display the menu screen.
3. Change the camera's Auto power off settings.
3-1. Press the [  ], [  ] keys to select the [  ] tab.
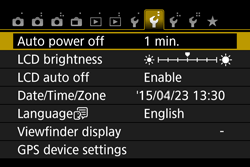
3-2. Press the [  ], [  ] keys to select [Auto power off], then press [  ].
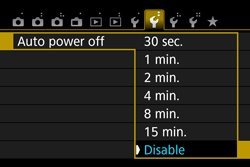
3-3. Press the [ ], [ ] keys to select [Disable], then press [ ].
4. Press the [MENU] button to turn off the display on the LCD monitor, and then set the camera's power switch to [OFF].
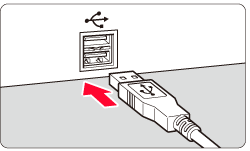
5. Connect the large plug of the supplied interface cable into the USB port of your computer.
For the location and direction of the USB port, refer to the computer's instruction manual.
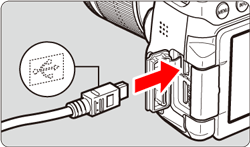
6. Make the connection to the camera.
With the [  ] mark on the plug facing the front of the camera, connect it to the camera’s [DIGITAL] terminal.
7. Set the camera's power switch to [ON].
8. EOS Utility starts automatically.
If EOS Utility does not start automatically, click the [Start] button, then select [All Programs], [Canon Utilities], and then [EOS Utility].
NOTE
- Windows 8: Right-click on the [Start] screen and click on [All apps] displayed at the bottom right of the screen to display the [Apps] screen. Then, click [EOS Utility].
- Windows 8.1: Click [↓]on the bottom left side of the [Start] screen to display the [Apps] screen, and then click [EOS Utility].
- Mac OS X: Click the [EOS Utility] icon on the Dock.
For information about operations after connecting the camera to the computer, please refer to the camera’s instruction manual.
This completes the process of connecting the camera to the computer.
|
