
Resolve the error displayed, then retry - MP495 / MP499
| Article ID: ART114157 | | | Date published: 05/11/2015 | | | Date last updated: 10/05/2018 |
Description
Solution
An Error Code Is Displayed on the LED
Alarm Lamp Is Lit Orange
When a machine error occurs, the Alarm lamp is lit orange and the error code as follows is displayed on the LED. Check the error code displayed on the LED and take the appropriate action to correct the error.
In addition to the actions listed in the table, the following buttons are valid when an operator call error occurs:
- ON button: To turn the machine off and on again.
- OK button: To clear and recover from an error. In some operator call errors, the error will automatically be cleared when the cause of the error is eliminated, and pressing the OK button may not be necessary.
- Stop button: To cancel the job at error occurrence, and to clear the error.
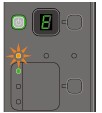
* Depending on the error occurred, the Alarm lamp is not lit.
|
Error Code |
Cause |
Action |
|---|---|---|
|
E, 0, 2  (LED display) |
The machine is out of paper./Paper does not feed. |
Reload the paper on the Rear Tray correctly and press the Black or Color button. |
|
E, 0, 3  (LED display) |
Paper Output Tray is closed./Paper jam. |
If the Paper Output Tray is closed, open it. The machine resumes printing. If opening the Paper Output Tray does not resolve the problem, or if the tray was open to begin with, the paper may be jammed. Remove the jammed paper, reload paper properly in the printer, then press the Black or Color button.
|
|
E, 0, 4 E, 0, 5   (LED display) |
The FINE Cartridge cannot be recognized. |
The FINE Cartridge may not be installed properly, or the Cartridge may not be compatible with this machine. Open the Scanning Unit (Cover) and install the appropriate FINE Cartridge. After that, push the Ink Cartridge Locking Cover until it clicks into place, then close the Scanning Unit (Cover).
|
|
E, 0, 7  (LED display) |
FINE Cartridge is not installed in the correct position. |
Make sure that each FINE Cartridge is installed in the correct position.
|
|
E, 0, 8  (LED display) |
Ink absorber is almost full. |
Press the machine's Black or Color button to continue printing. |
|
E, 1, 3  (LED display) |
The remaining ink level cannot be detected. |
The ink may have run out. The function for detecting the remaining ink level will be disabled since the ink level cannot be correctly detected. If you want to continue printing without this function, press the machine's Stop (Reset) button for at least 5 seconds. Canon recommends to use new genuine Canon cartridges in order to obtain optimum qualities. Please be advised that Canon shall not be liable for any malfunction or trouble caused by continuation of printing under the ink out condition. |
|
E, 1, 4  (LED display) |
The FINE Cartridge cannot be recognized. |
The FINE Cartridge may not be compatible with this printer. Install the appropriate FINE Cartridge.
|
|
E, 1, 5  (LED display) |
The FINE Cartridge cannot be recognized. |
The FINE Cartridge may not be installed properly. Open the Scanning Unit (Cover) and install the FINE Cartridge properly.
|
|
E, 1, 6  (LED display) |
The ink has run out. |
The ink has run out. Replace the ink cartridge and close the Scanning Unit (Cover). If printing is in progress and you want to continue printing, press the machine's Stop (Reset) button for at least 5 seconds with the ink cartridge installed. Then printing can continue under the ink out condition. The function for detecting the remaining ink level will be disabled. Replace the empty ink cartridge immediately after the printing. The resulting print quality is not satisfactory, if printing is continued under the ink out condition. |
|
E, 2, 0 E, 2, 1 E, 2, 2 E, 2, 3 E, 2, 4      (LED display) |
An error regarding network has occurred.
|
Refer to your setup manual or the Network Setup Troubleshooting and take the appropriate action. -Additional info E,2,0: Wait until the settings being performed were completed, then try the wireless LAN setting. E,2,3: Wait for a while, and perform the setting again. E,2,4: Confirm the access point, and perform the setting again. |
|
E, 3, 0  (LED display) |
The size of the original cannot be correctly detected or the document is too small when the Fit-to-Page copying is selected. |
|
|
E, 3, 1  (LED display) |
The machine is not connected with the computer. |
Connect the machine and the computer with a USB cable.
|
|
E, 5, 0  (LED display) |
Scanning the print head alignment sheet has failed. |
Press the Stop/Reset button to dismiss the error, then take the actions described below.
If the error is not resolved, connect the machine to the computer and align the Print Head on the printer driver. |
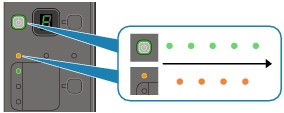
POWER Lamp Flashes Green and Alarm Lamp Flashes Orange Alternately
When the POWER and Alarm lamps flash alternately as shown below, and the error code as follows is displayed on the LED, an error requiring servicing might have occurred.
|
Error Code |
Action |
|---|---|
|
P, 0, 2  (LED display) |
Cancel printing, turn off the machine. Then clear the jammed paper or protective material that is preventing the FINE Cartridge Holder from moving, and turn on the machine again.  Important Important
|
|
P, 1, 0  (LED display) |
|
In cases other than the above: |
Turn off the machine, and unplug the power cord of the machine from the power supply. Plug the machine back in and turn the machine back on.
|