| Solution |
The machine will display a message when a toner cartridge is nearly empty. You can check the remaining toner level on the display.
Consumables
WARNING
- Do not dispose of used toner cartridges and drum units in open flames. Also, do not store toner cartridges, drum units or paper in a location exposed to open flames. This may cause the toner to ignite, and result in burns or fire.
- If you accidentally spill or scatter toner, carefully wipe up the loose toner with a damp, soft cloth and avoid inhaling any toner dust. Do not use a vacuum cleaner that is not equipped with safety measures to prevent dust explosions to clean up loose toner. Doing so may cause damage to the vacuum cleaner or result in a dust explosion due to static discharge.
If you are using a cardiac pacemaker
- Drum units generate a low level magnetic flux. If you use a cardiac pacemaker and feel abnormalities, please move away from toner cartridges and consult your physician immediately.
CAUTION
- Use caution not to inhale any toner. If you should inhale toner, consult a physician immediately.
- Use caution so that toner does not get into your eyes or mouth. If toner should get into your eyes or mouth, immediately wash with cold water and consult a physician.
- Use caution so that toner does not come into contact with your skin. If it should, wash with soap and cold water. If there is any irritation on your skin, consult a physician immediately.
- Keep the toner cartridges, drum units, and other consumables out of the reach of small children. If toner is ingested, consult a physician or poison control center immediately.
- Do not disassemble or modify the toner cartridges or drum units. Doing so may cause the toner to scatter.
IMPORTANT
Storing the toner cartridges and drum units
- Store toner cartridges in a cool location, away from direct sunlight. (The recommended storage conditions are temperatures below 30°C/86°F and humidity below 80%.)
- Store without opening until the toner cartridge is to be used.
- When removing the drum unit from this machine for storage, attach the protective cover for the drum, and then place the removed toner cartridge into the original protective bag or wrap it with a thick cloth.
- When storing the toner cartridges and drum units, do not store them upright or upside down. The toner will solidify and may not return to its original condition even if it is shaken.
Do not store the toner cartridges and drum units in the following locations
- Locations exposed to open flames
- Locations exposed to direct sunlight or bright light for five minutes or more
- Locations exposed to excessive salty air
- Locations where there are corrosive gases (i.e. aerosol sprays and ammonia)
- Locations subject to high temperature and high humidity
- Locations subject to dramatic changes in temperature and humidity where condensation may easily occur
- Locations with a large amount of dust
- Locations within the reach of children
Be careful of counterfeit toner cartridges and drum units
- Please be aware that there are counterfeit Canon toner cartridges and drum units in the marketplace. Use of counterfeit toner cartridge and drum unit may result in poor print quality or machine performance. Canon is not responsible for any malfunction, accident or damage caused by the use of counterfeit toner cartridge and drum unit. For more information, see canon.com/counterfeit.
Availability period of repair parts, toner cartridges and drum units
- Repair parts, toner cartridges and drum units for the machine will be available for at least seven (7) years after production of this machine model has been discontinued.
Drum unit packing materials
- Save the protective bag for the toner cartridge and protective cover for the drum. They are required when transporting this machine.
- The packing materials may be changed in form or placement, or may be added or removed without notice.
Toner
- If a message prompting you to replace the toner cartridge appears on the display, replace the used toner cartridge of the displayed color with a new one.
- Toner comes in four colors: black, cyan, magenta, and yellow.
- Check the toner color that you need to replace before ordering toner from your local authorized Canon dealer. Also, when replacing the toner cartridge, make sure that you replace toner of the correct color.
- Use only toner cartridges intended for use with this machine.
- For optimum print quality, using Canon genuine toner is recommended.
Drum Unit
- When you replace the drum unit with a new one, be sure to use only drum units intended for use with the machine. For optimum print quality, using Canon genuine drum unit is recommended.
Genuine Supplies
- Canon has developed and manufactured Toner, Parts, and Supplies specifically for use in this machine. For optimal print quality and for optimal machine performance and productivity, we recommend that you use Genuine Canon Toner, Parts, and Supplies. Contact your Canon Authorized Dealer or Service Provider for Genuine Canon Supplies.
How to Replace Toner Cartridges 1. Remove the toner cartridge of the displayed color.
1-1. Open the front cover of the main unit.
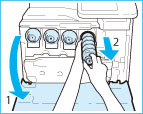
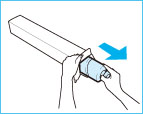
1-2. Pull out the toner cartridge to replace.
Pull the toner cartridge out halfway, and then remove it completely while supporting it and keeping it straight with your other hand from underneath.
WARNING
Do not burn or throw used toner cartridges into open flames, as this may cause the toner remaining inside the cartridges to ignite, resulting in burns or a fire.
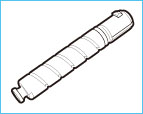
2. Prepare the new toner cartridge.
2-1. Open the package of the toner cartridge, and remove the toner cartridge.
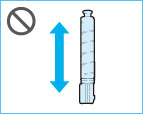
2-2. Hold the new toner cartridge in hands as shown in the illustration, and shake it vertically approximately 10 times.
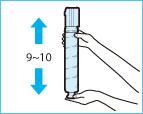
IMPORTANT
Do not shake the toner cartridge in the direction shown in the illustration. Doing so may cause the toner to not output properly.
3. Pull the toner cartridge straight up and out of the machine.
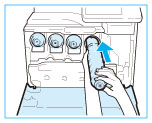
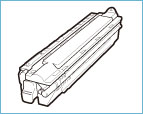
3-1. Match the new toner cartridge with the slot on the main unit as shown in the illustration.
3-2. Push the new toner cartridge in as far as possible.
Support the new toner cartridge with your hand from underneath while pushing it into the machine with your other hand.
4. Close the front cover of the main unit.
|