
Specifying the Basic Settings for Faxing - MX490 / MX492
| Article ID: ART100324 | | | Date published: 05/11/2015 | | | Date last updated: 04/15/2019 |
Description
Specifying the Basic Settings for Faxing
Solution
| Specifying the Basic Settings for Faxing
ID : 8202500400 _ EN _ 1
|
|
| Solution |
You can set the sender information such as date/time, unit name, and unit fax/telephone number.
About the Sender Information If the unit name and unit fax/telephone number are registered, they are printed with date and time as sender information on the recipient's fax.
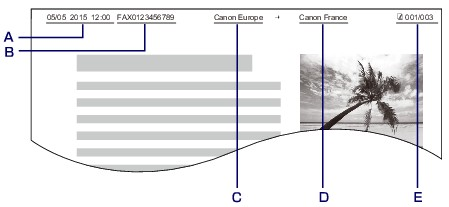 A. Date and time of transmission
B. Unit fax/telephone number
C. Unit name
D. The registered recipient's name is printed when sending faxes with the coded memory dial.
E. Page number
Setting the Date and Time This section describes the procedure to set the date and time.
1. Make sure that the machine is turned on.
2. Press the Setup
 button. button.The Setup menu screen is displayed.
3. Use the
  button to select Device settings, then press the OK button. button to select Device settings, then press the OK button.
4. Use the
button to select Dev. user settings, then press the OK button.
5. Use the
button to select Date/time setting, then press the OK button.
6. Set the date and time.
Use the
button to move the cursor under the desired position, then use the Numeric buttons to enter the date and time. Enter the date and time in 24-hour format.
Enter only the last two digits of the year.
7. Press the OK button.
8. Press the FAX
 button to return to the Fax standby screen. button to return to the Fax standby screen.
Setting Daylight Saving Time (Summer Time) Some countries adopt the daylight saving time (summer time) system that shifts the clock time forward at certain periods of the year.
You can set your machine to automatically change the time by registering the date and time that daylight saving time (summer time) begins and ends.
1. Make sure that the machine is turned on.
2. Press the Setup
button.The Setup menu screen is displayed.
3. Use the
button to select Device settings, then press the OK button.
4. Use the
button to select Dev. user settings, then press the OK button.
5. Use the
button to select DST setting, then press the OK button.
6. Use the
button to select ON, then press the OK button.To disable summer time, select OFF.
7. Set the date and time when summer time starts.
(1) Use the
button to select Start date/time, then press the OK button.(2) Make sure that Set month is selected, then press the OK button.
(3) Use the
button to select the month when summer time starts, then press the OK button.(4) Make sure that Set week is selected, then press the OK button.
(5) Use the
button to select the week when summer time starts, then press the OK button.(6) Make sure that Set day of week is selected, then press the OK button.
(7) Use the
button to select the day of the week when summer time starts, then press the OK button.(8) Make sure that Set shift time is selected, then press the OK button.
(9) Use the
button to move the cursor under the desired position, use the Numeric buttons to enter the time (in 24-hour format) when summer time starts, then press the OK button.Precede single digits with a zero.

8. Set the date and time when summer time ends.
(1) Use the
button to select End date/time, then press the OK button.(2) Make sure that Set month is selected, then press the OK button.
(3) Use the
button to select the month when summer time ends, then press the OK button.(4) Make sure that Set week is selected, then press the OK button.
(5) Use the
button to select the week when summer time ends, then press the OK button.(6) Make sure that Set day of week is selected, then press the OK button.
(7) Use the
button to select the day of the week when summer time ends, then press the OK button.(8) Make sure that Set shift time is selected, then press the OK button.
(9) Use the
button to move the cursor under the desired position, use the Numeric buttons to enter the time (in 24-hour format) when summer time ends, then press the OK button.Precede single digits with a zero.

9. Press the FAX
button to return to the Fax standby screen.
Registering User Information This section describes the procedure to register the user information.
1. Make sure that the machine is turned on.
2. Press the Setup
button.The Setup menu screen is displayed.
3. Use the
button to select Fax settings, then press the OK button.
4. Use the
button to select FAX user settings, then press the OK button.
5. Enter the unit fax/telephone number.
(1) Make sure that Unit TEL no. registr. is selected, then press the OK button.
(2) Use the Numeric buttons to enter the unit fax/telephone number.
 (3) Press the OK button.
6. Enter the unit name.
(1) Make sure that Unit name registr. is selected, then press the OK button.
(2) Use the Numeric buttons to enter the unit name.
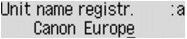 (3) Press the OK button.
Entering Numbers, Letters, and Symbols Use the Numeric buttons to enter or edit such information as unit name, a recipient's name for the directory, etc.
- Switching the Input Mode
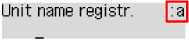
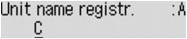
Each time the Tone
 button is pressed, the input mode is switched in the following order: lowercase mode (:a), uppercase mode (:A), then numeric mode (:1). button is pressed, the input mode is switched in the following order: lowercase mode (:a), uppercase mode (:A), then numeric mode (:1).The current input mode appears at the upper right corner of the LCD.
- Entering Numbers, Letters, and Symbols
 Press the Tone
button to switch the input mode.Use the Numeric buttons to enter the desired characters.
Press the
 button five times. button five times.
Press the Back
 button. button.
- Editing Entered Numbers, Letters, and Symbols
 Press the
or button to move the cursor under the position you want to edit.
Press the
button five times.
Move the cursor under the character to the right of the insertion position, then enter the character. The character on the cursor will move to the right and the new character will be inserted.
Move the cursor under the character, then press the Back
button.
- List of Characters Assigned to Each Numeric Button
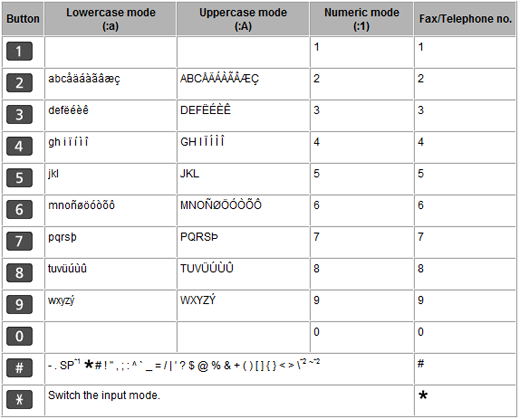 *1 "SP" indicates a space.
*2 Displayed only when entering characters in the LAN settings.
|
SIMS Doc Id
8202500400