| Solution |
With CameraWindow* you can save MP4 movies and photos to your computer.
* Software for photos and MP4 movies.
IMPORTANT
- To perform this operation, you must first download the DIGITAL VIDEO CAMERA Software from the Canon homepage and use it to install CameraWindow.
- An internet connection is necessary for downloading the software. Please refer to the 'Related information' section at the end of this page for more information on the installation procedure.
- In this section, Windows 7 is used as an example. Operations and on-screen displays and may differ slightly when using Windows 8/8.1, or Mac OS X.
Connecting the Camcorder to the Computer 1. Power the camcorder using the compact power adapter.
2. Press <Playback> button to set the camcorder to Playback mode.
3. Touch [  ].
4. Touch  to switch between the  (Built-in memory) and the  (Memory card). Touch  to switch to (MP4 format).
5. Touch [  ].
6. Connect the camcorder to the computer using the supplied USB cable.
- Camcorder: If a device selection screen appears, select [Computer].
- Windows: If the AutoPlay dialog box appears instead, click [Downloads Images From Canon Camera] to start the CameraWindow program.
Computer: CameraWindow will start automatically and the main screen will appear.
NOTE
If the [AutoPlay] screen does not appear, click [Start] > [All Programs] or [Programs] > [Canon Utilities] > [CameraWindow] > [CameraWindow].
- When the camera and computer become capable of communicating, CameraWindow will start.
- If a device selection window appears, select your camcorders model name from the list and click OK.
Using CameraWindow 1. The following window appears.
2. The [CameraWindow] menu appears. Click [Import Images from Camera].
REFERENCE
By default, the imported movies and images will be saved in folders separated by shooting date in the computers [Picture] folder.
To change the destination folder, click (  ) (displayed in the upper right of the screen shown in step 2), and perform the following procedure. Click [Import] > [Folder Settings] >  [Browse], and specify a folder as the destination folder. Confirm the  destination folder that you have specified. Then, click  [OK].
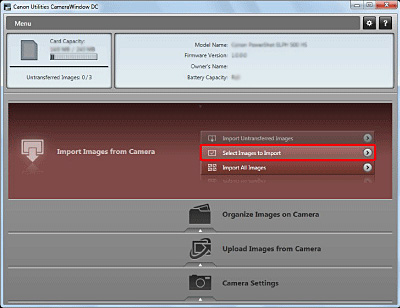
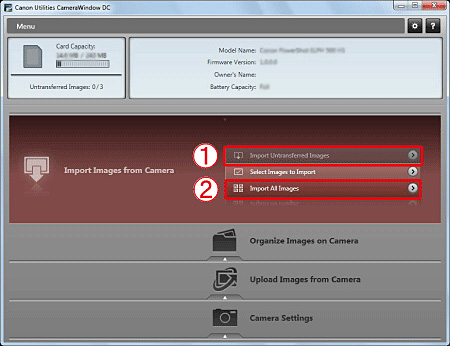
3. A window like the one shown below appears, so click [Import Untransferred Images] or [Import All Images].
REFERENCE
3-1. To select and import movies or images, click [Select Images to Import] in Step 3.
3-2. Select the movies and images you want to import, and then click [Import] (  ). After this step, please follow the subsequent procedures below.
NOTE
Icons displayed on thumbnail images:
[  ] appears on untransferred movie and photos.
If [ ] does not appear, the movie or photo has already been transferred.
[  ] appears on movie files.
[ ] does not appear on photos.
4. The following window appears, and the computer starts to transfer movies and images from the camcorder.
5. The following screen appears after the movies and images have been transferred. Click [ OK ].

6. The following window appears.
Click the [  ] button to close the window.
IMPORTANT
- When the camcorder is connected to a computer:
- Do not open the memory card slot cover and do not remove the memory card.
- Do not change or delete any of the camcorders folders or files directly from the computer as this may result in permanent data loss. When saving recordings on a computer, we recommend using the software described in this section (Transfer Utility LE for AVCHD movies; CameraWindow for MP4 movies and photos).
-Do not set the computer in Sleep or Hibernate mode (Windows) and do not activate the Sleep function (Mac OS).
- If you wish to use the recordings on your computer, make copies of them first. Use the copied files, retaining the originals.
NOTE
To uninstall CameraWindow:
- Windows: In the Control Panel, open Programs and Features or Add or Remove Programs. Select Canon Utilities CameraWindow DC 8, click Uninstall or Uninstall/ Change and then click OK.
- Mac OS: Drag and drop the following folder to the Trash:
/Applications/Canon Utilities/CameraWindow
The following types of MP4 scenes will be recognized as multiple files on a computer.
- Scenes exceeding 4 GB.
- Scenes recorded at 35 Mbps exceeding 30 minutes.
- Scenes recorded at a video quality other than 35 Mbps exceeding 1 hour.
- Depending on the computer, the software may not work correctly or you may not be able to play back movies.
- When the camcorder is powered only using the battery pack, the batterys charge on the camcorders details area of the CameraWindow screen (Battery Capacity) will always appear as Full, regardless of the actual remaining battery charge.
|