Follow the steps below to set up your printer to be able to send faxes.
 Refer to this article if you want to know how to receive faxes.
 Before you send important documents, we recommended that you speak to the recipient to verify the telephone number so your vital information doesn't get incorrectly routed.
Enter the fax or telephone number
-
Turn the printer / fax machine ON.
-
Tap the Fax  button. The fax standby screen displays.

- Load documents on the scanning glass (face down) or in the document feeder (face up).
- If the document is double-sided, load it on the glass.
-
Tap Menu  on the Fax standby screen. The fax menu screen displays. Adjust the scan contrast and resolution as necessary.
-
Use the left or right arrow 
 to select FAX TX settings, then tap OK.
-
Use the left or right arrow to select Scan contrast, then tap OK. The left arrow decreases the contrast, and the right arrow increases the contrast.

-
Tap OK to return to the FAX TX settings screen.
- Use the left or right arrow to select Scan resolution, then tap OK. The Scan resolution screen displays.

- The settings below are available on the Scan Resolution screen. The * (asterisk) on the screen indicates the current setting.
-
Standard: Use this for text-only documents.
-
Fine: Use this for fine-print documents.
-
Extra Fine: Use this for detailed illustration or fine-print quality If the recipient's fax isn't compatible with Extra fine (300 x 300 dpi), your fax will send in Standard or Fine resolution.
- Photo: Use this for photographs.
When you send a color fax, the original document always scans in the same resolution (200 x 200 dpi). The image quality (compression rate) is determined by the scan resolution you select, except that Extra fine and Photo provide the same image quality.
-
Use the numeric buttons to dial the recipient's fax / phone number. If you send a long distance fax, enter a 1 + area code.
-
Numeric buttons: Enters the number. In some locations (such as some businesses), you may need to dial a prefix (such as 9) first before the area code and number.
-
Right button: Deletes the last character entered.
-
Left button: Enters a space.
-
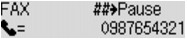
 Pound (hashtag) button: Tap this once to enter a pound sign #. Tap it again to enter P
Send the fax
-
Select Color for color transmission, or Black for black & white transmission. The document scans.
Color transmission is available only if the recipient's fax machine supports color faxes.
-
To send the scanned document, tap OK.
-
To send additional pages, load the next page, and select Color or Black. After all pages scan, tap OK.
To cancel a fax transmission, tap Stop. If you cancel a fax in progress, follow the instructions on the screen. If documents remain in the feeder after you cancel, close the feeder cover and tap OK to eject the documents.
Resend a faxes (redial a busy number)
If the recipient's line is busy, automatic redial will retry the number after a specific interval. Automatic redial is enabled by default, but you can disable if you prefer to use manual redial.
Automatic redial
-
If you enable automatic redial, you can specify the maximum number of redial attempts and the length of time the machine waits between redials.
-
Enable and specify the automatic redial on Auto redial in Adv. FAX settings under Fax settings.
While in automatic redial mode, the unsent fax is stored in the machine's memory temporarily until the fax is complete.
To cancel automatic redial, wait until the machine starts the redial process, then tap Stop. Also, delete the unsent fax from the machine's memory while the machine is on-standby for a redial operation.
Manual redial
-
Tap FAX.
-
Load documents on the glass or in the document feeder and adjust the scan contrast and resolution as necessary.
-
Tap Menu .
-
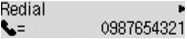
Use left or right arrow to select Redial, then tap OK. The Redial screen displays.
-
Use the left or right arrow to select the recipient's number to redial, then tap OK.
-
Select Color for color transmission, or Black for black & white transmission.
Good to know
-
Unsent documents are stored in the machine's memory. They aren't stored if there is a fax error.
-
If a power failure occurs or you unplug the power cord before automatic redial is complete, all faxes stored in the machine's memory are deleted.
-
For manual redials, the machine memorizes up to 10 recent recipients. Note that the machine doesn't memorize any recipients dialed by the redial function or from the directory.
-
When your machine is connected to a PBX (Private Branch Exchange) system, refer to the instructions of the system for details on how to dial the recipient's fax or telephone number.
If your product issue was not resolved after following the steps above, or if you require additional help, please create or log in to your Canon Account to see your technical support options.
Or if you still need help, visit our Canon Community by clicking the button below to get answers:

____________________________________________________________________________________________
