Wireless LAN Setup Using the Operation Panel - MX340
Article ID: ART100512
|
Date published: 05/11/2015
|
Date last updated: 03/12/2021
Description
This article will show you how to manually enter the network passphrase when attempting a wireless setup with the PIXMA MX340.
Solution
The following video shows how to enter text on the screen of the printer, as described in step 5.
The MX340 can be connected to a wireless network using the operation panel. To connect to a wireless network using this method, follow these steps:
Press the Menu button on the printer until Device Settings appears.
Press the (+) button until LAN settings appears. Press OK.
If the Wi-Fi lamp on the printer is not on, select WLAN active/inactive in the LAN settings menu and press OK. Then, use the (-) button and select Wireless LAN active. Press OK.
In the LAN settings menu, press the (+) button until Wireless LAN setup appears. Press OK.
In the Wireless LAN setup menu, press OK on Easy setup.
After the printer searches for nearby wireless networks, Select access point will appear on the LCD. Use the (-) and (+) buttons to select the access point to connect to. Press OK twice.
If the access point has encryption enabled, use the numeric keypad to enter in the WEP key or WPA/WPA2 passphrase.
To enter in the passphrase, use the numeric keypad to the right of the display. If entering in a letter, press a number on the keypad a number of times to enter in a specific letter. For example, to enter the letter c you must press the number 2 on the keypad three times. Also, to enter symbols, press the Symbols key until the desired symbol is displayed.
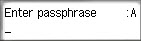
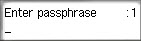
At first, the printer will assume that you are entering in lower case letters. To toggle between lower case letters, upper case letters and numbers, press the Tone key. Each time the key is pressed, the printer will display a different character to the right of Enter passphrase (or Enter WEP key) as shown:
If a mistake has been made, press the (-) buttonto move the cursor underneath the character to be deleted. Then, press the Back button to delete the character. Enter in the correct character as needed. Press the (+) button to move the cursor to the end of the key/passphrase. Continue entering in the key/passphrase.
After the key/passphrase has been entered in, press OK. The printer will attempt to connect to the access point.
If this appears, press OK. If the printer fails to connect, an error message will appear on the LCD. Press OK and make any corrections to the key/passphrase. Then, press OK.
If your product issue was not resolved after following the steps above, or if you require additional help, please create or log in to your Canon Account to see your technical support options.
Or if you still need help, visit our Canon Community by clicking the button below to get answers:

 The following video shows how to enter text on the screen of the printer, as described in step 5.
 (+) button until LAN settings appears. Press OK.
 If the Wi-Fi lamp on the printer is not on, select WLAN active/inactive in the LAN settings menu and press OK. Then, use the
  (-) button and select Wireless LAN active. Press OK.
 key until the desired symbol is displayed.
 key. Each time the key is pressed, the printer will display a different character to the right of Enter passphrase (or Enter WEP key) as shown:
 button to delete the character. Enter in the correct character as needed. Press the