
Scanning Documents and Saving Them in a Computer (USB & Network Connection)
| Article ID: ART100561 | | | Date published: 05/11/2015 | | | Date last updated: 08/14/2015 |
Description
Scanning Documents and Saving Them in a Computer (USB & Network Connection)
Solution
| Scanning Documents and Saving Them in a Computer (USB & Network Connection) ID
:
8202239800
_
EN
_
1
|
|||||||||||||||||||
| Solution |
Using the Machine as a Scanner
You can scan original documents by using the operation panel of the machine or an application on a computer. Whichever way you use, the scanned documents are converted into electronic file formats such as PDFs. Use the scan function to convert large-volume paper documents into files so that you can organize them easily.
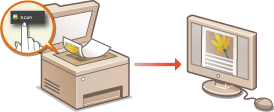
 Scanning from the Machine Scanning from the Machine
You can scan and save documents to your computer by using the operation panel of the machine. You can also save documents to a USB memory device or send them as e-mail attachments.
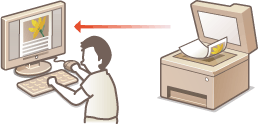
Scanning from a Computer
You can scan documents placed on the machine from a computer. The scanned documents are saved to the computer. In addition to scanning with an application such as an image-processing or word-processing application, you can also scan using the included ScanGear MF.
Scanning with the Canon Mobile Application
You can operate a smartphone or tablet to scan an original placed on the machine. For more information on this function, see the Canon website.
Before Scanning from the Machine Before scanning from the machine, you must first configure settings for the machine and a computer. Use the following steps.
Configuring the Machine
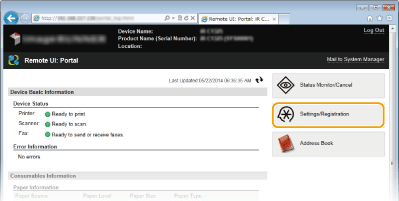
1. Start the Remote UI and log on in System Manager Mode.
2. Click [Settings/Registration].
3. Click [Network Settings]
 [TCP/IP Settings]. [TCP/IP Settings].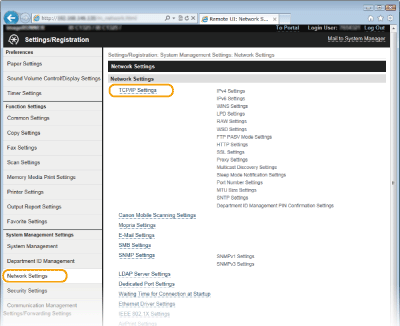
4. Click [Edit...] in [WSD Settings].

5. Select the [Use WSD Scanning] and [Use Computer Scanning] check boxes.

6. Click [OK].
7. Restart the machine.
Configuring the Computer
8. Open the printer folder.
9. Click [Add a device] or [Add a printer].

10. Select the machine when it is detected, and click [Next].
Scanning from the Machine The sequence of "scanning a document and saving it to a computer" can only be done when scanning from the machine.
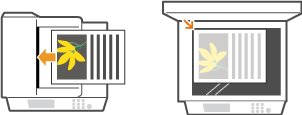
1. Place the document(s).
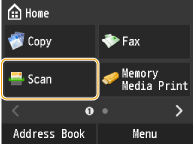
2. Tap <Scan>.
3. Tap <Computer>.
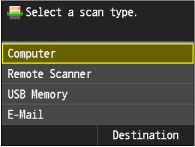
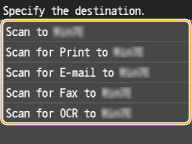
4. Tap the destination.
5. Tap <Scan>.

6. Press

Scanning Using an Application Scan the document by using an application. You can use Adobe Photoshop, Microsoft Office Word, or other image-processing and word-processing applications. The scanned image is directly loaded in the application, allowing you to edit or process the image immediately. The following procedure varies depending on the application.
From the Operation Panel
1. Place the document(s).

The second or subsequent documents may not be scanned, or an error message may be displayed depending on the application. In such a case, place and scan one document at a time.
2. Tap <Scan>.
3. Tap <Remote Scanner>.

From a Computer
4. From the application, select the start scan command.
5. Select the scanner driver for the machine.
6. Configure the scan settings as necessary.
7. Click [Scan].
Configuring Scan Settings in ScanGear MF ScanGear MF is a scanner driver included with the machine. You can use ScanGear MF to load the scanned image into Adobe Photoshop, Microsoft Office Word, or other image-processing and word-processing applications. Select ScanGear MF from the scan commands.
 Configuring Scan Settings in Simple Mode Configuring Scan Settings in Simple ModeSimple Mode is a collection of basic scan settings in ScanGear MF designed for easy operation. In other words, Simple Mode is a digest version of ScanGear MF. Configure settings in the order indicated from
 to to  on the screen, and click [Scan]. By doing so, you can configure basic settings and scan. on the screen, and click [Scan]. By doing so, you can configure basic settings and scan.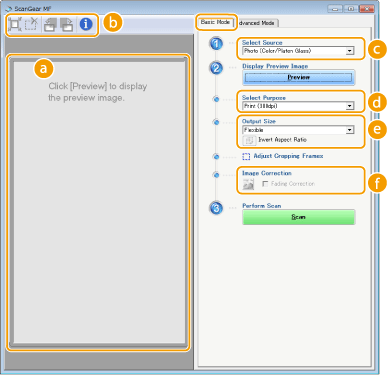
 Preview area Preview areaYou can preview the document that is placed on the platen glass. If you click [Preview], a preview image is displayed in this area and the cropping frame is displayed with a dotted line.
 Toolbar ToolbarControl the image in the preview area.
 (Auto Crop) (Auto Crop)The cropping frame that fits the scanned image is automatically set. Each time you click the icon, the cropping frame is reduced. You can move the frame, or change its size with your mouse.

Manually setting multiple scanning areas
 (Clear Crop Frame) (Clear Crop Frame)Clears the selected cropping frame.
 (Left Rotate) / (Left Rotate) /  (Right Rotate) (Right Rotate)Rotates the preview image 90 degrees to the left or right.
 (Information) (Information)Displays the current settings of the scanned image, such as the color mode and size of the scan area.
 [Select Source] [Select Source]Select the image type to scan documents. Available items vary depending on where you placed the document.
 [Select Purpose] [Select Purpose]Select a setting based on your intended use of the scanned image.
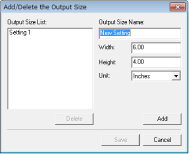
 [Output Size] [Output Size]
 [Image Correction] [Image Correction]Select the [Fading Correction] check box to correct faded colors on an old photograph or other images into vivid colors. This setting is available when a preview image is displayed and you select [Photo (Color/Platen Glass)] or [Magazine (Color/Platen Glass)] for [Select Source] (
).
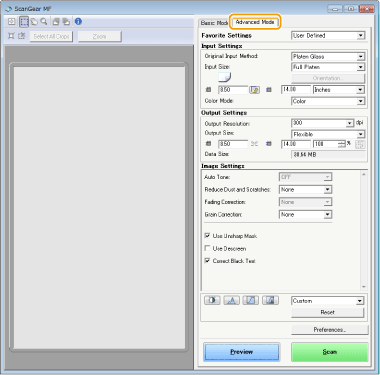
Configuring Scan Settings in Advanced ModeIf you click the [Advanced Mode] tab on the ScanGear MF screen, you can make more advanced adjustments in the image quality than you can in Simple Mode. You can also register adjusted settings as Favorite Settings. For more details, see "e-Manual" (HTML manual) in the DVD-ROM supplied with the machine.
|
||||||||||||||||||
 to switch between the portrait and landscape orientation. This button is not available when [Flexible] is selected.
SIMS Doc Id
8202239800