
Loading paper in the MX850
| Article ID: ART101167 | | | Date published: 05/11/2015 | | | Date last updated: 08/15/2015 |
Description
Solution
Loading Paper |
 |
|
|

|
|
 Loading Paper in the Rear Tray
1. Flatten the four corners of the paper before loading it.

Note
Align the edges of paper neatly before loading. Loading paper without aligning the edges may cause paper jams.
- When you do not print, remove unused paper from the Rear Tray, put them back into the package, and keep it on a level surface.
- Take out only the necessary number of sheets from the package, just before printing.
2. Prepare to load paper.

(1) Open the Rear Tray Cover and pull out the Paper Support.
Put your finger in the rounded indent of the Paper Support and pull it out until it stops.
(2) Open the Paper Output Tray.
Press the Open button to open the Paper Output Tray.
(3) Open the Output Tray Extension.
(4) Press the Feed Switch so that the Rear Tray lamp (A) lights.
You can also select the paper source with the printer driver.
For details, refer to the PC Printing Guide on-screen manual.
3. Load the paper.
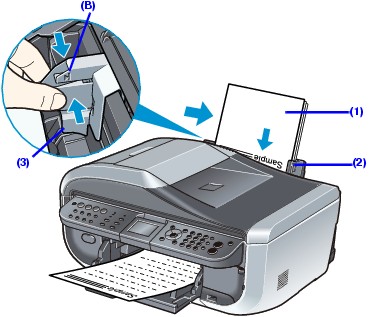
Do not load higher than the Load Limit Mark (B).
(1) Load the paper in the Rear Tray with the print side facing UP.
(2) Align the paper stack against the Cover Guide on the right side of the Paper Support.
Make sure that the Cover Guide is set upright when you load paper in the Rear Tray.
(3) Pinch the Paper Guide and slide it against the left side of the paper stack.
important
Do not slide the Paper Guide too hard. The paper may not be fed properly.
4. Specify the page size and media type settings according to the loaded paper.
Loading Paper in the Cassette
Some types and sizes of paper are not loadable in the Cassette and require the use of the Rear Tray. I
1. Flatten the four corners of the paper before loading it.
See Flatten the four corners of the paper before loading it..
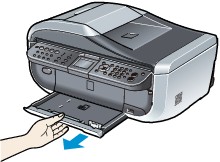
2. Pull out the Cassette from the machine.
3. Load the paper with the print side facing DOWN.
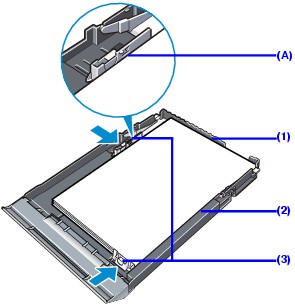
Do not load higher than the Load Limit Mark (A).
(1) Load the paper in the Cassette with the print side facing DOWN and the leading edge to the far side.
(2) Align the paper stack against the right side of the Cassette.
(3) Slide the Paper Guides to fit to the loaded paper stack.
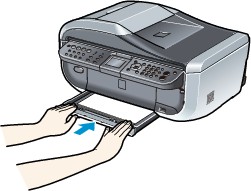
4. Insert the Cassette into the machine.
Push the Cassette all the way into the machine.
5. Prepare the Paper Output Tray.

(1) Open the Paper Output Tray.
Press the Open button to open the Paper Output Tray.
(2) Open the Output Tray Extension.
(3) Press the Feed Switch so that the Cassette lamp (B) lights.
You can also select the paper source with the printer driver.
For details, refer to the PC Printing Guide on-screen manual.
6. Specify the page size and media type settings according to the loaded paper.