
Setup the MX850 for use over a wired LAN - Mac OS X
| Article ID: ART101314 | | | Date published: 05/11/2015 | | | Date last updated: 11/04/2015 |
Description
Setting up the MX850 for use over a wired LAN - Mac OS X
Solution
How to install the MP drivers and connect the printer with a wired LAN (Mac OS X)Install MP Drivers using the prepackaged CD-ROM* to enable printing and scanning. * If using downloaded drivers click here < Procedures >
Note :
- MP Drivers can be installed using either Easy Install or Custom Install.
Easy Install automatically installs the MP drivers, application software and digitized manual, which are in the CD-ROM. Custom Install allows users to complete installation in a short time. When using Custom Install, please select MP drivers and Canon IJ Network Tool along with your choices. - Screenshots for Mac OS X Ver. 10.4.x are used in the following procedures.
Note:
- When Mac OS X is shared by multiple users (accounts), first login as an Administrator.
- If your computer has resident software such as antivirus software, exit in advance.
1. Connect the printer to the computer with the USB cable.
Confirm that the printer is powered on. 2. Turn on the computer to start Mac OS X.
3. Set the prepackaged CD-ROM in the computer.
4. The CD-ROM folder will open automatically.
Note :
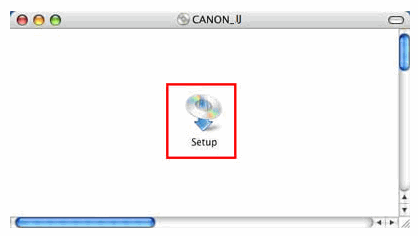
If the folder in the CD-ROM does not open automatically, double-click the CANON IJ icon on the desktop.
5. Double-click the Setup icon.
6. Enter Name and Password for authentication, then click OK.
Note :
When you do not know the administrator name and the password, click the ? icon.
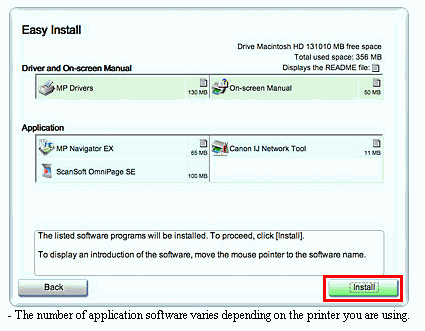
7. Click Easy Install or Custom Install.
When selecting Easy Install:
a. Click Install.
 When selecting Custom Install:
a. When the following window is displayed, check MP Drivers, Canon IJ Network Tool, and other application software you want to use, then click Install.

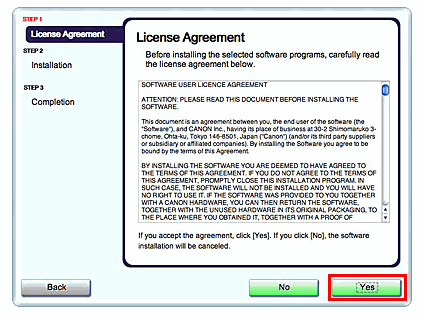
8. Read the License Agreement carefully and if you agree, click Yes.
9. The installation starts.
A message may be displayed during installation. If it is displayed, follow the directions on the screen to continue the installation. The installation of the MP drivers and application has been completed.
Now, proceed to the Canon user registration. 10. If you register now, click Register. If not, click Next.
Registration can be done after the MP drivers installation. 11. When the Installation Results window is displayed, click Restart.
Note :
When failing to install halfway, install MP Drivers again.
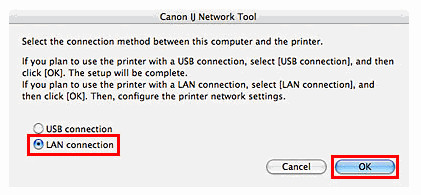
12. When the computer restarts, Canon IJ Network Tool will be launched.
Select LAN connection, then click OK. Note :
- When Canon IJ Network Tool does not start automatically, select Library - Printers - Canon - IJPrinter - Utilities - Canon IJ Network Tool.
*If you have already set up the printer on the network and want to set up any additional LAN-connected computer(s) click here to access the instructions which begin on page 27 of the Network Setup Guide. Otherwise, continue with the instructions, below.
Note :
If the below screen appears, click OK.
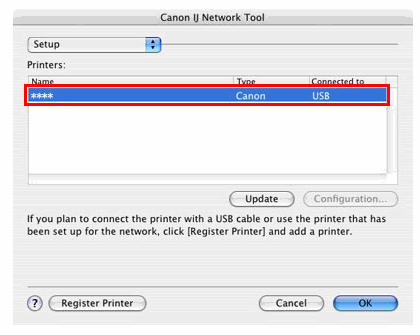
13. Select Setup in the pop-up menu, select your machine's name in Printers, then click OK.
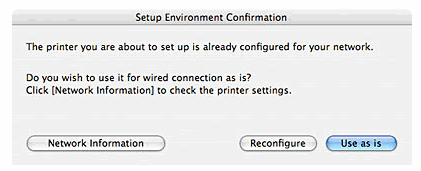
Note :
If the machine's network settings are already configured, the Setup Environment Confirmation dialog box appears asking for your confirmation to use the machine with the current settings.
To reconfigure the network settings, click Reconfigure.
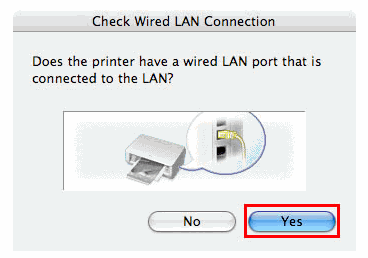
14. When the Check Wired LAN Connection dialog box appears, connect the machine to the network devices such as hubs with a LAN cable, then click Yes.
15. The machine connected with the USB cable is detected automatically via LAN connection.
Note :
Address dialog box appears. Make sure of the following, then click Connect.
- The network devices such as hubs or routers are turned on, and the machine and the computer are connected to the network.
- The machine is connected to the computer with the USB cable.
- The IP address to be set for the machine is displayed on the Set Printer IP Address dialog box. If it is different from the address you want to set for the machine, enter the desired IP address on the Set Printer IP Address dialog box. (If the machine is turned off, the Set Printer IP Address dialog box does not appear.)
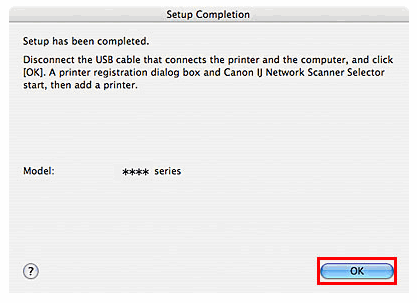
16. When the Setup Completion dialog box appears, remove the USB cable, then click OK.
17. The Printer Setup Utility* (Print Center in Mac OS X v.10.2.8) and Canon IJ Network Scanner Selector will start up.
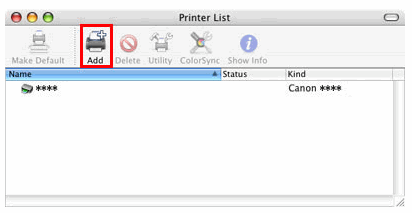
*OS X 10.5 users skip to next step (18). On the Printer List dialog box, click Add.
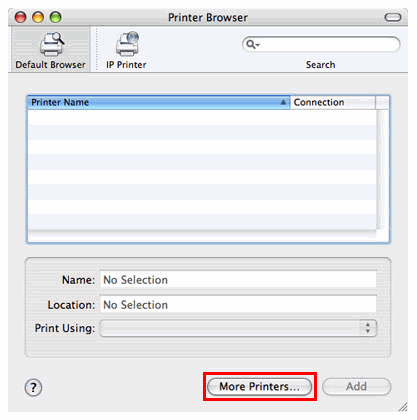
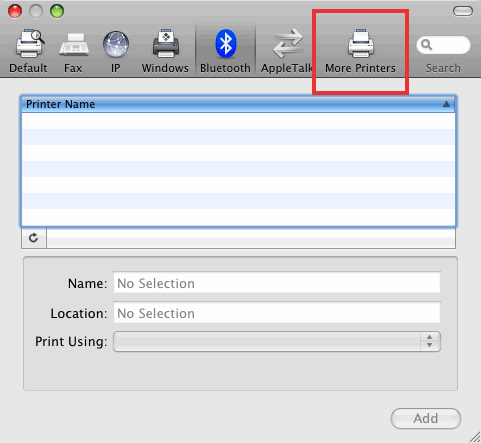
18. Click More Printers.
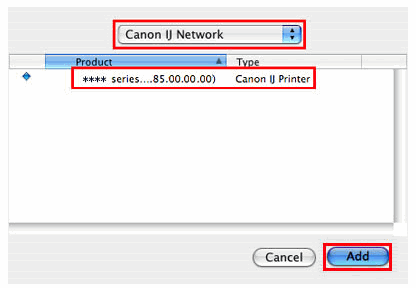
19. Select CANON IJ Network from the pop-up menu, then select the printer you are using in the product column; then click Add.
Note :
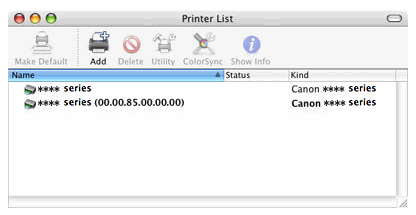
- Alphanumerical characters after the printer name you are using represent the printer's MAC address.
20. Confirm that the printer name is added in Printer List.
21. On the Canon IJ Network Scanner Selector screen, confirm that a check mark is displayed on the MAC address of the machine in Network Device List, then click Exit to close the dialog box. If a check mark is not displayed, select the MAC address of the machine in Network Device List, then click Apply to use the machine as a scanner.
The settings are completed.
|


Installing Downloaded Drivers
- Visit Canon's support page at: www.canontechsupport.com
- Select 'DOWNLOAD LIBRARY' from the gray bar at the top of the page.
-
From the Download Library page, just below 'Please choose your product from the menus below:', select your model in the following manner:
- Click the down arrow on the top drop-down box and select the appropriate category (Printers, Scanners, Multifunction, etc.).
- Click the down arrow on the middle drop-down box and select the appropriate product type.
- Click the down arrow on the bottom drop-down box and select the appropriate model.
- On the Download Library page for your model, click 'Drivers / Software'.
Note: Some links may launch in a new window. If you are having troubling viewing, please disable any active pop-up blockers. - Select Mac OS X in the Select OS dropdown list.
- The files required for wired LAN setup are the Printer Driver and Scanner Driver in the Drivers section, and the IJ Network Tool in the Software section. It is highly recommended to download the MP Navigator software for use in scanning.
- For each file : Click 'I Agree - Begin Download' to agree to the Disclaimer and continue the download process.
- Note: Please read and follow any on -screen instructions throughout this process. Some products may have a separate file that includes detailed installation instructions. The instructions may vary and should be referenced prior to the download.
- When a file has completed downloading a window will automatically open and an .mpkg file will be visible (see example below). Double-click this file to start installation.
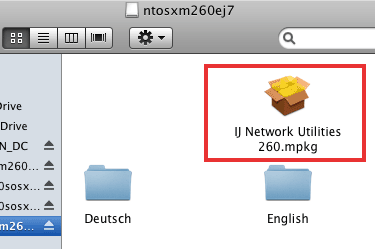
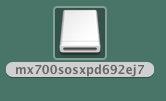
If this window does not open automatically, double-click the the disk icon which will be located on the desktop (see example below)
- Follow any instructions that appear. When the installation is finished , a Restart prompt will appear. Click the Restart button to restart, or , to save time, do not click the Restart until after all files have been installed.
- Return to Step 12 to complete the wired LAN installation.
SIMS Doc Id
0