Set the Ink Intensity (Mac OS X)
The Intensity setting controls the amount of ink placed on the paper. The higher the intensity the darker (more ink) the printed image will be. If the Intensity setting is set too high, the printed page may become too wet and curl or streak. The coloring can be adjusted manually for all items, or automatically using ColorSync. If the color on the printout is different from your image, adjust color balance and intensity with the Color Correction setting of BJ Standard. Follow the instructions below to adjust the ink intensity settings manually.
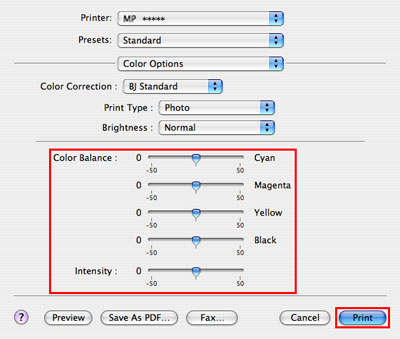
Ink Intensity Settings: Color Correction, Print Type, Brightness, Color Balance and Intensity settings can all be changed manually.
Note: The images used are an example using the Canon PIXMA MP500 MultiPASS printer on OS X.4. Some images may appear differently pending the actual model and version of the OS being used.
- Confirm that the cable is connected and the printer is powered on.
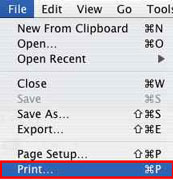
- Select 'Print' from the File menu to open the Print dialog.
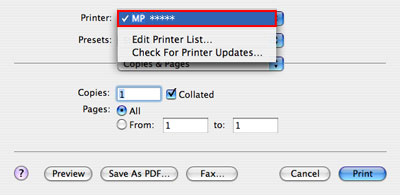
- In the Printer pop-up menu, select the printer you are using.
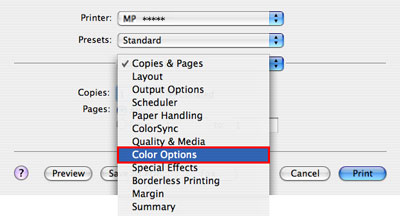
- In the third pop-up menu, select 'Color Options'.
- Select 'BJ Standard', 'ColorSync', or 'None' from the 'Color Correction' pop-up menu.

Note: The image above shows 'BJ Standard' selected. 'BJ Standard' is selected as 'Color Correction' by default setting. If the color on the printout is different from your image, adjust color balance and intensity with the 'Color Correction' setting of 'BJ Standard'.
- In the 'Print Type' pop-up menu, select 'Photo' or 'Graphic' according to the type of file to be printed.

- In the 'Brightness' pop-up menu, select the option favorable for the print results.
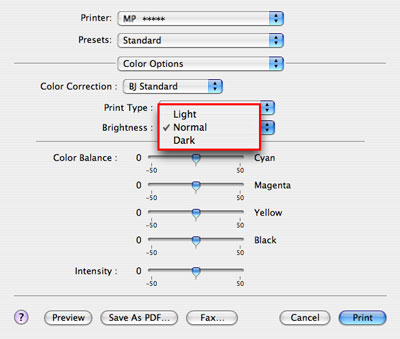
- Adjust the 'Color Balance' and 'Intensity', moving the appropriate slide bars to the right or left.
Note: Move the slide bar to the right from the center to deepen the intensity. Move it to the left to lighten the intensity.
- When the setting is finished, click 'Print' to perform printing.
Adjusting the intensity is completed.
Ink Intensity Settings: Color Correction, Print Type, Brightness, Color Balance and Intensity settings can all be changed manually.
Click to return to the top of the page.
Color Correction: (See the instructions above to change the settings.)
- BJ Standard, the color will be corrected best to perform printing with this printer.
Caution: This is an advanced setting option and is not recommended to be used.
- Adjust color balance and intensity when needed.
Note: ColorSync is the Macintosh color correcting function to bring the coloring of print results close to the images on the display by matching color among different devices. For additional information regarding the ColorSync settings, customers may refer to the Apple Help files and application vendor, or customers may use their support options for Apple.
- If you select None, color correction will not be performed.
Click to return to step 5 of the instructions above.
Click to return to the top of the page.
Print Type: The correcting method can be selected according to the data to be printed. (See the instructions above to change the settings.)
Brightness: Select the option favorable for the print results. (See the instructions above to change the settings.)
Color Balance: The level for each color can be adjusted. (See the instructions above to change the settings.)
- Move the slider bar right to darken the image, and move the slider bar left to lighten the image.
Note: The coloring of entire data to be printed can be changed by adjusting color balance as the balance of amount of each ink is changed. To change the coloring drastically, adjust it from application software. Use the printer driver only for fine adjustments.
Click to return to step 8 of the instructions above.
Click to return to the top of the page.
Intensity: The intensity for printing can be adjusted. (See the instructions above to change the settings.)
