Entering Date and Time
Note: When your machine is connected to a computer with the MP driver installed, even if the date and time are entered from the Operation Panel of the machine, the date and time will be read from your computer every time you start the computer, turn the machine on, or disconnect and connect the USB cable. When using your machine connecting to your computer, set the date and time on your computer precisely.
The date and time will be reset when you disconnect the power cord or there is a power failure. In this case, you can set it again on the machine. Alternatively, it can be read from your computer and set on the machine by connecting the machine to your computer with the MP driver installed.
1. Press the <FAX> button, then press the <Menu> button . The Fax menu is displayed.
2. Press the

or

button to select
Maintenance/settings, then press the
OK button.

The Maintenance/settings screen is displayed.
3. Press the
or
button to select
Device settings, then press the
OK button.

The Device settings screen is displayed.
4. Press the

or

button to select
FAX settings, then press the
OK button.
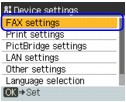
The FAX settings screen is displayed.
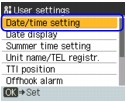
5. Press the or button to select User settings, then press the OK button.

The User settings screen is displayed.
6. Display the Date/time setting screen.
Press the or button to select Date/time setting, then press the OK button.
7. Press the Numeric buttons to enter the date and time (in 24-hour format), then press the OK button.
Enter only the last two digits of the year.

|
 Note Note
-
If you misentered the date and time, press the or button to move the cursor under the number to enter the correct number.
-
If you are unable to save the setting, ensure you enter the correct date according to the date format. There are three available date formats: MM/DD/YYYY; YYYY/MM/DD and DD/MM/YYYY.
|
8. Press the OK button to finalize your setting.
The display returns to the User settings screen.
