Using the Card Slot over a Network - MX850
| Article ID: ART101507 | | | Date published: 05/11/2015 | | | Date last updated: 11/04/2015 |
Description
Solution
Using the Card Slot over a Network |
 |
 Confirming Whether the Card Slot is Mounted
The Card Slot must be mounted to use it over a network.
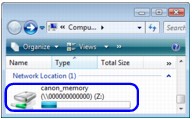
When the Card Slot is mounted, the following icon appears on Computer or My Computer (Windows), or on the desktop (Macintosh).
Open Computer (or My Computer), and find the canon_memory (\\xxxxxxxxxxxx) icon with the mapped drive letter.
* "xxxxxxxxxxxx" is a string of 12 alphanumeric characters.
* The icon name may vary depending on the language version of Windows you are using.
The CANON_MEMORY icon appears on the desktop.


If these icons are not found, the network drive for the Card Slot is not installed yet. For details on how to mount the Card Slot, see Mounting the Card Slot as the Network Drive (Windows) or Mounting the Card Slot as the Network Drive (Macintosh).
Mounting the Card Slot as the Network Drive (Windows)
1. Start up the Canon IJ Network Tool.
2. Select the machine and click Utility.
3. Select Network in the pop-up menu.
4. Select the machine and click Network Settings.
The Configuration dialog box on the Canon IJ Network Tool is displayed.
Note
Wired LAN, Access Control, and Admin Password settings can be set and modified in the Configuration dialog box. For other features, operate in the Canon IJ Network Tool screen.
Opening the Canon IJ Network Tool Screen
To open the Canon IJ Network Tool screen, double click Library, Printers, Canon, BJprinter, Utilities, and Canon IJ Network Tool.
2. Select the machine in Printers.
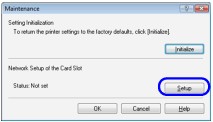
3. Select Maintenance on the Settings menu.
4. Click Setup.
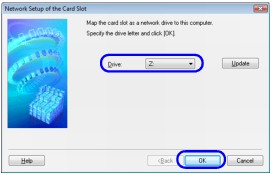
5. Specify the drive letter, then click OK.
6. Confirm that the icon for the Card Slot appears.
If the Card Slot cannot be mounted properly, see Troubles in the Network Setup of the Card Slot.
Mounting the Card Slot as the Network Drive (Macintosh)
1. Start up the Canon IJ Network Tool.
See Starting Up the Canon IJ Network Tool.
2. Select Maintenance on the Settings menu.
3. Click Setup.

4. Confirm that the icon for the Card Slot appears.
If the Card Slot cannot be mounted properly, see Troubles in the Network Setup of the Card Slot.
Restrictions on Card Slot Use over a Network
 In Macintosh, you cannot write data to a memory card in the Card Slot over a network. You can only read data from a memory card.
The Card Slot can be shared by multiple computers, if the machine is connected to a network. Multiple computers cannot access the Card Slot at the same time. While one computer connected over the network is reading from and writing to a memory card in the Card Slot, other computers cannot access the Card Slot.
When you access the network drive for the Card Slot over the network, file names consisting of less than eight lowercase letters (not including its extension) may be shown in uppercase.
For example, a file name such as "abcdefg.doc" may appear as "ABCDEFG.DOC", while a name such as "AbcdeFG.doc" will appear the same.
The file is not actually renamed, but merely appears to be changed.
When you access the network drive for the Card Slot over the network with the Read/write attribute setting of the machine set to USB enabled, you cannot access the network drive for the Card Slot properly. On the other hand, if this setting is set to LAN enabled, you cannot access it via USB. Make sure that the Read/write attribute setting is set properly depending on your connection type. Select Read-only mode to read via USB and over a network, although you cannot write files to a memory card in either way with this setting.
If you write files to a memory card over a network when the Canon IJ Network Scan Utility is not running, the Date Modified of the files will change. Make sure to start up the Canon IJ Network Scan Utility before you write files to a memory card over the network.
|
If the following occurs when using the network drive for the Card Slot over a network, see Troubles in the Network Setup of the Card Slot.
|
Troubles in the Network Setup of the Card Slot |
|
Problem
Possible Cause and Measures
The available drive letter cannot be selected on the Network Setup of the Card Slot dialog box.
Cannot mount the Card Slot.
If you cannot mount the Card Slot to use it over the network with the Canon IJ Network Tool, follow the procedure below to mount the Card Slot manually.
(1) Check the Default Name of the machine by selecting Network Information on the View menu on the Canon IJ Network Tool.
(2) Click Start > All Programs > Accessories > Run.
In Windows XP and Windows 2000, click Start > Run.
(3) Input "\\xxxxxxxxxxxx\", then click OK.
"xxxxxxxxxxxx" is a string of 12 alphanumeric characters of the Default Name. For example, if the Default Name is "0000000847B6\canon_memory", then input only "\\0000000847B6\".
(4) When the canon_memory icon appears, right-click the icon, then select Map Network Drive.
(5) Select the drive letter and click Finish.
If you cannot mount the Card Slot with the method above, input the IP address of the machine instead of the 12 alphanumeric characters of the Default Name, and try again. For example, "\\192.168.1.1\". If you mount the Card Slot with the IP address, you have to remount it whenever the machine's IP address changes.
(1) Check the Default Name of the machine by selecting Network Information on the View menu on the Canon IJ Network Tool.
(2) On Finder, click the Go menu and Connect to Server.
(3) Input "smb://xxxxxxxxxxxx/canon_memory/", then click Connect.
"xxxxxxxxxxxx" is a string of 12 alphanumeric characters of the Default Name. For example, if the Default Name is "0000000847B6/canon_memory", then input "smb://0000000847B6/ canon_memory/".
Unable to determine whether the Card Slot is mounted.
Open Computer (or My Computer), and find the canon_memory (\\xxxxxxxxxxxx) icon with the mapped drive letter.
* "xxxxxxxxxxxx" is a string of 12 alphanumeric characters.
* The icon name may vary depending on the language version of Windows you are using.
The CANON_MEMORY icon appears on the desktop.
Cannot access the Card Slot after the network setup of the Card Slot is complete.
When the Read/write attribute setting under Device settings is set to USB enabled, you cannot access the Card Slot. Change the setting to LAN enabled.
Important
If you disabled the firewall function, disconnect your network from the Internet. You can do this by configuring your access point or router not to connect to the Internet or WAN.
To disable the Windows Firewall:
(1) Click Start > Control Panel > Security > Windows Firewall > Change settings.
In Windows XP and Windows 2000, click Start > Control Panel > Security Center > Windows Firewall.
(2) Select Off and click OK.
To open port 137:139:
(1) Click Start > Control Panel > Security > Windows Firewall > Change settings.
In Windows XP and Windows 2000, click Start > Control Panel > Security Center > Windows Firewall.
(2) Select the Advanced tab and select the target connection, and click Settings.
(3) Select the Services tab, and click Add.
(4) On the Service Settings dialog box, input the following information, and click OK.
Description of service: Input the name of this service.
Name or IP address: Input the IP address of the machine. For details, see Displaying Network Setting Information.
External Port number for this service: Input "137".
TCP/UDP: Select TCP.
Port number for this service: Input the same number as External Port number.
(5) Repeat step1 to 3. On the Service Settings dialog box, input the same information as you did in step 4 except for selecting UDP in TCP/UDP.
(6) Use the same procedure to open the other ports (138TCP, 138UDP, 139TCP, and 139UDP).
(1) Right-click Computer, select Properties, then click Change settings.
In Windows XP and Windows 2000, right-click My Computer, then select Properties.
(2) Select the Computer Name tab, then click Change.
(3) Change the workgroup name to "WORKGROUP", then click OK.
(1) Right-click Computer (or My Computer), and select Disconnect Network Drive.
(2) Select the network drive to disconnect, then click OK.
(3) Remount the Card Slot using the Canon IJ Network Tool.
Make sure that a memory card is inserted in the Card Slot. If it is not inserted, insert it.
Depending on the Mac OS version, the authentication screen may appear.
Can read the memory card in the Card Slot, but cannot write to it.
The Card Slot is disconnected.
Mount the Card Slot again using the Canon IJ Network Tool. For details, see Mounting the Card Slot as the Network Drive (Windows).
The Card Slot is disconnected automatically after restarting the computer. Mount it again using the Canon IJ Network Tool, if necessary. For details, see Mounting the Card Slot as the Network Drive (Macintosh).
The Date Modified of files changes when saving them in the network drive for the Card Slot.
If you write files to a memory card over a network when the Canon IJ Network Scan Utility is not running, the Date Modified of the files will change. Make sure to start up the Canon IJ Network Scan Utility before you write files to a memory card over the network.
Cannot access a memory card in the Card Slot using MP Navigator EX.
If "Cannot access the memory card" is displayed when you click Memory Card under Scan/Import Document or Images on MP Navigator EX, confirm what the message says, then click Retry. If the message appears again, mount the Card Slot as the network drive referring to Mounting the Card Slot as the Network Drive (Windows) or Mounting the Card Slot as the Network Drive (Macintosh). Confirm the icon for the Card Slot appears on My Computer (Windows) or the desktop (Macintosh), and try to access using MP Navigator EX.
No file appears on the network drive for the Card Slot or you cannot access files that appear on the drive.
Make sure that a memory card is inserted to the Card Slot.
If you have removed a memory card before ejecting the CANON_MEMORY icon on the desktop, restart the computer.
You need to eject the CANON_MEMORY icon by dragging it into the trash before removing the memory card from the Card Slot.
1. Turn on the machine.
2. Press the Menu button.
3. Press the
or
button to select Maintenance/settings, then press the OK button.
The Maintenance/settings screen is displayed.
4. Press the
The Device settings screen is displayed.
5. Press the
or
button to select LAN settings, then press the OK button.
The LAN settings screen is displayed.
6. Press the
The following information on the machine's network setting is displayed.
Items Setting (IPv4) Setting (IPv6) Connection Active / Inactive Active / Inactive IP address XXX.XXX.XXX.XXX XXXX:XXXX:XXXX:XXXX:
XXXX:XXXX:XXXX:XXXXSubnet mask XXX.XXX.XXX.XXX Subnet prefix length XXX
Default gateway XXX.XXX.XXX.XXX XXXX:XXXX:XXXX:XXXX:
XXXX:XXXX:XXXX:XXXXMAC address XX:XX:XX:XX:XX:XX
XX:XX:XX:XX:XX:XX MAC address filtering ON / OFF
ON / OFF
IPsec Active / Inactive Security protocol ESP / ESP & AH / AH Pre-shared key XXXXXXXXXXXXXXXX
* "X" represents an alphanumeric character ranging from 0 to 9 and A to F.
* You can enter up to 16 alphanumeric characters in Pre-shared key.

Starting Up the Canon IJ Network Tool
1. Double-click the Canon IJ Network Tool icon on the desktop.
You can also click Start > All Programs (Programs in Windows 2000) > Canon IJ Network Utilities > Canon IJ Network Tool > Canon IJ Network Tool to start up the tool.
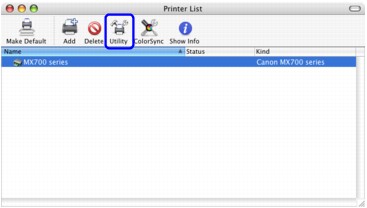
1. Start up Printer Setup Utility.
a. Select Applications on the Go menu.
b. Double-click the Utilities folder, and then double-click the Printer Setup Utility icon.
In Mac OS X v.10.2.8, double-click the Utilities folder and then the Print Center icon.
The Printer List opens.
c. Select your machine's name in the Name list and click Utility.
In Mac OS X v.10.2.8, select your machine's name in the Name list and click Configure.
d. Select your machine's name in the Product list and click Maintenance.
The Canon IJ Printer Utility starts up. Back.