Perform Print Head Alignment (Mac OS X) MP240

Article ID: ART101876 | Date published: 05/11/2015 | Date last updated: 07/26/2019
 

Description

Perform Print Head Alignment on a Mac OS X computer.

Solution

Print Head Alignment

Print Head Alignment adjusts differences in the ink cartridge position, and improves print quality with regards to graphs and lines.

 
  1. Confirm that the printer is connected to the computer and the printer is powered on.
     
  2. Launch the IJ Printer Utility.

     
  3. In the pop-up menu, select 'Test Print'.


    *Display varies according to the printer model.
     
  4. Click Print Head Alignment.


  5. Load one sheet of A4 or letter size plain paper into the auto sheet feeder, and click 'OK'.
    Print Head Alignment starts.

    Do not perform any other operations until printing is completed.

  6. Refer to the printed sheet, do the following.


    *Display varies according to the printer model.
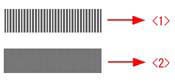
    1. Select the pattern with the least amount of vertical streaking in the field for Column A.
    2. Enter the pattern number of the selected pattern in the Column A box displayed in the right side of the screen.
    3. Similarly, enter the numbers of the selected patterns in the Column B to L boxes.
    4. When all the numbers are entered, click 'Send'.


      <1> An example of the pattern with highly visible amount of vertical streaking.
      <2> An example of the pattern with less visible amount of vertical streaking.
       
  7. Performing Print Head Alignment is complete.

SIMS Doc Id

0

Rate this Article
Was this article helpful?
Yes, This document is helpful
No, This document needs a clearer explanation
 
Please provide your comments