|
|
Uninstalling / reinstalling the MP240 drivers (Windows)
| Article ID: ART102053 |
| |
Date published: 05/11/2015 |
| |
Date last updated: 08/15/2015 |
Description
Uninstalling / reinstalling the PIXMA MP drivers on a Windows computer.
Solution
Uninstall and Reinstall the Driver
If the MP Navigator or the MP drivers are no longer required, or if they are not installed correctly, uninstall them.
Caution: Uninstalling means deleting software, such as MP drivers, from the computer. Once the software has been deleted the unit cannot be used through the computer until the software has been reinstalled.
Note: Login as a user with Administrator privileges to uninstall on WindowsXP/2000/Vista. Turn off any programs running in the background, such as antivirus programs and firewalls before begining.
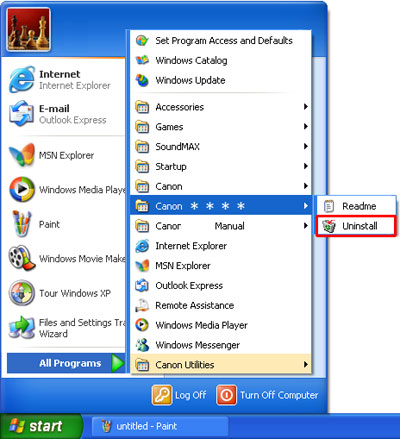
- Select 'Program' (for Windows 2000), or 'All Programs' (for Windows XP / Windows Vista) from the Start menu.
- Select the name of the printer model to remove and select 'Uninstall.'
- When the MP Drivers Uninstaller window is displayed, click 'Perform.'
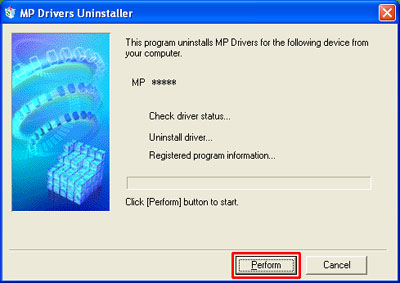
- When the confirmation window is displayed, click 'Yes.'
- When the Uninstallation Complete window is displayed, click 'Complete.'
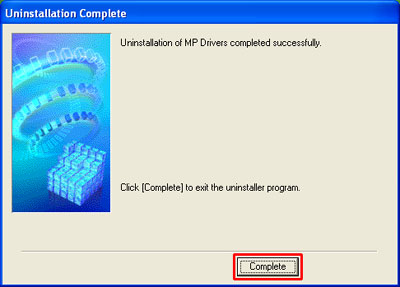
- Reinstall the drivers.
Reinstall the Drivers
Note:
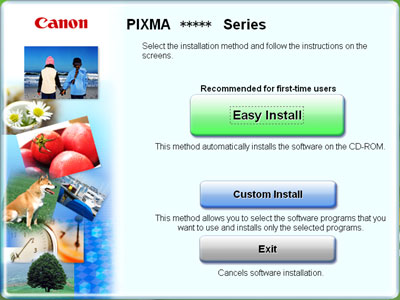
- The MP drivers can be installed using Easy Install or Custom Install.
Easy Install automatically installs the software which is in the CD-ROM.
This method is recommended for first-time users.
Custom Install allows you to select the software programs from MP Drivers, Application Software, and On-screen Manual.
- Login as a user with Administrator privileges to install on WindowsXP/2000/Vista.
- Close any antivirus software that may be running prior to installing the drivers.
- Turn off the printer and disconnect the cable connecting the computer and the printer.
- Insert CD-ROM in the computer. (The CD-ROM will start automatically and the following window will be displayed on the screen.)
-
- If setup does not start automatically, click 'Start' and then 'Run'.
- At the Run window, type x:\msetup4.exe (where x is your computer's CD drive) in Open box and then click 'OK'.
- At the main installation window, click 'Easy Install' or 'Custom Install'.
When selecting Easy Install:
(A) Click 'Easy Install'.
(B) Click 'Install' in the following window.

* Display varies according to the printer model.
When selecting Custom Install:
(A) Click 'Custom Install'.
(B) When the following window is displayed, click 'MP Drivers' and the application software to be installed, and then click 'Next'.
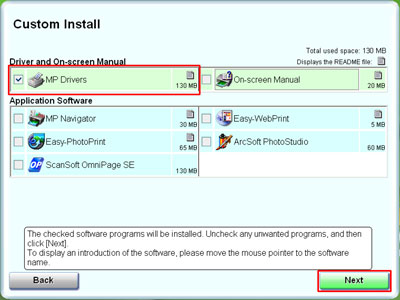
* Display varies according to the printer model.
- When the License Agreement window is displayed, read the content carefully and click 'Yes'.
- The installation will start.
Messages may be displayed during the installation of the application software.
Follow the instructions on the window and continue the installation.
- When the Printer Connection window appears, connect the printer to the computer and power on the printer.
Note: If the installation cannot proceed even after 2 minutes, stop the installation by following the procedures below and start from the beginning again.
1) Click 'Cancel' at the Printer Connection window then click 'Start Over' at the Installation Failure window.
2) At the window to install the driver / applications appears, click 'Back' then click 'Exit'.
3) Restart the computer.
4) Install the printer driver again.
- For Windows XP, at the Welcome to the Found New Hardware Wizard dialog box, confirm Install the software automatically (Recommended) is selected, then click 'Next'.
Note: The Welcome to the Found New Hardware Wizard dialog box may be behind the Printer Connection window.
In this case, click 'Found New Hardware Wizard' button on the task bar to display the window.
- After the files are copied automatically and the dialog box Completing Found New Hardware Wizard window appears, click 'Finish'.
- If the Welcome to the Found New Hardware Wizard dialog box appears again, click 'Finish' again.
- At the Print Head Alignment window, click 'Execute'.
Note:
* The Execute button may not appear for all models. In that case, skip to step 13.
* The Print Head Alignment can also be done after the installation of the printer driver.
- When the Start Print Head Alignment window appears, load one sheet of A4 or letter size plain paper in the sheet feeder and click 'Print Head Alignment'.
- At the Do not start another operation until current one has finished dialog box, click 'OK'.
- When the pattern is printed, click 'Next' at the Print Head Alignment dialog box.
- At the Installation Results dialog box, check the content then click 'Next'.
- At the Installation completed successfully dialog box, click 'Exit'.
Note: When the Restart button appears, confirm that Restart the system now (recommended) is checked then click 'Restart'.
|
