Connect the camera to your computer with the dedicated USB cable so that they can communicate. You can connect the camera while your computer is running.
- When you connect the camera to your computer, be sure to follow the procedure below.
-
Never perform the following operations while the software installed from the SOLUTION DISK is running after connecting the camera to the computer, as a communications error may occur:
- Set the camera's power switch to <OFF>.
- Open the SD card slot cover.
- Disconnect the dedicated USB cable or remove the battery.
- Disconnect the DC coupler (optional) or unplug the AC adapter (optional) or power cord.
Before you perform the operations below, be sure to exit the software being used.
-
Plug the dedicated USB cable into the computer.
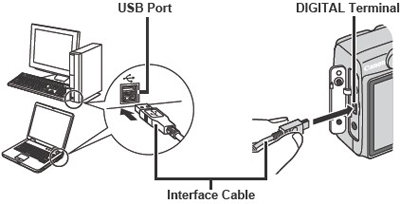
- Plug the cable into the USB port on the computer.
- The location of the port differs depending on your computer. Refer to the User's Manual for your computer for details.
-
Plug the dedicated USB cable into your camera.
- Open the cover and plug the cable connector into the <DIGITAL> terminal.
-
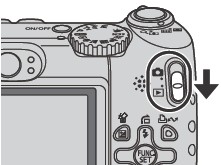
Set the camera's  (Playback) /
  (Shooting) mode switch to playback mode and power the camera on.
-
- The PowerShot A590 IS screen (event screen) and the Scanner and Camera Wizard dialog box appear.
- Use only the dedicated USB cable to connect the camera to your computer.
- Push the plug firmly all the way into the socket. Loose connections can cause faults or malfunctions.
- Connect the camera to the computer directly using the dedicated USB cable. The camera and computer may not operate correctly if you connect them via a hub or you connect to multiple USB devices.
- The connection may not operate correctly if you are using other USB devices, excluding USB mouse or keyboards, at the same time. If this occurs, disconnect the other USB devices from the computer and try reconnecting the camera.
- Do not connect more than one camera to the same computer. The connections may not operate correctly.
- While the camera and your computer are communicating, the camera's LCD panel may blink and, if you are using the LCD monitor, the image on the monitor may flicker. This is not a malfunction.
- When unplugging the dedicated USB cable, be sure to grip the sides of the plug as you pull it out.
- If you do not perform any operation while the camera and computer are connected, a confirmation message appears on the computer screen asking whether you wish to continue communicating with the camera for some computer systems. If you do not perform any operation even after this message appears, the communication with the camera is terminated. To re-establish communication, press the shutter button down halfway or set the camera's power switch to <OFF> and then back to <ON>.
- Do not put the computer to sleep while it is connected to the camera. If you do put your computer to sleep while it is connected to the camera, never disconnect the dedicated USB cable while your computer is still in sleep mode. Always wake your computer up before disconnecting the camera. On some types of computers, disconnecting the dedicated USB cable while your computer is in sleep mode could prevent the computer from waking up correctly. Refer to the computer's User's Manual for more information on sleep mode.
- When the camera is connected to a computer, you should use the Compact Power Adapter ACK600 (optional) so that you can continue using the camera regardless of battery level.
|
