Printing onto Customer Size Paper or Envelopes
This section describes how to print onto custom size paper or envelopes from the printer driver. You can specify the paper size on the printer driver screen displayed on your computer. Load the custom size paper or envelopes in the stack bypass tray.
Specifying the Paper Size and Type
note:
- Depending on the application or system environment, you may not be able to select paper size or type from the printer driver screen. In this case, specify the paper size and type from the [File] menu of the application -> [Printer Settings] or [File] -> [Page Setup].
- The following procedures are explained using sample screens from Windows 2000.
1. Select [Print] from the [File] menu of the application. The printer driver screen is displayed.
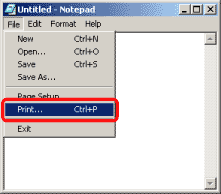
note: The procedure to display the printer driver screen may differ depending on the applications you are using.
2. Select your printer from [Select Printer], then click [Page Setup].

If the [Page Setup] tab does not displayed, click [Properties] or [Printer Preference].

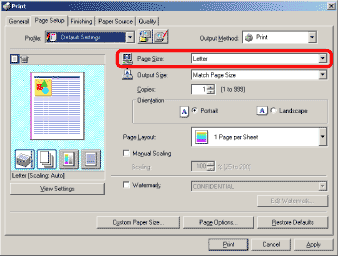
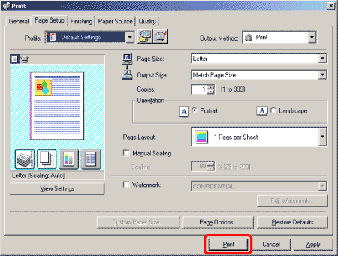
3. Select page size of the document you created in the application from [Page Size].
note:
- If you select [Custom ] in [Page Size], you may not be able to specify [Manual Scaling], [Page Layout] or [2-sided Printing].
- If you use envelopes, select an envelope type in [Page Size].
4. Specify [Output Size].
- If you print onto the same size of paper as the document setting, select [Match Page Size] in [Output Size].
- If you print onto custom size paper, select [Custom Size].
- You can specify the size of custom size paper beforehand. (See "Registering the Custom Size.")
- Proceed to the next step if you select an envelope.
- Proceed to step 7 if you select other paper size than envelope.
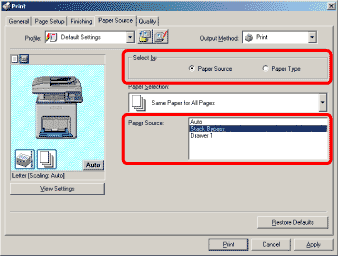
5. Click [Paper Source] tab.
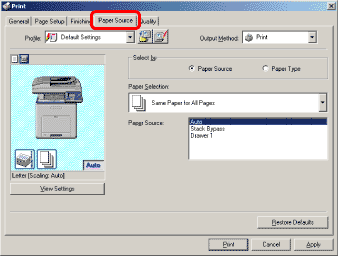
6. Make sure that [Paper Source] is selected in [Select by], select [Stack Bypass] in [Paper Source] and click [OK].
7. Click [Print] or [OK]. Printing starts.
Registering the Custom Size
note: The following procedures are explained using sample screens from Windows 2000.
1. On the [Start] menu, point to [Settings] -> click [Printers].
- If you use Windows XP Professional/Server 2003, from the [Start] menu, click [Printers and Faxes].
- If you use Windows XP Home Edition, from the [Start] menu, click [Control Panel] -> [Printers and Other Hardware] -> [Printers and Faxes].
- If you use Windows Vista, from the [
 ](Start) menu, click [Control Panel] -> [Printers].
- If you use Windows Server 2008, from the [Start] menu, click [Control Panel] -> [Printers].

The [Printers] folder is displayed.
2. In the [Printers] folder (or [Printers and Faxes] folder), right-click the printer icon whose settings you want to configure -> click [Printing Preferences] from the displayed menu. The printer driver screen is displayed.

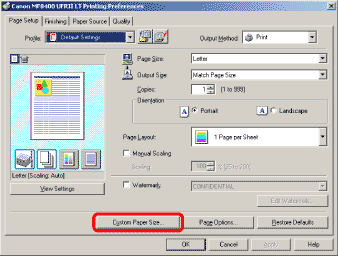
3. Click [Custom Paper Size?] on the [Page Setup] page.
note: When you access the printer driver screen from the [Printers] or [Printers and Faxes] folder, the full control access rights are required. Log on as a Power User or an Administrator if you use Windows 2000/XP/Server 2003/Vista/Server 2008.
4. Specify the paper size and enter the name in [Name of Custom Paper Size].
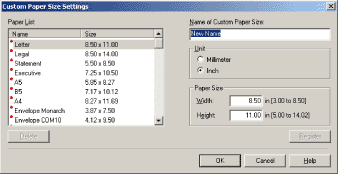
5. Click [OK].
- Registered custom size paper can be used other printers installed in the computer.
- Available paper size and type vary depending on the printer model. For information, see the online help for each printer driver.
- You can register the paper size specified in the [Server Properties] dialog box accessed from the [Printers] or [Printers and Faxes] as a custom-size paper. In this case, enter a value of 1/4" - 2" (5 mm - 50 mm) for the left, right, top and bottom margin in [Printer Area Margins].
- You can register the paper size specified in the [Server Properties] dialog box accessed from the [Printers] or [Printers and Faxes] as a custom-size paper. In this case, enter a value of 1/4" - 2" (5 mm - 50 mm) for the left, right, top and bottom margin in [Printer Area Margins].
note: If you copy or print received faxes onto custom-size paper, set the paper size and type from the control panel of the machine.
- If you load paper in the stack bypass tray, the paper size setting screen appears. Select <Custom Size> and specify the size.
- If you frequently use the same size of paper in the stack bypass tray, you can set <Stack Bypass Paper (Std.)> in <Paper Settings> of the <Additional Func.> menu.
- If you want to print received faxes onto custom-size paper, register paper size in <Stack Bypass Paper (Std.)> and set <Receive> for <Stack Bypass> in <Auto Drawer Selection>in <Common Settings> of the <Additional Func.> menu to <On>.
