
Setup the MP970 for use over a wired LAN - Windows
| Article ID: ART102395 | | | Date published: 05/11/2015 | | | Date last updated: 08/15/2015 |
Description
Setting up the MP970 for use over a wired LAN - Windows
Solution
How to use the wired LAN connection after the MP Drivers installation (Windows)
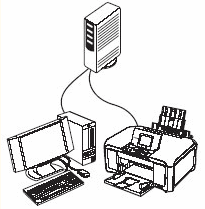
Connect the printer to the computer with a wired LAN to enable the printer to use over the wired network.
Install MP Drivers and Canon IJ Network Tool from the prepackaged CD-ROM into the computer, then specify the wired LAN settings. < Network Example >
Note :
< Procedures >
The MP Drivers can be installed using Easy Install or Custom Install.
Easy Install automatically installs the MP drivers, application software and digitized manual, which are in the CD-ROM. Custom Install allows users to complete installation in a short time. When using Custom Install, please select MP drivers and Canon IJ Network Tool along with your choices. 1. Set the prepackaged CD-ROM in the computer.
2. The CD-ROM starts automatically.
Note :
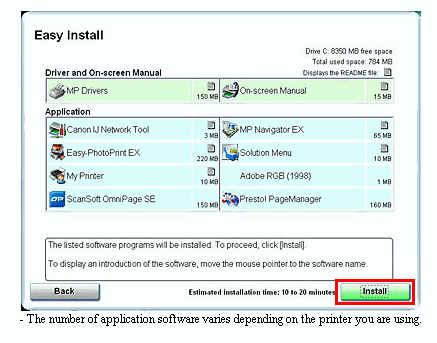
3. Click Easy Install or Custom Install.
When selecting Easy Install:
a. Click Install.
-
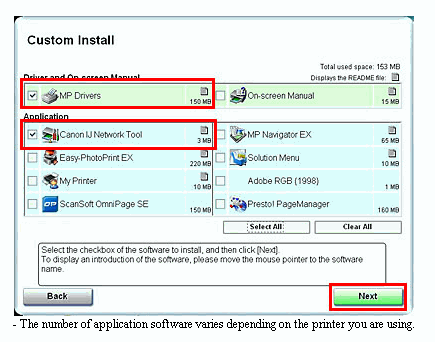
When selecting Custom Install:
a. Select MP Drivers, Canon IJ Network Tool, and other application software you want to use, then click Next.
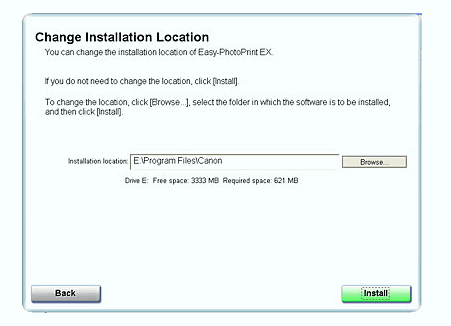
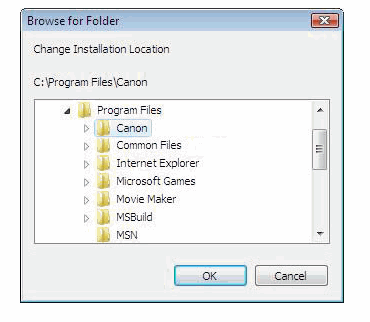
 b. The installation location can be changed depending on application software. (The following procedures show Easy-PhotoPrint EX.) - If you do not need to change the location, click Install.
- If you want to change the installation location, type in the name of the folder in which the application is installed in Installation location, or click Browse to select a folder.
Click OK, and you will return to the Change Installation Location window. Confirm that the installation location has been changed, and click Install.
4. Read the License Agreement carefully. If you agree with the agreement, click Yes.
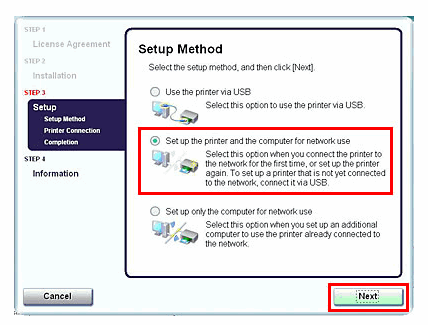
6. Select "Set up the printer and the computer for network use" in the Setup Method window, then click Next.
7. When the Printer Connection window is displayed, connect the printer to the computer and turn the printer ON.
 Note :
8. When the Setup Preparations window is displayed, confirm the following, then click Next.
- The printer is turned ON.
- The network communication for the computer is enabled.
- The printer is connected to the computer with a USB cable.
Note :
9. When the Check Wired LAN Connection dialog box appears, connect the machine to the network devices such as hubs with a LAN cable, then click Yes.
Note :
10. The machine connected with the USB cable is detected automatically via LAN connection.
Follow the instructions below depending on the detection result. (When the printer is detected automatically)
When the printer is detected automatically, you can use the printer without any further connecting operation.
Go to procedure 11. (When the Set Printer IP Address window is displayed)
If the machine was not detected, the Set Printer IP Address dialog box appears. Make sure of the following, then click Connect.
- The network devices such as hubs or routers are turned on, and the machine and the computer are connected to the network.
- The machine is connected to the computer with the USB cable.
- The IP address to be set for the machine is displayed on the Set Printer IP Address dialog box. If it is different from the address you want to set for the machine, enter the desired IP address on the Set Printer IP Address dialog box. ( If the machine is turned off, the Set Printer IP Address dialog box does not appear. )
After the printer is detected, if using Windows Vista, go to procedure 12.
If using Windows XP/2000, go to procedure 11. 11. The Network Setup of the Card Slot window will be displayed.
Specify the drive letter of the card slot of the printer, then, click OK.
12. The Setup Completion window will be displayed.
Turn off the printer, remove the USB cable which connects the printer to the computer, then place the printer in the location where you will use it. Turn on the printer, then click Finish.
The settings for MP drivers installation and a wired LAN communication have been completed. Now, proceed to the Canon user registration. 13. If you register now, click Register. If not, click Next.
Registration can be done after the MP drivers installation. Note :
15. The Installation completed successfully screen appears.
Note :
If only one CD-ROM is included in the package for the Windows setup
Click Exit.
Note :
When the Continue to Windows (CD-2) screen appears, perform the following steps (1) to (3) to complete the installation.
(1) Click Exit.
The Setup CD-ROM "Windows (CD-1)" is ejected. (2) Insert the Setup CD-ROM "Windows (CD-2) Macintosh."
(3) Follow the on-screen instructions to proceed with the setup.
The end of the procedure.
|


SIMS Doc Id
0