Set Ink Drying Wait Time (Windows) back to standard setting
| Article ID: ART102510 |
| |
Date published: 05/11/2015 |
| |
Date last updated: 08/15/2015 |
Description
Ink Drying Wait Time will increase the time it takes to print.
Solution
Ink Drying Wait Time
Ink Drying Wait Time will prevent ink from smearing on subsequent pages. However, this will increase the time it takes to complete a print job. Follow these instructions to set the Ink Drying Time back to standard setting.
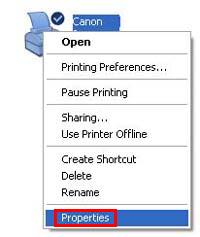
- Open the the printer's Properties screen.
Note: This setting must be set from the Printers Folder. If the printer Properties / Preferences are accessed from an application, the setting will be unavailable (grayed out).
For Windows Vista
-
- Click / Select 'Start' from the bottom left of the Windows screen, 'Control Panel', 'Hardware and Sound', and then click on 'Printers'. Note: If you are in 'Classic' view, Click 'Printers' directly from the 'Control Panel'.
- Click your right mouse button on the listing for your printer, and then select 'Properties' from the menu that appears.
For Windows XP Home Edition
- Click / Select 'Start' from the bottom left of the Windows screen, 'Control Panel,' 'Printers and Other Hardware,' and 'Printers and Faxes.'
- Click your right mouse button on the listing for your printer, and then select 'Properties' from the menu that appears.
For Windows XP Professional Edition
- Click 'Start' from the bottom left of the Windows screen, and 'Printers and Faxes.'
- Click your right mouse button on the listing for your printer, and then select 'Properties' from the menu that appears.
For Windows 2000/Me/98
- Click / Select 'Start' from the bottom left of the Windows screen, and 'Settings,' then 'Printers.'
- Click your right mouse button on the listing for your printer, and then select 'Properties' from the menu that appears.
- Right click on icon for your printer, and then click 'Properties' on the menu that appears.
- Click the Maintenance tab.
- Click 'Custom Settings'.
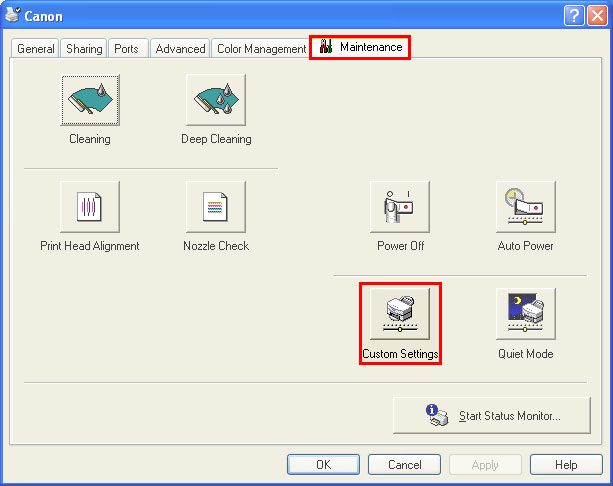
NOTE: Available maintenance functions vary depending on model
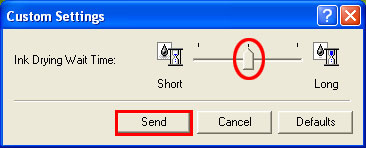
- Set 'Ink Drying Wait Time' in the Custom Settings dialog.
- Drag the 'Ink Drying Wait Time' slide-bar to change the setting. Moving the 'Ink Drying Wait Time' slide-bar to the center to shorten the time it takes to complete a print job.
- Click 'Send'.
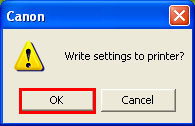
- When the confirmation message is indicated, make sure that the printer is powered on, and click OK.
- Ink Drying Wait Time setting is completed.
