Setting and Changing method of printer driver port
- Connecting to a TCP/IP Network:
All computers that use the machine must have TCP/IP client software installed and must be enabled for TCP/IP network use. For details, see the manuals provided with the operating system.
- Installing the Printer Driver and Specifying the Machine Destination Setting:
To print from a computer, you must install a printer driver and specify a setting for the machine destination. The machine destination setting differs depending on the print application used for printing. Use the following information as a guide to determine the print application you are using, and then perform the necessary operations.
- LPD: This is the print application generally used with TCP/IP.
- Raw: This is a print application used with Windows 2000/XP/Server 2003/Vista. It can print at higher speeds than LPD.
note:
In the following procedures, items displayed on the screen for Windows XP are used; items might differ depending on your operating system.
1. Open the printer properties dialog box.
- For Windows Vista, click [Start] on the Windows task bar  [Control Panel] [Hardware and Sound] [Printer].
- For Windows 2000, click [Start] on the Windows task bar [Settings] [Printers].
- For Windows XP Professional/Server 2003, click [start] on the Windows task bar [Printers and Faxes].
- For Windows XP Home Edition, click [start] on the Windows task bar [Control Panel] [Printers and Other Hardware] [Printers and Faxes].
2. Right-click the icon of the printer you installed select [Properties].
3. Display the [Ports] sheet by clicking the [Ports] tab.
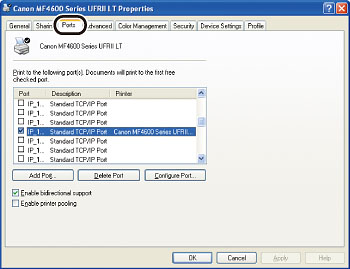
4. Open the [Printer Ports] dialog box by clicking [Add Port].
5. From [Available ports types], select [Standard TCP/IP Port] click [New Port].
The Add Standard TCP/IP Printer Port Wizard starts.
6. Click [Next].
7. In [Printer Name or IP Address], enter the machine IP address or machine host name click [Next].
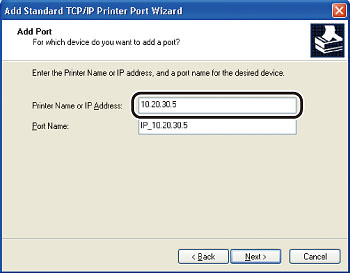
After the computer has confirmed that there is a machine in which the entered IP address is assigned, the [Completing the Add Standard TCP/IP Printer Port Wizard] window appears.
8. Click [Finish].
If the dialog box displays [Additional Port Information Required], follow the instructions on the screen to search again, or click [Standard] click [Canon Network Printing Device with P9100] from the pull-down list click [Next].
9. Click [Close] to close the [Printer Ports] dialog box.
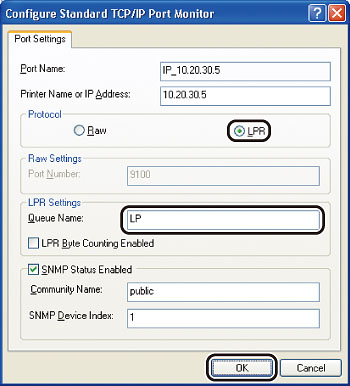
10. In the printer properties dialog box, click [Configure Port] click [LPR] under [Protocol] enter a print queue in [Queue Name] under [LPR Settings].
If you want to use Raw, confirm [Raw] under [Protocol] is selected, and proceed to step 11.
note:
You can specify a print queue in [Queue Name]. The following three print queues are available:
LP: The machine prints according to its spool settings. Normally select this option.
SPOOL: The machine prints only after spooling a print job on the hard disk, regardless of its spool settings.
DIRECT: The machine prints without spooling a print job on the hard disk, regardless of its spool settings.
11. Click [OK].
12. Click [Close].
