
Basic steps to print from Windows - iP3600 / iP4600
| Article ID: ART103007 | | | Date published: 05/11/2015 | | | Date last updated: 11/04/2015 |
Solution
- Operations may vary depending on your software application. For details on the operation, refer to the instruction manual of your application.
- The screens used in this section are for printing with Windows Vista operating system Ultimate Edition (hereafter referred to as "Windows Vista").
1.Make sure that the printer is turned on.
2.Load paper.
note:Load A4, B5, A5, or Letter-sized plain paper in the Cassette and other sizes or types of paper such as photo paper in the Rear Tray.
3.Open the Paper Output Tray gently, and extend to open the Output Tray Extension.
4.Create (or open) a document to print using an appropriate software application.
5.Open the printer properties dialog box.
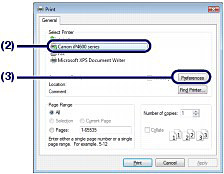
(1) Select Print on the File menu or the command bar in your software application.
The Print dialog box appears.
(2) Make sure that your printer's name is selected.
note:If another printer's name is selected, click and select your printer's name.
(3) Click Preferences (or Properties).
6. Specify the required print settings.
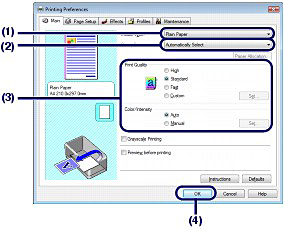
(1) Select the media type of the paper to print in Media Type.
note:If you select A4, B5, A5, or Letter-sized plain paper when Automatically Select is selected in Paper Source, the printer feeds the paper from the Cassette. If you select other sizes or types of paper such as photo paper, the printer feeds the paper from the Rear Tray.If you select the wrong page size or media type, the printer may feed the paper from the wrong paper source or may not print with the proper print quality.
(2) Make sure that Automatically Select is selected in Paper Source.
(3) Specify the print quality, etc. in Print Quality and Color/Intensity as required.
(4) Click OK.
note:
- To confirm the page size, click the Page Setup tab. If the setting does not match the document's page size already set in the software application, you need to reset the page size, or otherwise use Scaled Printing or Fit-to-Page Printing.
- For details on the printer driver functions, click Help or Instructions to view the online help or the on-screen manual: Advanced Guide. The Instructions button appears on the Main and Maintenance sheets if the on-screen manual is installed on your computer.
- To display the preview to confirm the print result, select the Preview before printing check box on the Main sheet. Some software applications may not have a preview function.
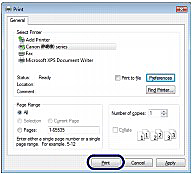
7. Start printing.
Click Print (or OK) to start printing.
Printing Documents (Macintosh)note:
- To cancel a print job in progress, press the RESUME/CANCEL button on the printer or click Cancel Printing on the printer status monitor. After canceling the print job, blank sheets of paper may be ejected. To display the printer status monitor, click Canon XXX (where "XXX" is your printer's name) on the taskbar.
- If printed ruled lines are misaligned or print results are unsatisfactory, adjust the print head position.
note:Operations may vary depending on your software application. For details on the operation, refer to the instruction manual of your application.
- For Mac OS X v.10.5.x
1.Make sure that the printer is turned on.
2.Load paper.
note:Load A4, B5, A5, or Letter-sized plain paper in the Cassette and other sizes or types of paper such as photo paper in the Rear Tray.
3.Open the Paper Output Tray gently, and extend to open the Output Tray Extension.
4. Create (or open) a document to print using an appropriate software application.
5.Open the Print dialog box.
Select Print on the File menu in your software application.
The Print dialog box appears.
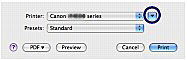
note:If the dialog box below appears, click(Down arrow).
6.Specify the required print settings.
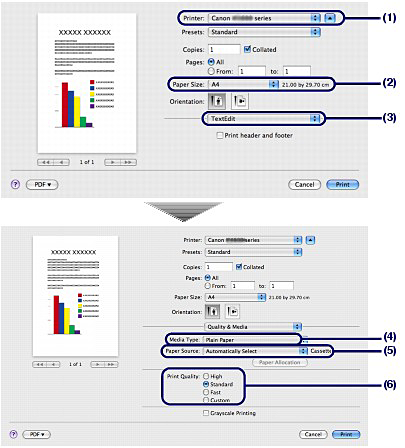
(1) Make sure that your printer's name is selected in Printer.
(2) Select the page size of the paper to print in Paper Size.
(3) Select Quality & Media in the pop-up menu.
(4) Select the media type of the paper to print in Media Type.
note:If you select A4, B5, A5, or Letter-sized plain paper when Automatically Select is selected in Paper Source, the printer feeds the paper from the Cassette. If you select other sizes or types of paper such as photo paper, the printer feeds the paper from the Rear Tray.If you select the wrong page size or media type, the printer may feed the paper from the wrong paper source or may not print with the proper print quality.
(5) Make sure that Automatically Select is selected in Paper Source.
(6) Select the print quality in Print Quality.
note:
- For details on the printer driver functions, click
(Question) on the Quality & Media, Color Options, Borderless Printing, or Duplex Printing & Margin screen to view the on-screen manual: Advanced Guide.
- If the on-screen manual is not installed, it does not appear even if
7.Start printing.
Click Print to start printing.
note:
- Click the printer icon in the Dock to display the list of print jobs in progress.
- To cancel a print job in progress, select the desired job in the Name list and click Delete. After canceling the print job, blank sheets of paper may be ejected. To temporarily stop a job in progress, click Hold. To temporarily stop all the jobs in the list, click Pause Printer.
- If printed ruled lines are misaligned or print results are unsatisfactory, adjust the print head position.
- For Mac OS X v.10.4.x or Mac OS X v.10.3.9
note:The screens used in this section are for printing in Mac OS X v.10.4.x.
1.Make sure that the printer is turned on.
2.Load paper.
note:Load A4, B5, A5, or Letter-sized plain paper in the Cassette and other paper such as photo paper in the Rear Tray.
3.Open the Paper Output Tray gently, and extend to open the Output Tray Extension.
4.Create (or open) a document to print using an appropriate software application.
5.Specify the page size.
(1) Select Page Setup on the File menu in your software application.
The Page Setup dialog box appears.
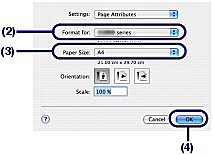
(2) Make sure that your printer's name is selected in Format for.
(3) Select the page size of the paper to print in Paper Size.
(4) Click OK.
6.Specify the required print settings.
(1) Select Print on the File menu in your software application.
The Print dialog box appears.
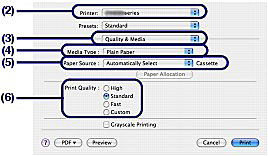
(2) Make sure that your printer's name is selected in Printer.
(3) Select Quality & Media in the pop-up menu.
(4) Select the media type of the paper to print in Media Type.
note:If you select A4, B5, A5, or Letter-sized plain paper when Automatically Select is selected in Paper Source, the printer feeds the paper from the Cassette. If you select other sizes or types of paper such as photo paper, the printer feeds the paper from the Rear Tray.If you select the wrong page size or media type, the printer may feed the paper from the wrong paper source or may not print with the proper print quality.
(5) Make sure that Automatically Select is selected in Paper Source.
(6) Select the print quality in Print Quality.
note:
- For details on the printer driver functions, click (Question) on the Quality & Media, Color Options, Special Effects, Borderless Printing, or Duplex Printing & Margin screen to view the on-screen manual: Advanced Guide. If the on-screen manual is not installed, it does not appear even if (Question) is clicked.
- To display the preview to confirm the print result, click Preview. Some software applications may not have a preview function.
- For details on the printer driver functions, click
7.Start printing.
Click Print to start printing.
note:
- Click the printer icon in the Dock to display the list of print jobs in progress.
- To cancel a print job in progress, select the desired job in the Name list and click Delete. After canceling the print job, blank sheets of paper may be ejected. To temporarily stop a job in progress, click Hold. To temporarily stop all the jobs in the list, click Stop Jobs.
- If printed ruled lines are misaligned or print results are unsatisfactory, adjust the print head position.
SIMS Doc Id
0