The Print settings options allow you to change the paper size, media type and print quality. The available options will vary dependent on the function; that is Copy or Memory card mode. Memory card Print settings will appear after the card is inserted and a photo is selected.
Copy Print Settings:
- At Copy mode screen, press the
 (Up) or
  (Down) arrow button to specify the number of copies (1).
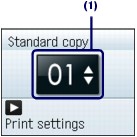
- Press the
 (Right arrow) button to display the Print settings window.

- At Copy Print settings screen, press the (Up) or (Down) arrow button to select a setting and then press the
 (Left) or (Right) arrow button to change the item. Click here to see the items to change.
- Press the Color button for color copying, or the Black button for black & white copying.
The machine starts copying.
- To cancel copying, press the Stop button.
NOTE: Do not open the Document Cover or move the loaded original until the copying is completed.
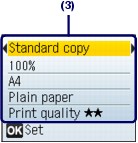
Items to Change:
(1) Copy type:
Select the copy type: Standard copy, Frame erase, etc.
(2) Magnification:
You can select Fit to page to make the copy automatically enlarged or reduced to fit the selected page size.
(3) Page size:
Select the page size of the loaded paper: A4, 8.5" x 11" (LTR), etc.
(4) Media type:
Select the media type of the loaded paper: Plain paper, Glossy, etc.
(5) Print quality:
Adjust the print quality according to the original to copy: Print quality (quality-priority), Print quality (standard), or Print quality (speed-priority). The available print quality depends on the paper selected in Media type.
Note:
- Settings such as the page size, media type, and print quality are retained, and these settings will appear next time the copy mode is selected even if the power is turned off and on.
- Some items cannot be specified in combination depending on the function.
- You can specify the amount of extension in Extension amount under Device settings, when Borderless copy is selected for the copy type.
- You can set the print quality to Print quality (speed-quality) only when plain paper is selected for the media type.
- If you select Print quality (speed-priority) with the media type set to Plain paper and the quality is not as good as expected, select Print quality (standard) or Print quality (quality-priority) and then try copying again.
- When you make black & white copies by pressing the Black button, select Print quality (quality-priority) for the print quality to render tones in range of gray (grayscale copy).
- You can specify auto intensity. This function automatically adjusts the intensity of the original on the Platen Glass.
Return to top
Memory Card Print Settings
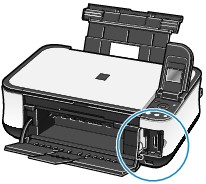
- Insert a memory card with the labeled side facing to the left into the Card Slot.
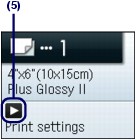
- After the machine reads the photos on the memory card, the card mode screen will appear (1).
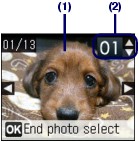
- Use the (Left) or (Right) button to display the photo to print.
- Use the (Up) or (Down) button to specify the number of copies.
- Repeat steps 3 and 4 to specify the number of copies for each photo.
- Press the <OK> button.
The print confirmation screen appears.
- Press the (Right) button to display the Print settings screen.
-
Confirm the page size, media type, print quality, etc., and press the <OK> button.
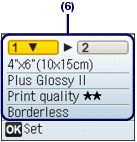
- Here we confirm that 4"x6" (10x15cm) is selected for the page size and the type of loaded photo paper for the media type.
- To change the settings, use the (Up) or (Down) button to select the item to change. Click here to see the items to change.
- Press the (Left) or (Right) button.
- To switch to the other tab, use the (Up) or (Down) button to select the settings tab, and press the (Left) or (Right) button.
- Confirm the total number of sheets to print (7).

- Press the <Color> button or the <OK> button.
Items to Change:
|
Tab 1:
|
Tab 2:
|
|

|

|
(1) Page size:
Select the page size of the loaded paper: 4"x6" (10x15cm), A4, etc.
(2) Media type:
Select the media type of the loaded paper: Glossy, Plain paper, etc.
(3) Print quality:
Adjust the print quality: Print quality (quality-priority), Print quality (standard).
(4) Bordered, Borderless:
Select bordered or borderless print: Bordered or Borderless.
Note: When Plain paper is selected in Media type, you cannot select Borderless.
(5) Date printing:
Select whether or not to print the shooting date. For a sample image using this function, see Using Other Functions.
Note: The shooting date is printed according to Date display in Device settings.
(6) Photo optimizer:
Automatically optimizes brightness and tone of a photo. For a sample image using this function, see Using Other Functions.
(7) Red-Eye correct:
Corrects red eyes in portraits caused by direct flash photography.
(8) Face brightener:
Brightens a darkened face on the photo taken against the light.
Note:
* All settings such as the page size, media type, and print quality are retained, and these settings will appear next time a photo is selected in the card mode even if the power is turned off and on.
* Some items cannot be specified in combination depending on the function.
Return to top