Printing images in Grayscale - Easy-PhotoPrint Pro
| Article ID: ART103741 |
| |
Date published: 05/11/2015 |
| |
Date last updated: 03/30/2016 |
Description
Printing images in Grayscale - Easy-PhotoPrint Pro
Solution
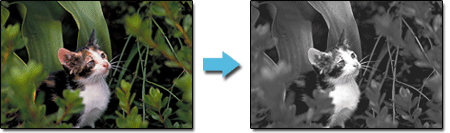
Printing Photos in Grayscale
You can print color photos in grayscale photos.
-
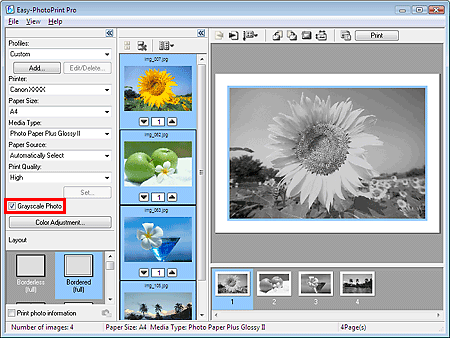
Check that the photo you want to print is displayed in the bottom right area of the screen.
- Select the Grayscale Photo checkbox in the Printer Settings window.
 Important
- When you select the Grayscale Photo checkbox, all the selected images will be printed in grayscale.
 Note
Note
- When Photo Paper Pro II or Fine Art "Photo Rag" is selected for Media Type, click Color Adjustment... to open the Color Adjustment dialog box in which you can adjust the black color tone. See Help for details.
- Click Print.
The Print dialog box appears.
-
Click OK.
Important
-
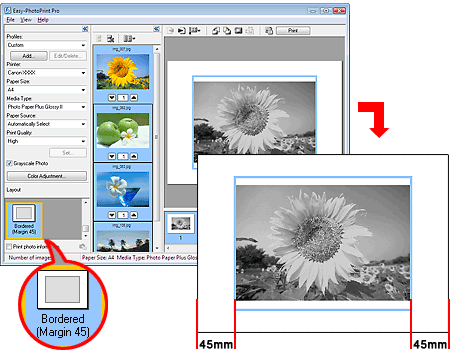
White streaks may appear at the top and bottom edges of grayscale photos printed in Letter, A4 or 8"x10" 20x25cm size. In that case, print with a 45 mm or more margin at the top and bottom edges.
If you select Bordered (Margin 45) for Layout, images will be reduced to allow a 45 mm margin at the top and bottom edges when printing.
-
If the print result after adjusting the color balance in the Color Adjustment dialog box is different from the preview image, print a color pattern and adjust the colors based on the pattern.
 Adjusting Color Balance using Sample Patterns
Page top
Adjusting Color Balance using Sample Patterns
You can print a pattern of an image and adjust the color balance of the image based on the pattern.
-
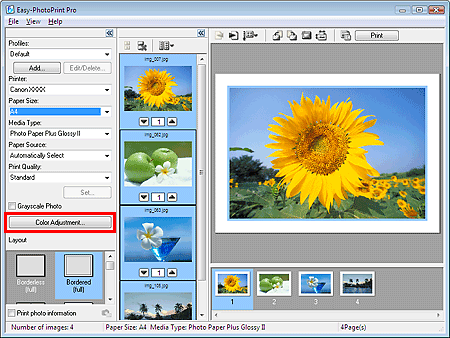
Check that the photo you want to print is displayed in the bottom right area of the screen.
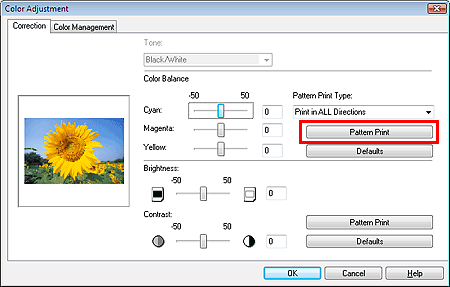
- Click Color Adjustment... in the Printer Settings window.
The Color Adjustment dialog box appears.
-
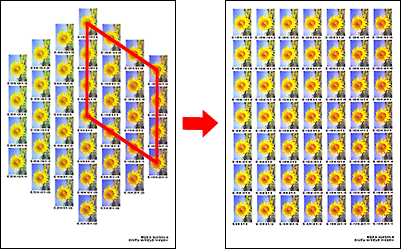
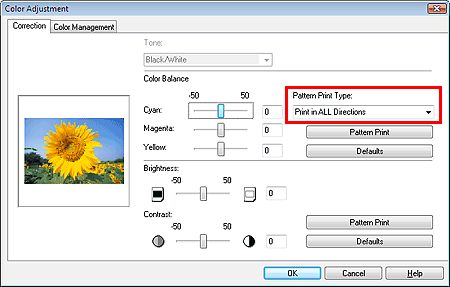
Select the color direction in which you want to adjust from Pattern Print Type.
Note
- Select Print in ALL Directions to print a pattern of the image adjusted in the following six directions. (The image with the current color balance values is printed in the center.) Use the pattern to determine the color direction in which you want to adjust the color balance.
|

|
R (upper right) direction
|
:
|
Red
|
|
Y (upper) direction
|
:
|
Yellow
|
|
G (upper left) direction
|
:
|
Green
|
|
C (lower left) direction
|
:
|
Cyan
|
|
B (lower) direction
|
:
|
Blue
|
|
M (lower right) direction
|
:
|
Magenta
|
If Grayscale Photo was selected, choose Custom in the Tone dropdown list to get specific printing direction options.
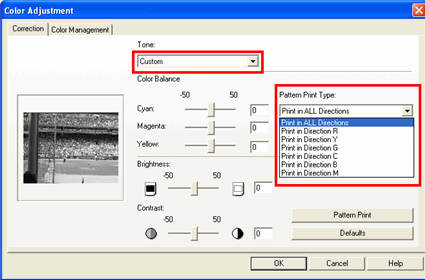
- Select a specific direction such as Print in Direction R to print a pattern of the image adjusted in the selected direction. (The image with the current color balance values is printed at the bottom left.) For example, select Print in Direction R to print a more detailed pattern of the portion in the R direction of the pattern for all directions (the portion outlined in red in the figure below). This allows you to check more variations than in all directions.
- Click Pattern Print.
The pattern is printed.
-
Select the image with the desired color balance from the printed pattern and enter the values indicated below the image into Color Balance.
-
Click OK.
Page top