Changing Resolution / Compression Settings
When pictures are taken as JPEG images, the images are processed inside the camera for optimum image quality, and also compressed to allow a larger number of images to be stored on the memory card. However, the compression process is irreversible, meaning that the original image data cannot be recovered once it has been compressed.
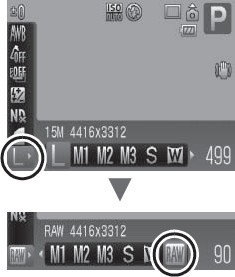
RAW data is the data output by the imaging element and converted to digital data which is recorded as is. This results in images with almost no deterioration in image quality and a higher quality than JPEG images. To shoot in the RAW file format, the camera must be set to a creative mode, either <P>, <Av>, <Tv>, or <M> and the RAW quality option selected as shown below. To view RAW images on a computer, you need to use the supplied software (ZoomBrowser EX/ ImageBrowser), which also lets you broadly adjust images without deterioration in image quality. Using the software's image processing functions, you can take the adjusted image data and convert it a JPEG, TIFF or other type of image in line with your intended use. However, you cannot use direct print or make print (DPOF) settings with images taken in RAW.
RAW Image Options
|
Resolution
|
Purpose
|
| RAW* |
Print larger than A2 size 420 x 594 mm (16.5 x 23.4 in.) prints |
| RAW* + Large Fine JPEG |
Print larger than A2 size 420 x 594 mm (16.5 x 23.4 in.) prints |
|
L (Large) 4416 X 3312 pixels
|
Print larger than A2 size 420 x 594 mm (16.5 x 23.4 in.) prints |
|
M1 (Medium 1) 3456 x 2592 pixels
|
Print larger than A3 size 297 x 420 mm (11.7 x 16.5 in.) prints
|
|
M2 (Medium 2) 2592 x 1944 pixels
|
Print up to A4 size 210 x 297 mm (8.3 x 11.7 in.) prints
Print up to letter size 216 x 279 mm (8.5 x 11 in.) prints
|
| M3 (Medium 3) 1600 x 1200 pixels |
Print postcard size 148 x 100 mm (6 x 4 in.) prints
Print L size 119 x 89 mm (4.7 x 3.5 in.) prints
|
|
S (Small) 640 X 480 pixels
|
Send images as e-mail attachments
Shoot more images
|
|
 (Wide) (4416 x 2480) pixels (Wide) (4416 x 2480) pixels
|
Suitable for printing on wide size paper ( you ca check the composition at a 16:9 aspect ratio. Areas that will not be recorded appear on the LCD monitor as a black border) |
* Raw files require conversion prior to being able to use them.
|
Compression
|
Purpose
|
 Superfine Superfine |
Shoot higher quality images |
 Fine Fine |
Shoot normal quality images |
 Normal Normal |
Shoot more images |
Changing the Resolution and Compression
1. Turn the camera on by pressing power button.

2. Press the <FUNC./SET> button.
3. In the Function menu select L* or  using the
  or
or  button.

* The current setting is displayed.
4. Select the resolution you wish to set using the  or
or  button. (Excluding
  )
)
5. Press the <FUNC./SET> button.
6. Select the compression you wish to set using the or button.
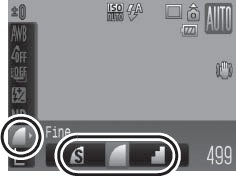
You can shoot the image right after selecting settings by pressing the shutter button. This screen will appear again, once the image is shot.
7. Press the <FUNC./SET> button.
8. Shoot the image.

- Some settings are not available with certain Shooting modes.
- The resolution can be changed in the (movie) mode however compression cannot be changed independently.
Changing the image type to RAW
1. Select RAW in the resolution selection by pressing the <FUNC./SET> button and select RAW using the or buttons.
Simultaneously Recording RAW and JPEG Images.
| On |
Two images, a RAW image and a JPEG image (Large / Fine), will be recorded with each shot. Since a Large Fine image is also recorded, you can print the image, or view it on a computer, without using the supplied software. images are saved with the same file number to the same folder, and can be distinguished by their file extension. RAW images end with the ".CR2", while JPEGs end with ".JPG" |
| Off |
Only RAW images are recorded. |
1. Select [Record RAW +  ] from the shooting menu as shown below.
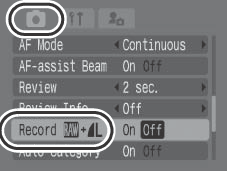
2. Choose to set the selection to [On].

3. Shoot the image.
The RAW + icon will show in the bottom right corner of the recorded image to indicate that it was shot in RAW + jpeg.
