
How to shoot using Live View on the EOS Digital Rebel XS.
| Article ID: ART104268 | | | Date published: 05/11/2015 | | | Date last updated: 09/29/2015 |
Description
Solution
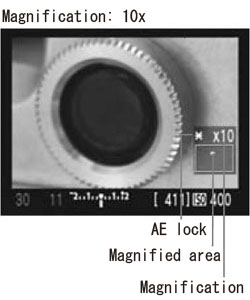
With your camera, you can shoot while viewing a real-time image on the camera's LCD monitor. This is called "Live View shooting." This image can be magnified by 5x or 10x, so you can focus the camera more precisely.
Important:
If you handhold the camera like a compact digital camera and shoot while viewing the LCD monitor, camera shake can cause blurred images.
STEP I. Preparing for Live View Shooting
1. Set the camera's power switch to <ON>.
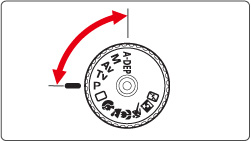
2. Set the <Mode Dial> to a Creative Zone.
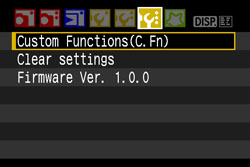
3. Press the <MENU> button.
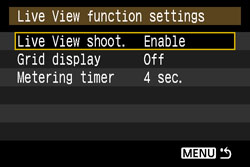
4. Press the <Cross Keys> to select the [ ] tab. Next press the <Cross Keys> to select the [Live View function settings], then press the <SET> button.

5. Press the <Cross Keys> to select [Live View shoot] from the displayed menu item, and then press the <SET> button.
6. Press the <Cross Keys> to select [Enable].
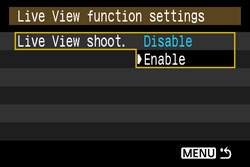
7. Press the <SET> button. Make sure that [Live View shoot-Enable] is set, and then press the <MENU> button twice.

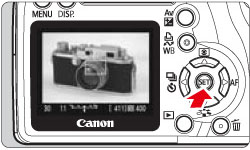
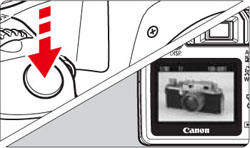
8. Make sure that the menu display disappears, and then press the <SET> button.
- The Live View image will appear on the LCD monitor.
- The Live View image will reflect the brightness level of the actual image you capture.
- The Live View image will appear on the LCD monitor. The Live View image will reflect the brightness level of the actual image you capture.
Attention:
- Live View shooting does not work in Basic Zone modes.
- During Live View shooting, do not point the camera toward the sun. The sun's heat can damage the camera's components.
- Live View shooting will disable the following Custom Function settings; [C.Fn III 8 Mirror lockup] [C.Fn IV 9 Shutter/AE lock button] [C.Fn IV 10 SET button when shooting].
- Under low light or bright light conditions, the Live View image might not reflect the brightness of the captured image.
- If the light source within the image changes, the screen might flicker. If this happens, stop the Live View shooting, then resume Live View shooting under the actual light source to be used.
- During Live View image display, if you point the camera in a different direction, it might throw off the correct brightness momentarily and the image might not look right. Wait until the image brightness stabilizes before shooting.
- If there is a very bright light source in the picture, such as the sun, the bright area might be blackened on the LCD monitor. However, the actual captured image will correctly show the bright area.
- If you set the [LCD brightness] to bright settings in low light, chrominance noise may appear in the Live View image. However, the chrominance noise will not be recorded to the captured image.
- When you magnify the image, the image sharpness may look more pronounced than it really is.
- Under the [Custom Functions (C.Fn)] menu, setting [C.Fn II 5 Auto Lighting Optimizer] to [0: Enable] may display a darkly-exposed (set with exposure compensation) image brighter.
- Live View shooting does not work in Basic Zone modes. During Live View shooting, do not point the camera toward the sun. The sun's heat can damage the camera's components. Live View shooting will disable the following Custom Function settings; [C.Fn III 8 Mirror lockup] [C.Fn IV 9 Shutter/AE lock button] [C.Fn IV 10 SET button when shooting]. Under low light or bright light conditions, the Live View image might not reflect the brightness of the captured image. If the light source within the image changes, the screen might flicker. If this happens, stop the Live View shooting, then resume Live View shooting under the actual light source to be used. During Live View image display, if you point the camera in a different direction, it might throw off the correct brightness momentarily and the image might not look right. Wait until the image brightness stabilizes before shooting. If there is a very bright light source in the picture, such as the sun, the bright area might be blackened on the LCD monitor. However, the actual captured image will correctly show the bright area. If you set the [LCD brightness] to bright settings in low light, chrominance noise may appear in the Live View image. However, the chrominance noise will not be recorded to the captured image. When you magnify the image, the image sharpness may look more pronounced than it really is. Under the [Custom Functions (C.Fn)] menu, setting [C.Fn II 5 Auto Lighting Optimizer] to [0: Enable] may display a darkly-exposed (set with exposure compensation) image brighter.
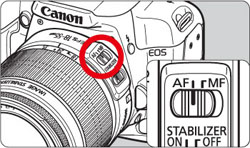
1. Set the lens focus mode switch to <MF>.
Turn the lens focusing ring to focus roughly.

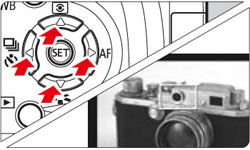
2. Move the focusing frame to the position where you want to focus.
- Press the <Cross Keys> key to move the focusing frame.
- To move to the center focusing frame, press the <
 > (Erase) button.
 - Press the <Cross Keys> key to move the focusing frame. To move to the center focusing frame, press the <> (Erase) button.
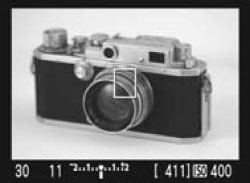
3. Magnify the image.
Press the < > (magnify) button, the area within the focusing frame will be magnified.
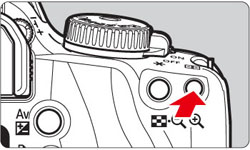
Each time you press the <> button, the display format will change as follows:
Full view -> 5x -> 10x -> Full view
4. While looking at the Live View image on the LCD monitor, turn the focusing ring to focus manually.
5. Press the <> button to check the image composition in full view.
6. Check the exposure.
- Press the shutter button halfway and The shutter speed and aperture will be displayed.
- If you set exposure compensation, the image brightness will change accordingly.
- Press the shutter button halfway and The shutter speed and aperture will be displayed. If you set exposure compensation, the image brightness will change accordingly.
7. Press the shutter button completely to take the picture.
The picture will be taken and the captured image is displayed on the LCD monitor. After the image review ends, the camera will return to Live View shooting automatically.
Exit Live View shooting with the Live View image displayed, press <SET> button.
Note:
- <A-DEP> will be the same as using <P>.
- You can set the ISO speed, white balance, and exposure compensation during Live View shooting.
- The Picture Style, drive mode, AF mode, and AF point cannot be changed during Live View shooting.
- During Live View shooting, the metering mode will be set to evaluative metering regardless of the current metering mode setting.
- You can check the depth of field by pressing the depth-of-field preview button.
- During continuous shooting, the exposure set for the first shot will also be applied to subsequent shots.
- <A-DEP> will be the same as using <P>. You can set the ISO speed, white balance, and exposure compensation during Live View shooting. The Picture Style, drive mode, AF mode, and AF point cannot be changed during Live View shooting. During Live View shooting, the metering mode will be set to evaluative metering regardless of the current metering mode setting. You can check the depth of field by pressing the depth-of-field preview button. During continuous shooting, the exposure set for the first shot will also be applied to subsequent shots.
Attention:
- When you use Live View shooting for a long period, the camera's temperature may increase and it can degrade image quality. Terminate Live View shooting when not shooting images. Before taking a long exposure, stop Live View shooting temporarily and wait several minutes before shooting.
- High temperatures, high ISO speeds, or long exposures may cause noise or irregular colors in the image captured with Live View shooting.
- If you take the picture while the image is magnified, the exposure might not come out as desired. Return to the full view before taking the picture. During the magnified view, the shutter speed and aperture will be displayed in red.
- Even if you take the picture during magnified view, the captured image will reflect the full view.
- The focus preset feature on super telephoto lenses cannot be used.
- For Live View shooting, do not use an Extension Tube or TS-E lens. Doing so can cause irregular or unintended exposures.
- FE lock is not possible when the built-in flash or external Speedlite is used. Modeling flash is not possible when external Speedlite is used.
- A non-Canon flash will not fire.
- When you use Live View shooting for a long period, the camera's temperature may increase and it can degrade image quality. Terminate Live View shooting when not shooting images. Before taking a long exposure, stop Live View shooting temporarily and wait several minutes before shooting.High temperatures, high ISO speeds, or long exposures may cause noise or irregular colors in the image captured with Live View shooting.If you take the picture while the image is magnified, the exposure might not come out as desired. Return to the full view before taking the picture. During the magnified view, the shutter speed and aperture will be displayed in red.Even if you take the picture during magnified view, the captured image will reflect the full view.The focus preset feature on super telephoto lenses cannot be used.For Live View shooting, do not use an Extension Tube or TS-E lens. Doing so can cause irregular or unintended exposures.FE lock is not possible when the built-in flash or external Speedlite is used. Modeling flash is not possible when external Speedlite is used.A non-Canon flash will not fire.
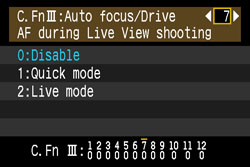
Under [Custom Functions (C.Fn)], when [AF during Live View shooting] is set to [1: Quick mode] or [2: Live mode], you can focus with AF. Quick mode and Live mode use a different AF method.
- Quick mode...the same as using AF as usual with the dedicated AF sensor.
- Live mode...the image sensor is used to focus.
- Quick mode...the same as using AF as usual with the dedicated AF sensor. Live mode...the image sensor is used to focus.
If you want precise focusing, magnify the image and focus manually.
[C.Fn-8-1: Quick mode]
This is the same as using AF as usual with the dedicated AF sensor. Although you can focus the desired area quickly, the Live View image will be interrupted momentarily during the AF operation.
1. Set the power switch to <ON>.
2. Press the <MENU> button.
3. Press the <Cross Keys> to select [  ] tab and press the <SET> button.
4. Press the <Cross Keys> to select custom function number [7], and press the <SET> button.
5. Press the <Cross keys> to select [1: Quick mode], and press the <SET> button.

6. Make sure that [1:Quick mode] is set, and then press the <MENU> button twice.
7. Set the lens focus mode switch to <AF>.

8. Set the AF mode to [ONE SHOT].
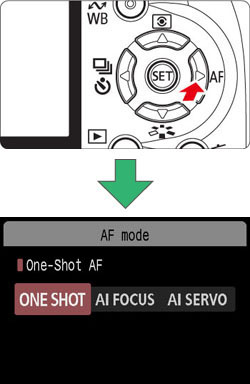
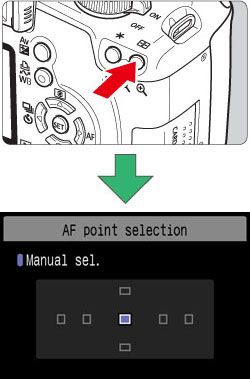
9. Select the AF point for focusing.
- Before starting Live View shooting, select the AF point.
- Press the < > button and press the <Cross Keys> to select the AF point.
- Press the shutter button halfway for shooting ready.
- Before starting Live View shooting, select the AF point. Press the <
 > button and press the <Cross Keys> to select the AF point. Press the shutter button halfway for shooting ready.
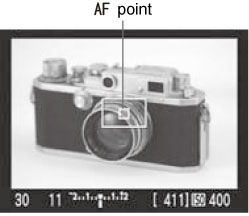
10. Press the <SET> button and display the Live View image.
- The Live View image will appear on the LCD monitor, and the selected AF point will be displayed.
- The focusing frame (larger frame) will also be displayed.
- The Live View image will appear on the LCD monitor, and the selected AF point will be displayed. The focusing frame (larger frame) will also be displayed.
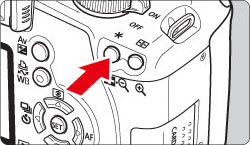
11. Aim the selected AF point over the subject, and hold down the <  > (AE Lock/FE Lock) button.
- The Live View image will turn off, the reflex mirror will go back down, and AF will be executed.
- When focus is achieved, the beeper will sound.
- The Live View image will turn off, the reflex mirror will go back down, and AF will be executed. When focus is achieved, the beeper will sound.
12. When you let go of the <> button, the Live View image will reappear. Check the focus and exposure, then press the shutter button to take the picture.
Attention:
- You cannot take a picture during autofocusing. Take the picture only while the Live View image is displayed.
- Although you can set the AF mode to AI Servo AF or AI Focus AF, AF will stop when the camera returns to the Live View image display (step 12), so you cannot focus the moving subject.
- AF is not possible with Remote Switch RS-60E3 (sold separately).
- You cannot take a picture during autofocusing. Take the picture only while the Live View image is displayed. Although you can set the AF mode to AI Servo AF or AI Focus AF, AF will stop when the camera returns to the Live View image display (step 12), so you cannot focus the moving subject. AF is not possible with Remote Switch RS-60E3 (sold separately).
[C.Fn-8-2: Live mode]
The image sensor is used to focus. Although AF is possible with the Live View image displayed, the AF operation will take longer than with Quick mode. Also, achieving focus may be more difficult than with Quick mode.
1. Set the power switch to <ON>.
2. Press the <MENU> button.
3. Press the <Cross Keys> to select [] tab and press the <SET> button.

4. Press the <Cross keys> to select custom function number [7], and press the <SET> button.

5. Press the <Cross Keys> to select [2:Live mode], and press the <SET> button.
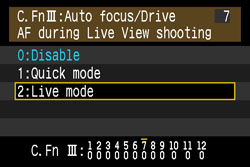
6. Make sure that [2:Live mode] is set, and then press the <MENU> button twice.
7. Set the lens focus mode switch to <AF>.
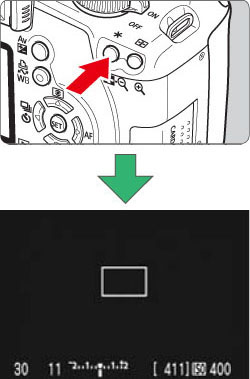
8. Display the Live View image.
Press the <SET> button and the Live View image will appear on the LCD monitor. When Live mode is set, the AF point will be displayed.
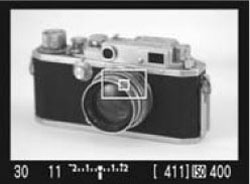
9. Aim the AF point over the subject and press the < > (AE Lock/FE Lock) button to autofocus.
- When focus is achieved, the AF point will turn green and the beeper will sound.
- If focus is not achieved, the AF point will turn orange.
- When focus is achieved, the AF point will turn green and the beeper will sound. If focus is not achieved, the AF point will turn orange.
10. Check the focus and exposure, then press the shutter button to take the picture.
Note:
- You can press the <Cross keys> to move the AF point to where you want to focus (it cannot go to the edges of the picture). To move to the center AF point, press the < > button.
- To magnify the image at the AF point, press the <>(magnify) button.
- You can press the <Cross keys> to move the AF point to where you want to focus (it cannot go to the edges of the picture). To move to the center AF point, press the <
 > button. To magnify the image at the AF point, press the < > (magnify) button.
Attention:
- If focusing is difficult with the magnified image, return to the full view and use AF.
- If the image flickers, making it difficult to focus, stop the Live View shooting and resume Live View shooting under the actual light source to be used. Check that the flickering has stopped, then autofocus.
- If you autofocus in the full view, then magnify the image, the focus might be off.
- The AF-assist beam will not be emitted.
- AF is not possible with Remote Switch RS-60E3 (sold separately).
- If focusing is difficult with the magnified image, return to the full view and use AF. If the image flickers, making it difficult to focus, stop the Live View shooting and resume Live View shooting under the actual light source to be used. Check that the flickering has stopped, then autofocus. If you autofocus in the full view, then magnify the image, the focus might be off. The AF-assist beam will not be emitted. AF is not possible with Remote Switch RS-60E3 (sold separately).
Reference:
With Live mode, AF can fail to achieve focus in the following
- Low-contrast subject such as a blue sky and solid-color surfaces.
- Subjects in low light.
- Stripes and other patterns where there is contrast only in the horizontal direction.
- Under a light source whose brightness, color, or pattern keeps changing.
- Night scenes or points of light.
- Under fluorescent lighting or when the image flickers.
- Extremely small subjects.
- Subjects strongly reflecting light.
- When near and far subjects are covering the AF points, such as an animal in a cage.
- Subjects which keep moving within the AF point and cannot keep still due to camera shake or subject blur.
- A subject approaching or leaving the camera.
- When AF is used for an extremely out-of-focus subject.
- When shooting a soft-focus image with a soft-focus lens.
- When using a special effect filter.
- Low-contrast subject such as a blue sky and solid-color surfaces. Subjects in low light. Stripes and other patterns where there is contrast only in the horizontal direction. Under a light source whose brightness, color, or pattern keeps changing. Night scenes or points of light. Under fluorescent lighting or when the image flickers. Extremely small subjects. Subjects strongly reflecting light. When near and far subjects are covering the AF points, such as an animal in a cage. Subjects which keep moving within the AF point and cannot keep still due to camera shake or subject blur. A subject approaching or leaving the camera. When AF is used for an extremely out-of-focus subject. When shooting a soft-focus image with a soft-focus lens. When using a special effect filter.
If you connect the camera to a PC that has the software supplied with the camera installed, you can shoot remotely while viewing the computer screen. For details, please see the related information.
This is the end of the instructions for Live View shooting.