Before you replace ink cartridges, there are a few things to know.
 Caution
-
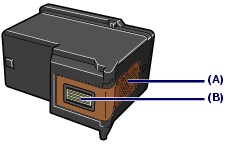
Don't touch the electrical contacts (A) or print head nozzles (B) on the cartridge. The machine may not print properly if you do.
-
The inside of the machine may be stained with ink. Be careful not to stain your hands or clothing. You can wipe off any ink that's inside the printer with a clean, dry cloth.
-
Don't try to stop the cartridge holder when it's moving and don't try to forcibly move it.
-
Don't touch the metallic or other parts inside the machine.
-
Discard empty cartridges according to the local laws and regulations regarding disposal of consumables.
Replace ink cartridges
Follow these steps to replace ink cartridges:
-
Make sure the power is turned ON.
-
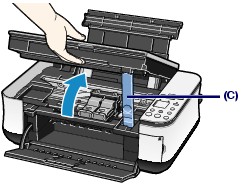
Open the paper output tray and lift the scanning unit (main cover), then hold it open with the support (C).
 When opening the main cover, lift it with the document cover closed.
-
The cartridge holder moves to the replacement position.
If the main cover is left open for more than 10 minutes, the cartridge holder moves to the right. In this case, close and reopen the main cover.
-
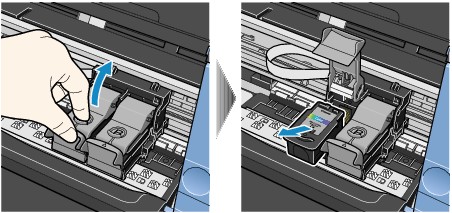
Pinch the tabs and open the ink cartridge locking cover, then remove the cartridge.
-
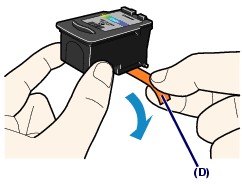
Take a new cartridge out of the package and gently remove the orange protective tape (D).
Be careful not to shake the ink cartridge. Don't reattach the protective tape after you remove it.
-
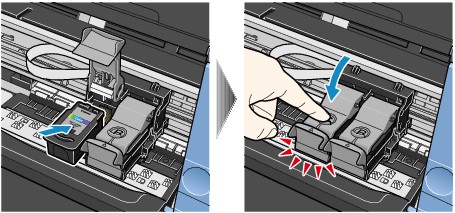
Put a new cartridge in the cartridge holder. Push down the ink locking cover until it clicks into place. (The color cartridge goes on the left and the black on the right.)
-
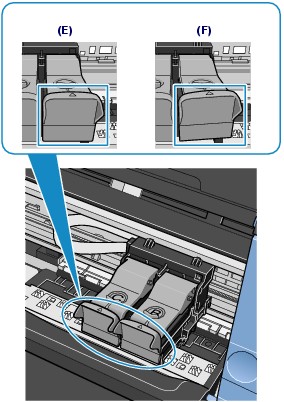
Confirm that the cover is closed correctly (E), and isn't tilted (F).
-
Lift the cover slightly to set the scanning unit support back to its original position. then gently close the cover.
After you replace a cartridge, the machine automatically cleans the print head. Wait for the machine to finish before completing any print tasks.
 If the Alarm lamp lights or flashes orange after the main cover is closed, refer to Troubleshooting in the printer's on-screen manual: Advanced Guide.
About ink cartridges
-
For best print quality, use new Canon brand cartridges (refills may clog the nozzles and won't alert you when it's time to replace the ink).
-
Replace cartridges right after you remove them. Don't leave the machine with cartridges missing.
-
Use cartridges within six months of installation.
-
Some color ink is consumed even when you print in black-and-white.
-
Some ink is consumed when you clean the print head.
