Removing a paper jam from the ADF.
If a document jam occurs in the feeder, the message <Remove the jammed paper from inside the cover of the feeder.> appears on the display. Refer to the location of the paper jam and clearing procedure displayed on the screen to clear the jam. Press the right Any key to display the next procedure.

attention:
- If loose toner comes into contact with your skin or clothing, wash with cold water. Warm water will set the toner.
- When removing jammed original or paper, take care not to cut your hands on the edges of the original or paper.
- After clearing all paper jams, remove your hands from the machine immediately. Even if the machine is not in operation, your hands, hair, or clothing may get caught in the feed rollers, which could result in personal injury or damage if the machine suddenly starts printing.
important:
- Remove jammed paper while the power of the machine is ON. If the power is turned OFF, the data being printed will be deleted. When you remove the fixing unit to remove jammed paper, however, the data being printed will be deleted because you have to turn the machine OFF.
- Applying excess force may result in tearing paper or damaging the parts in the printer. When removing jammed paper, pull out the paper in the most appropriate direction, judging from the position of the paper.
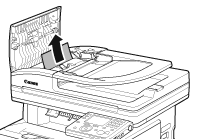
1. Open the feeder cover.

2. Hold sides of any jammed original and gently pull it out.
attention:
Do not force a jammed original out of the machine. If the jammed original cannot be removed easily, proceed to the next step.
3. Open the inner cover, holding it by its front tab (A).
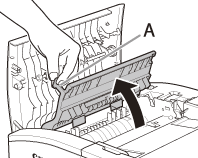
4. Lift the release lever (A) until it clicks into place.

5. Remove the jammed original.

note:
Do not force a jammed paper out of the machine as it may tear.
6. Return the release lever (A) to its original position.

7. Close the inner cover.

8. Close the feeder cover.

9. Load the original in the feeder again.