Setting Paper Size and Type for the Stack Bypass
You can set the paper size and type that the stack bypass uses beforehand. This setting is useful if you always load the same paper size and type into the stack bypass.
note:
- When printing on special types of paper, such as heavyweight paper or transparencies, be sure to correctly set the paper type, especially if you are using heavyweight paper. If the type of paper is not set correctly, it could adversely affect the quality of the image. Moreover, the fixing unit may become dirty and require a service repair, or the paper could jam.
- If you are using the stack bypass as a paper source for the Copy function, you must select the stack bypass when specifying the Drawer Eligibility for APS/ADS setting.
1 Press  (Additional Functions).
2

3

1 Press [ ] until [Stack Bypass Standard Settings] appears.
4

5

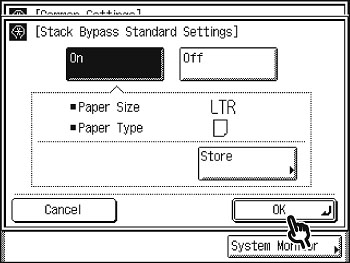
1 Press [On].
2 Press [Store].
6 Select the desired paper size.
 If you want to select a standard paper size:
1

1 Select the desired paper size.
2 Press [Next].
note:
To select an A or B series paper size, press [A/B-size].
2

1 Select the desired paper type.
2 Press [OK].
note:
- When printing on special types of paper, such as heavyweight paper or transparencies, be sure to correctly set the paper type, especially if you are using heavyweight paper. If the type of paper is not set correctly, it could adversely affect the quality of the image. Moreover, the fixing unit may become dirty and require a service repair, or the paper could jam.
- If you select [Transparency] or [Labels], make sure that you do not specify any finishing modes (Collate, or Group).
- [Transparency] can be selected only if [LTR] is selected as the paper size.
If you want to select a nonstandard paper size:
1

2

1 Press [X] to specify the horizontal axis of the paper, then enter a value using the numeric keys on the touch panel display.
2 Press [Y] to specify the vertical axis of the paper, then enter a value using the numeric keys on the touch panel display.
3 Press [OK].
note:
- If you make a mistake when entering values, press [C] on the touch panel display, then enter the correct values.
- You can enter only 2, 4, 8 or 16 as the denominator.
- The value entered in inches is converted to millimeters by the machine each time it is entered. Thus, there may be a slight difference between the value calculated and the actual value entered.
- To enter values in millimeters, press [mm].
- When entering the value in millimeters, you can also use  -
-  (numeric keys), and
  (Clear) to clear your entry.
- When entering the value in millimeters, you can also change the value by pressing [-] or [+] in increments of 1.0 mm, even if you have entered the value.
- If you enter a value outside the setting range, [OK] is grayed out and cannot be selected. Enter an appropriate value.
- You can use values for [X] between 5 7/8" (148 mm) and 17" (432 mm), and for [Y] between 3 3/4" (95 mm) and 11 11/16" (297 mm).
3

4
1 Select the desired paper type.
2 Press [OK].
note:
- When printing on special types of paper, such as heavyweight paper, be sure to correctly set the paper type, especially if you are using heavyweight paper. If the type of paper is not set correctly, it could adversely affect he quality of the image. Moreover, the fixing unit may become dirty and require a service repair, or the paper could jam.
- If you select [Irreg. Size], you cannot use the 1>2-Sided, 2>2-Sided, or Book>2- Sided mode.
If you want to select an envelope size:
1

2

1 Select the envelope type.
2 Press [OK].
note:
- If the envelope type is not selected correctly, a paper jam may occur.
- If you select [Envelope], you cannot use the 1>2-Sided, 2>2-Sided, Book>2- Sided, 2-page Separation, or Image Combination mode.
3

note:
[Transparency] can be selected only if [LTR] is selected as the paper size.
7
8 Press [Done] repeatedly until the Basic Features screen appears.
