Mounting on the Ceiling
WARNING:
Install the camera securely.
- When installing the VB-C300 on the ceiling, contact your Canon dealer.
- When installing the VB-C300 on the ceiling, check that the ceiling is strong enough to bear the weight of the VB-C300 including the Ceiling Bracket. Installation in a weak location could result in the VB-C300 falling and causing serious injury.
- At least once a year, check for looseness in the camera installation mount.
- When routing the cables, pay much attention not to damage the indoor wiring or piping.
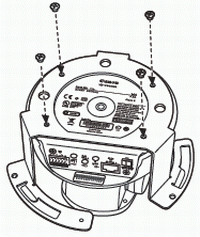
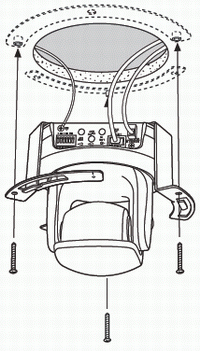
1. Mount the camera to the Ceiling Bracket with the supplied four screws.
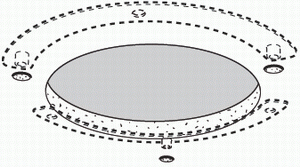
2. Use the supplied Template to determine the mounting location of the camera.
Considering the camera orientation, determine the mounting screw and cable hole locations and mark them with a pencil.
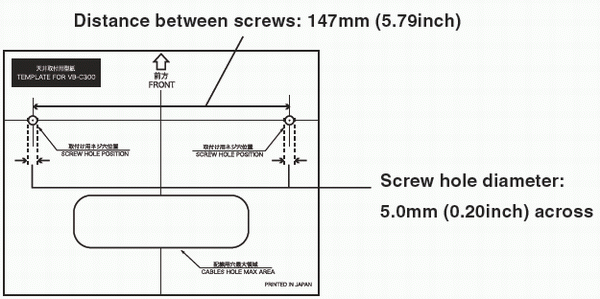
3. Drill two mounting screw holes and one cable hole on the ceiling.
Note: When using the AC adapter (optional), be sure to drill enough so that the ferrite core of the cable can pass it.
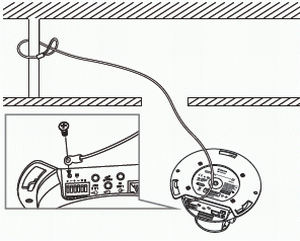
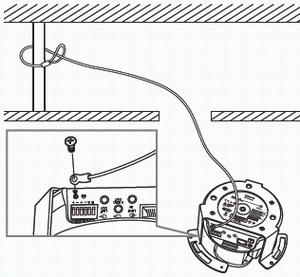
4. Secure the Safety Wire.
Secure the Safety Wire to an anchor or structure. After securing it, attach and fix it to the camera with a screw supplied with the camera.
Note: If the cable hole cannot be drilled, because the ceiling is concrete for example, secure the wire to an appropriate location.
5. Mount the camera on the ceiling.
Adjust the Ceiling Bracket to the screw holes on the ceiling, then secure it to the ceiling with two screws.
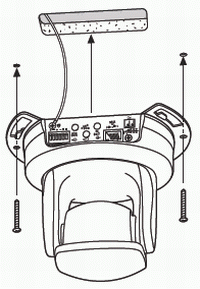
6. Connect the LAN cable passing through the cable hole to the camera.
When using the AC adapter (optional) or external power supply, connect the power cable to the camera.
Connect the cables to External Device I/O terminals or Audio output/input terminals as required to the camera.
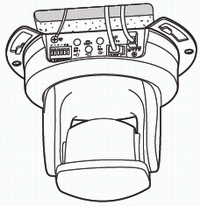
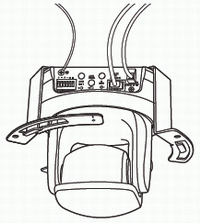
7. Attach the Ceiling Mount Cover to the camera.
Align the mark (o) on the Ceiling Mount Cover with the LED of the camera, and rotate the cover counterclockwise to the mark (I) to secure it.
Note: Ensure that the Ceiling Mount Cover is attached securely.
Tip: If the cables cannot be fit in the roof space, because the ceiling is concrete for example, or they cannot be in the Ceiling Mount Cover, cut the notch of the Ceiling Mount Cover with a plier to provide a notch to pass the cables through. In this case, attach the Ceiling Mount Cover first, then connect the cables.
Mounting the Camera at Upright Position
Note
- Observe the precautions in "Before Setting Up the Camera" and follow them before mounting the camera.
- The shooting position of the VB-C300 is set on the assumption that the camera is mounted at the inverted position. To reverse the camera video image upside down, see "Setting Image Size, Quality and Camera Control (Video and Camera)" in the Operation Guide
Mounting the Camera at a Flat Location
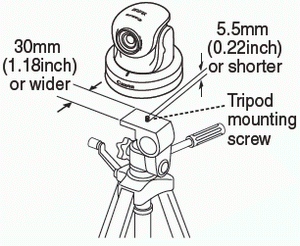
Using a Tripod
The screw hole for mounting a tripod is on the bottom of the VB-C300 toward the center.
- Do not overtighten the mounting screw. If excessive force is used to tighten the mounting screw, camera head movement may be impeded, or other malfunctions may result.
- Always use a tripod mounting screw that is less than 5.5 mm (0.22 in.) in length. The use of screws 5.5 mm (0.22 in.) long or longer could damage the camera. Also, the tripod seat used should be at least 30 mm (1.18 in.) in diameter.
|
 |
When Mounting the Camera on the Ceiling with the Dome Housing (VB-RD41S-C/S) (Optional)
Follow the steps below to mount the camera on the ceiling with the Indoor Dome Housing (optional). See the outer view of the dome to determine the mounting position and orientation.
Note: Observe the precautions in "Before Setting Up the Camera" and follow them before mounting the camera.
WARNING:
Install the camera securely.
- When installing the VB-C300 on the ceiling, contact your Canon dealer.
- When installing the VB-C300 on the ceiling, check that the ceiling is strong enough to bear the weight of the VB-C300 including the In-Ceiling Bracket. Installation in a weak location could result in the VB-C300 falling and causing serious injury.
- At least once a year, check for looseness in the camera installation mount.
- When routing the cables, pay much attention not to damage the indoor wiring or piping.
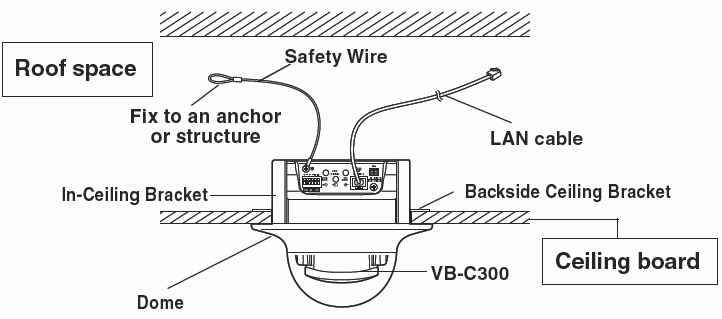
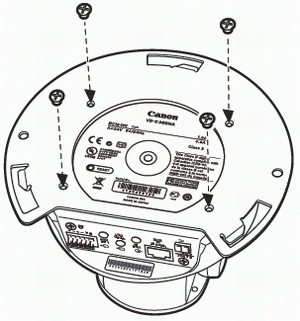
1. Mount the camera to the In-Ceiling Bracket with the four screws.
Use the screws supplied with the Dome Housing.
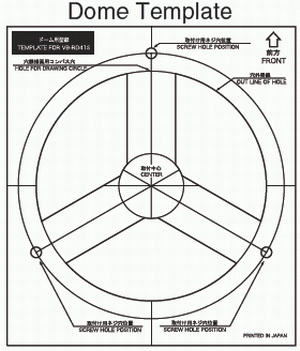
2. Determine the mounting position of the camera.
Aligning with the camera orientation, determine the hole locations for the Backside Ceiling Bracket and the hole location for the In-Ceiling Bracket, by using the template for the dome housing then mark them with a pencil.
3. Drill three mounting holes for the Backside Ceiling Bracket and a hole for the In-Ceiling Bracket on the ceiling.
Note: After drilling the holes, clean the mounting location so that drilled refuse may not enter the inside of the dome when installing the Indoor Dome Housing.
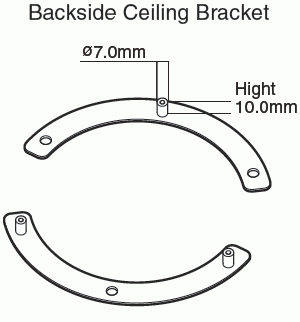
4. Mount the Backside Ceiling Bracket on the back side of the ceiling.
Tip: It is recommended to temporarily secure the Backside Ceiling Bracket with a two sided tape to the ceiling, so that it may not get loose when the dome is mounted on the ceiling.
Insert the convey parts on the Backside Ceiling Bracket into the holes drilled in step 3.
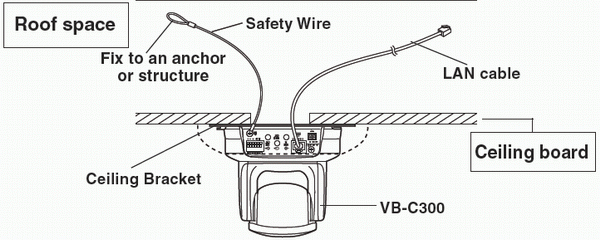
5. Secure the Safety Wire.
Secure the Safety Wire to an anchor or structure. After securing it, attach and fix it to the camera with a screw supplied with the camera.
6. Connect the LAN cable passing through the cable hole to the camera.
When using the AC adapter (optional) or external power supply, connect the power cable to the camera. Connect the cables to External Device I/O terminals or Audio output/input terminals as required to the camera.
7. Mount the In-Ceiling Bracket to the ceiling.
Insert the screws through the In-Ceiling Bracket and mount the In-Ceiling Bracket to the female parts of the roof space fittings.
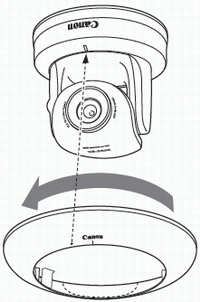
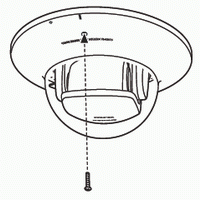
8. Mount the dome.
Align the mark (o) on the dome with the mark (I) of the In-Ceiling Bracket, and rotate the dome counterclockwise to the mark (I) to align the mounting screw holes to the mounting locations.
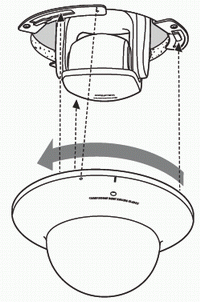
9. Fix the dome with a screw to prevent the dome from rotating.
10. When you finished mounting the camera, reboot the camera to initialize the camera position
Tip: If the LED is turned ON, its light may be reflected by the dome and caught by the camera. In this case, change the LED setting to "Turn the LED OFF."