 Articles Products Printers Inkjet Multifunction MX Series - Inkjet PIXMA MX7600 Articles Detail
Loading paper in the MX7600
| Article ID: ART104965 | | | Date published: 05/11/2015 | | | Date last updated: 08/15/2015 |
Description
Solution
Loading Printing Paper
This section describes how to load printing paper in the Rear Tray and the Cassette.
|
|
Hints for Handling the Paper Sources |
 |
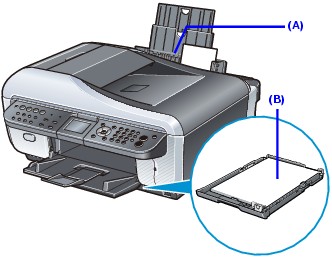
This machine offers two paper sources to load printing paper; the Rear Tray (A) and the Cassette (B)
.
 When You Print on Photo Paper
Load photo paper, or any type of paper other than plain paper, in the Rear Tray. When any media type other than plain paper is selected for printing, paper is automatically fed from the Rear Tray.
Note
For details on loading paper, see Loading Paper in the Rear Tray.

(A) Rear Tray: Load photo paper, or any type of paper other than plain paper
When You Print on Plain Paper
Load plain paper in the Cassette. When plain paper is selected for printing, paper is automatically fed from the Cassette. Only A4, B5, A5, Letter, or Legal-sized paper can be loaded in the Cassette.
For details on loading paper, see Loading Paper in the Cassette.
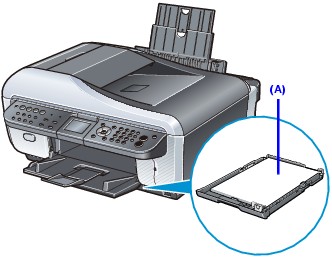
(A) Cassette: Load plain paper
Loading Paper |
|
|
|

|
|
Loading Paper in the Rear Tray
Load photo paper, or any type of paper other than plain paper, in the Rear Tray.
1 Flatten the four corners of the paper before loading it.

- When you do not print, remove unused paper from the Rear Tray, put them back into the package, and keep it on a level surface.
- Take out only the necessary number of sheets from the package, just before printing.
2 Prepare to load paper.
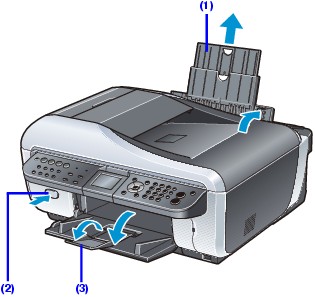
(1)
Open the Rear Tray Cover and pull out the Paper Support.
Put your finger in the rounded indent of the Paper Support and pull it out until it stops.
(2)
Open the Paper Output Tray.
Press the Open button to open the Paper Output Tray.
(3)
Open the Output Tray Extension.
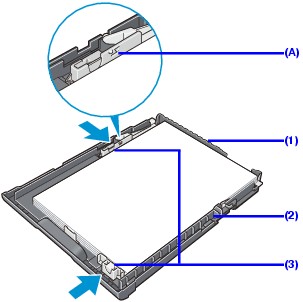
3 Load the paper.

Do not load higher than the Load Limit Mark (A)
.
(1) Load the paper in the Rear Tray with the print side facing UP.
(2) Align the paper stack against the Cover Guide on the right side of the Paper Support.
Make sure that the Cover Guide is set upright when you load paper in the Rear Tray.
(3) Pinch the Paper Guide and slide it against the left side of the paper stack.
Important
Do not slide the Paper Guide too hard. The paper may not be fed properly.
4 Specify the page size and media type settings according to the loaded paper.
When a Media type other than Plain paper is selected, the paper source will switch to the Rear Tray.
Loading Paper in the Cassette
Load plain paper in the Cassette.
1 Flatten the four corners of the paper before loading it.
See Flatten the four corners of the paper before loading it..
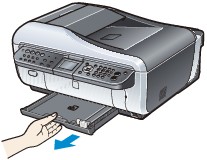
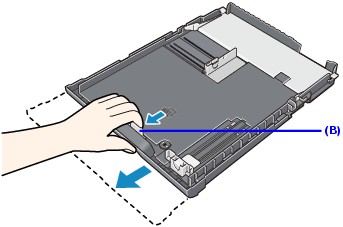
2 Pull out the Cassette from the machine.
3 Load the paper with the print side facing DOWN.
Do not load higher than the Load Limit Mark (A)
.
(1)
Load the paper in the Cassette with the print side facing DOWN and the leading edge to the far side.
(2)
Align the paper stack against the right side of the Cassette.
(3)
Slide the Paper Guides to fit to the loaded paper stack.
When loading Legal-sized paper, pull the tab (B)
towards you to unlock and fully extend the Cassette.
4 Insert the Cassette into the machine.
Push the Cassette all the way into the machine.

If Legal-sized paper is loaded in the Cassette, the Cassette will protrude slightly.
5 Open the Paper Output Tray.
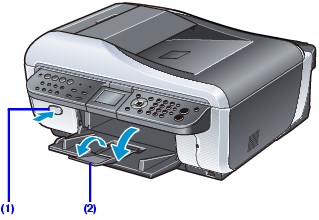
(1)
Open the Paper Output Tray.
Press the Open button to open the Paper Output Tray.
(2)
Open the Output Tray Extension.
6 Specify the page size and media type settings according to the loaded paper.
When Plain paper is selected for Media type, the paper source will switch to the Cassette.
|
Top of Page
The following types of media can be used. For detailed instructions on how to handle paper, refer to the instruction manual supplied with the paper. Non-Canon Genuine Papers Canon Genuine Papers
|
|
Plain paper cannot be fed from the Rear Tray. Load in the Cassette. |
Envelopes
Compatible Page Size: European DL, US Comm. Env. #10
Where to Load: Rear Tray
Paper Load Limit: 10 envelopes
Paper Output Tray Load Limit:
We recommend that you remove the previously printed envelope from the Paper Output Tray before continuously printing to avoid blurs and discoloration.
Media Type:
Printer Driver Setting: Envelope
Super White Paper SW-201
This media is suitable for printing business documents that feature graphics, and for printing photographs.
Where to Load: Cassette
Paper Load Limit: 100 sheets
Paper Output Tray Load Limit: 50 sheets
Media Type:
Printer Driver Setting: Plain Paper
Machine Setting: Plain paper
This paper cannot be fed from the Rear Tray. Load in the Cassette.
Matte Photo Paper MP-101
This is a thick matte water-resistant paper and provides superior color reproduction. It is suitable for a variety of printing purposes such as paper crafts, calendars, and photos with matte finish.
Where to Load: Rear Tray
Paper Load Limit: See Paper Load Limit for Canon Genuine Photo Papers.
Paper Output Tray Load Limit:
We recommend that you remove the previously printed sheet from the Paper Output Tray before continuously printing to avoid blurs and discoloration.
Media Type:
Printer Driver Setting: Matte Photo Paper
Machine Setting: Matte Photo Paper
This paper cannot be fed from the Cassette. Load in the Rear Tray.
Photo Paper Plus Glossy II PP-201
This is a thick paper with a glossy water-resistant coating and provides superior color reproduction. It is ideal for printing high quality photographs.
Where to Load: Rear Tray
Paper Load Limit: See Paper Load Limit for Canon Genuine Photo Papers.
* When loading paper in stacks, the print side may be marked as it is fed in or sheets may be stuck to one another causing them not to be fed properly. In this case, load one sheet at a time.
Paper Output Tray Load Limit:
We recommend that you remove the previously printed sheet from the Paper Output Tray before continuously printing to avoid blurs and discoloration.
Media Type:
Printer Driver Setting: Photo Paper Plus Glossy II
Machine Setting: Photo Plus Glossy II
This paper cannot be fed from the Cassette. Load in the Rear Tray.
Photo Paper Plus Glossy PP-101
This is a thick paper with a glossy water-resistant coating and provides superior color reproduction. It is ideal for printing high quality photographs.
Where to Load: Rear Tray
Paper Load Limit: See Paper Load Limit for Canon Genuine Photo Papers.
* When loading paper in stacks, the print side may be marked as it is fed in or sheets may be stuck to one another causing them not to be fed properly. In this case, load one sheet at a time.
Paper Output Tray Load Limit:
We recommend that you remove the previously printed sheet from the Paper Output Tray before continuously printing to avoid blurs and discoloration.
Media Type:
Printer Driver Setting: Photo Paper Plus Glossy
Machine Setting: Photo Plus Glossy
This paper cannot be fed from the Cassette. Load in the Rear Tray.
Photo Paper Plus Semi-gloss SG-201
This paper provides the same excellent water-resistant coating and superior color reproduction as the Photo Paper Plus Glossy PP-101, while offering a less reflective surface closer to a traditional matte finish.
Where to Load: Rear Tray
Paper Load Limit: See Paper Load Limit for Canon Genuine Photo Papers.
* When loading paper in stacks, the print side may be marked as it is fed in or sheets may be stuck to one another causing them not to be fed properly. In this case, load one sheet at a time.
Paper Output Tray Load Limit:
We recommend that you remove the previously printed sheet from the Paper Output Tray before continuously printing to avoid blurs and discoloration.
Media Type:
Printer Driver Setting: Photo Paper Plus Semi-gloss
Machine Setting: Plus Semi-gloss
This paper cannot be fed from the Cassette. Load in the Rear Tray.
Fine Art Paper "Photo Rag™" FA-PR1
This is a 100% cotton rag based art paper that has a soft, smooth texture that reduces gloss. It is ideal for printing a variety of artwork such as photographs.
Where to Load: Rear Tray
Paper Load Limit: 1 sheet
Paper Output Tray Load Limit:
We recommend that you remove the previously printed sheet from the Paper Output Tray before continuously printing to avoid blurs and discoloration.
Media Type:
Printer Driver Setting: Fine Art "Photo Rag"
If you choose a special page size for Fine Art Paper in the printer driver, a limit is set to prevent printing in the 1.38 inches / 35 mm margin on the top and bottom edges of the paper.
We recommend checking the area being printed in the preview screen before printing.
Refer to the PC Printing Guide on-screen manual.
Paper Load Limit for Canon Genuine Photo Papers
A4, Letter, 5" x 7" / 127.0 x 177.8 mm, and 8" x 10" / 203.2 x 254.0 mm: 10 sheets
4" x 6" / 101.6 x 152.4 mm and Wide: 20 sheets
The Credit card-sized paper cannot be fed from the Cassette. Load in the Rear Tray.
Before Printing on Art Paper
When using art paper, dust is liable to be generated. It is therefore recommended that paper dust be removed just before printing.
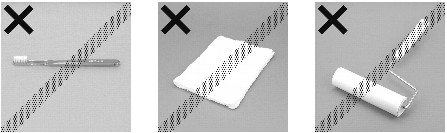
You will need a soft hair brush (or similar brush used to clean office automation equipment). The wider the brush, the more effective it will be.
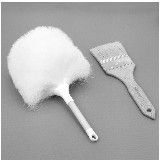
OK - soft brush made from material such as polypropylene, polyethylene, horse hair or goat hair.
Be sure not to use brushes as shown below. The printing surface may be damaged.
Not OK - brush made from hard material, cloth or washcloth, sticky and abrasive materials.
Paper dust removal procedure
(1) Check that the brush is not wet and free from dust or dirt.
(2) Brush the overall printing surface carefully in one direction.
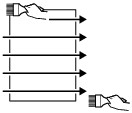
(3) To complete the removal of paper dust, brush the paper in the other direction from top to bottom.
