
How to print Vertical or Horizontal Banners (Large-Format Printing)
| Article ID: ART104971 | | | Date published: 05/11/2015 | | | Date last updated: 11/04/2015 |
Description
How to print Vertical or Horizontal Banners (Large-Format Printing)
Solution
|
Printing Vertical or Horizontal Banners (Large-Format Printing) |
| You can create vertical or horizontal banners by printing originals that are in banner format on rolls. |
| Originals created in Microsoft Word or other applications in your preferred size can be enlarged to fill the width of roll paper by completing simple printer driver settings. |
 |
| [Fit Roll Width Size] |
| You can easily create vertical or horizontal banners by automatically enlarging or reducing originals to fit the full width of rolls. |
| <Windows> |
| This topic describes how to print a banner about five times as long as the roll width based on the following example. |
| Document: A horizontal banner created in Microsoft Word |
| Page size: Non-standard (100x500 mm [3.9x19.7 in]) |
| Paper: Roll |
| Paper type: Plain Paper |
| Roll paper width: 16 in (406.4 mm) |
| Follow the steps below to print a banner in either horizontal or vertical format. |
| 1. Register a Custom Media Size . Banners tend to be in non-standard sizes, so register a Custom Media Size . In this example, 100x500 mm (3.9x19.7 in) is registered. |
| 2. In the application, create an original in the size you registered. |
| 3. Print the banner, using the settings that correspond to banners. |
| <Registering a Custom Media Size > |
| This example describes how to register a paper size that is horizontally elongated and suitable for banners in either horizontal or vertical format. |
| 1. Display the printer driver dialog box. |
| 2. Click the Page Setup tab to display the Page Setup sheet. |
 |
| 3. Click Roll Paper in the "L":Media Source list. |
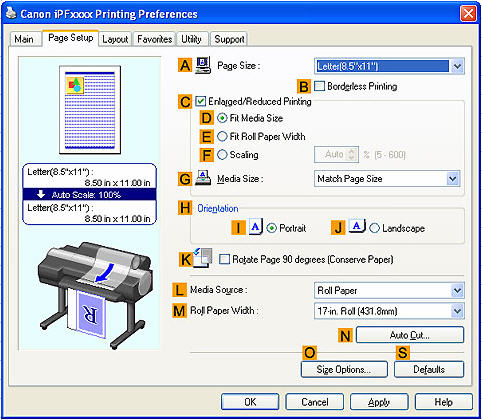
| 4. Click "O":Size Options to display the Media Size Options dialog box. |
| 5. Enter a desired paper name in Custom Media Size Name . "My Horizontal Banner" is used in this example. |
| 6. In Units , click mm . |
| 7. Under Media Size , enter "100" in Width and "500" in Height . |
| 8. Click Add to add the paper size of "My Horizontal Banner." |
| 9. Click OK to close the Media Size Options dialog box. |
| 10. Close the printer driver dialog box. |
| <Creating the banner in the application> |
| Follow the steps below to create the banner in Microsoft Word using the Custom Media Size you registered. |
| 1. Start Microsoft Word. |
| 2. Choose Page Setup from the File menu to display the Page Setup dialog box. |
| 3. Under Paper Size , click the Custom Media Size you registered—"My Horizontal Banner" in this example. |
| 4. Set the printing orientation to horizontal |
| 5. Create the banner. |
| <Printing the banner> |
| Follow the steps below to print the banner using the corresponding banner settings. |
| 1. Choose Print in the Microsoft Word menu. |
| 2. Select the printer in the dialog box, and then open the printer driver dialog box. |
| 3. Make sure the Main sheet is displayed. |
 |
| 4. In the "A":Media Type list, select the type of paper that is loaded. In this case, click Plain Paper . |
| 5. After confirming that "D":Easy Settings is selected, click POP Ad in the "E":Print Target list. |
| 6. Click the Page Setup tab to display the Page Setup sheet. |
 |
| 7. In the "A":Page Size list, click the size you registered, "My Horizontal Banner." |
| 8. Select the "D":Enlarged/Reduced Printing check box. |
| 9. Click Roll Paper in the "L":Media Source list. |
| 10. After you click "E":Fit Roll Paper Width , the Information dialog box is displayed. |
| 11. Select the width of the loaded roll in the Roll Paper Width list. In this case, click 16-in. Roll (406.4mm) , and then click OK . |
| 12. Confirm the print settings and print as desired. |
| <MacOS 9> |
| This topic describes how to print a banner about five times as long as the roll width based on the following example. |
| Document: An original designed for a horizontal banner |
| Page size: Non-standard (100x500 mm, [3.9x19.7 in]) |
| Paper: Roll |
| Paper type: Plain Paper |
| Roll paper width: 10 inches (254.0 mm) |
| The steps to print a vertical or horizontal banner are as follows. |
| 1. In the application, create an original in the format of a horizontal or vertical banner. |
| 2. Register a Custom Media Size in Media Design . Banners tend to be in non-standard sizes, so register a Custom Media Size . In this example, 100x500 mm (3.9x19.7 in) is registered. |
| 3. Print the banner, using the settings that correspond to banners. |
| <Register a Custom Media Size> |
| This example describes how to register and print using a page size that is horizontally elongated and suitable for banners in either horizontal or vertical format. |
| 1. Create the document in the application. |
| 2. Select the printer in Chooser . |
| 3. Choose Page Setup in the application menu to display the Page Attribute dialog box. |
 |
| 4. Click Media Design in the Page Attribute list to display the Media Design pane. |
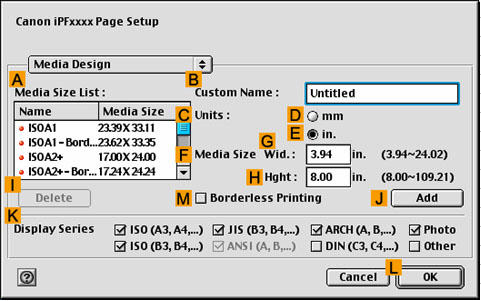 |
| 5. Enter a desired paper name in "B":Custom Name . "My Horizontal Banner" is used in this example. |
| 6. In "C":Units , click "D":mm . |
| 7. Under "F":Media Size , enter "100" in "G":Width. and "500" in "H":Hght . |
| 8. Click "J":Add to add the paper size of "My Horizontal Banner." |
| 9. Access the Page Attribute dialog box. |
 |
| 10. In the "A":Page Size list, click the size you added, "My Horizontal Banner." |
| 11. In "B":Orientation , click the icon of the document in landscape orientation. |
| 12. Click "I":OK to close the dialog box. |
| <Print the banner> |
| Follow these steps to print the banner using the corresponding banner settings. |
| 1. Choose Print in the application menu. |
| 2. Make sure the Main pane is displayed. |
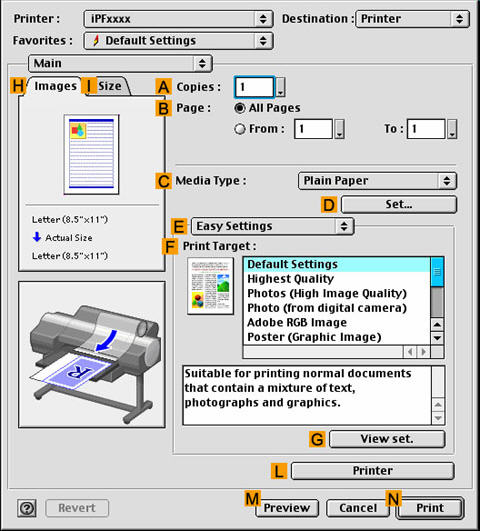 |
| 3. In the "C":Media Type list, select the type of paper that is loaded. In this case, click Plain Paper . |
| 4. After confirming that "E":Easy Settings is selected, click POP in the "F":Print Target list. |
| 5. Access the Finishing pane. |
 |
| 6. Click Roll Paper in the "A":Media Source list. |
| 7. Make sure the width of the loaded roll is displayed in the "B":Roll Paper Width list—in this case, 10 in. (254.0mm) . |
| 8. Access the Page Setup pane. |
 |
| 9. In "B":Page Size , make sure "My Horizontal Banner" is displayed, as registered in Media Design . |
| 10. Select the "C":Enlarged/Reduced Printing check box. |
| 11. Click "E":Fit Roll Width Size . |
| 12. Confirm the print settings, and then click "N":Print to start printing. |
| <MacOS X> |
| This topic describes how to print a banner about five times as long as the roll width based on the following example. |
| Document: An original designed for a horizontal banner |
| Page Size: Non-standard (100x500 mm [3.9x19.7 in]) |
| Paper: Roll |
| Paper type: Plain Paper |
| Roll paper width: 16 inches (406.4 mm) |
| Follow the steps below to print a banner in either horizontal or vertical format. |
| 1. In the application, create an original in the format of a horizontal or vertical banner. |
| 2. Register a "Custom Page Size." Banners tend to be in non-standard sizes, so register a "Custom Page Size" in Page Setup . In this example, 100x500 mm (3.9x19.7 in) is registered. |
| 3. Print the banner, using the settings that correspond to banners. |
| *The following procedures are based on Mac OS X 10.4. The method of setting up non-standard paper sizes varies depending on the version of Mac OS X. |
| <Register a "Custom Page Size"> |
| This example describes how to register and print using a page size that is horizontally elongated and suitable for banners in either horizontal or vertical format. |
| 1. Create the document in the application. |
| 2. Choose Page Setup from the application menu to display the Page Attribute dialog box. |
 |
| 3. Select the printer in the "B":Format for list. |
| 4. Click Manage Custom Sizes in the "C":Paper Size list to display the Custom Page Sizes dialog box. |
| 5. Double-click Untitled in the list at left, and then enter a name for the page size you want to register.Here, enter "100*500." |
| If the Untitled size is not listed at left, click + below the list. |
| 6. Under Page Size , enter "10" in Width and "50" in Height . Here, measurements are entered in centimeters. |
| 7. Specify the margins by entering "0.3" in Printer Margins . Here, too, measurements are entered in centimeters. |
| 8. Click OK to close the Custom Page Sizes dialog box. |
| 9. In the "C":Paper Size list, click the size of the original. In this case, click "100*500", the size you registered. |
| 10. In "D":Orientation , click the icon of the document in landscape orientation. |
| 11. Click "F":OK to close the dialog box. |
| <Print the banner> |
| Follow the steps below to print the banner using the corresponding banner settings. |
| 1. Choose Print in the application menu. |
| 2. Access the Main pane. |
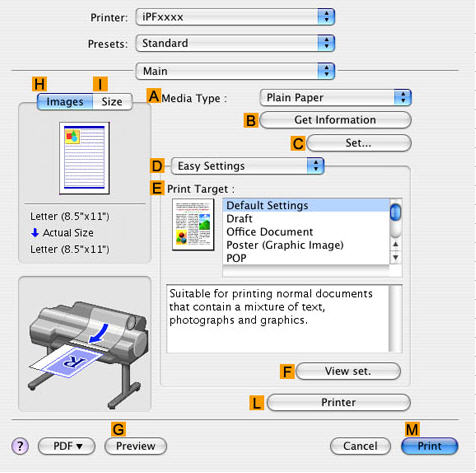 |
| 3. In the "A":Media Type list, select the type of paper that is loaded. In this case, click Plain Paper . |
| 4. After confirming that "D":Easy Settings is selected, click POP in the "E":Print Target list. |
| 5. Access the Page Setup pane. |
 |
| 6. Click Roll Paper in the "A":Media Source list. |
| 7. Make sure the width of the loaded roll is displayed in the "B":Roll Paper Width list—in this case, 16 in. (406.4mm) . |
| 8. In "C":Page Size , make sure "100*500" is displayed, as registered in Page Setup . |
| 9. Select the "D":Enlarged/Reduced Printing check box. |
| 10. Click "F":Fit Roll Paper Width . |
| 11. Confirm the print settings, and click "M":Print to start printing. |
SIMS Doc Id
0