Using the Flash
Use the flash according to the guidelines below. When in the camera AUTO mode if the flash is raised, only the Auto flash can be used, to disable the flash, lower the flash. Flash on is not selectable in AUTO.
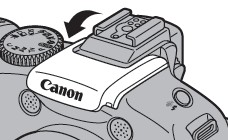
1. Raise the Flash Manually.

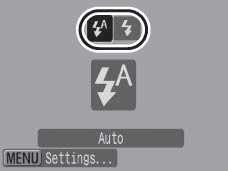
2. Press the  button to enable flash mode selection and to switch between flash modes. The selected flash mode appears on the LCD monitor.
 |
Auto
|
The flash fires automatically as required by the light level. |
|
Flash on
|
The flash fires with every shot. |
3. When you are not using the flash, lower the flash until it closes.

- When the flash recharging begins after shooting, the indicator blinks orange and the LCD monitor turns off. When recharging ends, the indicator turns off and the LCD monitor turns on. The time required for flash recharging will change depending on usage conditions and remaining battery power.
- A flashing red in the LCD monitor indicates insufficient light level. In this case, raise the flash before shooting. However, when shooting with the Tv or Av mode there is no indication.
|
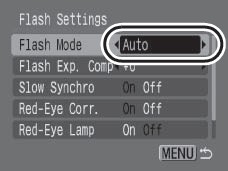
2. For additional setting options press the <Menu> button when choosing flash options or choose [Flash Settings] in the shooting menu as shown below. To access the [Flash Settings] select the option and press <FUNC./SET>

The following screen will display:
Use the  or
or  buttons to select an option.
Use the  or
or  buttons to make the setting.
The table below describes the various flash options:
|
Flash Mode
|
Summary
|
Note
|
|
Flash Mode
|
When set to [Manual], you can control the flash output in the Tv or Av shooting modes. |
|
|
Flash Exp Comp
|
Flash exposure compensation can be adjusted in the range of -2 to +2 stops in 1/3-stop increments. You can combine the flash exposure compensation with the camera's exposure compensation function for balanced exposure of the background when shooting with a flash. |
In the Tv and Av shooting modes, set [Flash Mode] to [Auto] in advance. |
|
Flash Output
|
The flash output can be controlled in three steps, up to FULL, when shooting. |
In Tv and Av shooting modes, please set [Flash Mode] to [Manual] in advance. |
|
Shutter Sync
|
You can switch the timing at which the flash fires. |
|
|
1st-Curtain
|
The flash fires right after the shutter opens, regardless of the shutter speed. Usually, the 1st-curtain is used when shooting. |
|
2nd-Curtain
|
The flash fires right before the shutter closes. Compared with the 1st-curtain, the flash fires later and allows you to shoot images in which, for example, a car's taillights seem to trail off behind. |
|
Slow Syncro
|
The flash timing is adjusted to slow shutter speeds. This reduces the chance that only the background will appear dark when a night scene or an interior shot is taken. |
Using Slow Syncro increases the chances for camera shake. Use a tripod for these situations. |
|
Red-Eye Corr.
|
Automatically searches for and corrects red eyes in the image when the flash fires. |
|
|
Red-Eye Lamp
|
This feature reduces the effect of light reflecting back from the eyes and making them appear red. |
The red-eye reduction lamp lights orange before the flash fires. |
|
Safety FE
|
The camera automatically changes the shutter speed or aperture value when the flash fires to avoid overexposing and blowing out the highlights in the scene. |
In Tv and Av shooting modes, set [Flash Mode] to [Auto] in advance. |
 About Red-Eye Correction About Red-Eye Correction
- When [Red-Eye Corr.] is set to [On], only the corrected image is recorded to the memory card.
- If the area around the eyes is red, for example from using red eye shadow, that area may also be corrected. If this happens, set [Red-Eye Corr.] to [Off].
- Red eyes may not be automatically detected or may not be fully corrected on some images. In either case, you can correct images with [Red-Eye Correction] in the menu.
|
- [Flash Settings] can also be displayed by pressing the
 button, followed by the <MENU> button. button, followed by the <MENU> button.
- You can also set [Flash Exp. Comp] and [Flash Output] in the FUNC. menu.
|
