
EOS 10D : Here are some common Program troubleshooting tips
| Article ID: ART105205 | | | Date published: 05/11/2015 | | | Date last updated: 08/15/2015 |
Description
Solution
The EOS 10D is shown in the operation screens as "EOS XXX".
Driver installation failed.
Have you installed the EOS 10D WIA Driver or EOS 10D TWAIN Driver?
You cannot install the driver correctly unless the EOS 10D WIA Driver or EOS 10D TWAIN Driver is already installed. Insert the SOLUTION DISK into the CD-ROM drive and install the EOS 10D WIA Driver or EOS 10D TWAIN Driver.
Is the cable firmly plugged into its socket?
Ensure that the plug on the interface cable is securely plugged into the USB port on your computer.
I have installed the software but the camera and computer cannot communicate.
Is the driver installed?
The driver is required for the communications between the camera and computer. When you use the SOLUTION DISK software to communicate between the camera and computer, be sure to install the driver shown below appropriate to your operating system.
• Windows XP/Windows Me: WIA Driver
• Windows 2000/Windows 98 SE: TWAIN Driver
Does your computer comply with these requirements?
PC with Windows XP, Windows 2000, Windows Me or Windows 98 SE preinstalled and a USB port as a standard feature.
* USB connections will not function correctly on computer systems other than those listed above.
Are the camera and computer connected correctly?
Connect the camera to your computer correctly using the interface cable.
Is there sufficient charge left in the camera battery?
Your computer does not supply power to the camera. Connect the DC Coupler Kit (optional) to the camera or load a fully charged battery into the camera before connecting it to your computer. ( "Installing and Removing the Battery" in the EOS 10D Instructions.)
Do you have more than one camera connected to your computer?
If you connect more than one camera to the same computer, the driver and camera may not operate normally.
Close the software and disconnect all the interface cables. Then reconnect just the interface cable that connects the camera to your computer.
Is the driver operating normally?
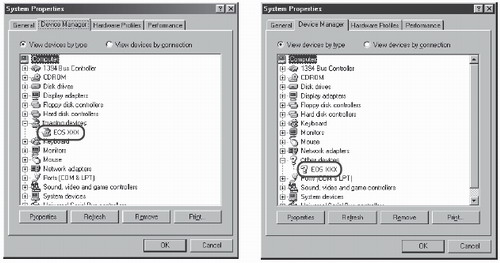
Connect the camera to your computer with the interface cable and set the camera's main switch to <ON> and open the [Device Manager]. Click the plus symbol [+] to the left of [Imaging devices] and check that [EOS 10D] is displayed.
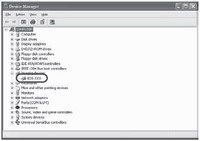
If [EOS 10D] does not appear, the driver is not operating normally. Briefly disconnect and then reconnect the interface cable, ensuring that the connection is secure. If [EOS 10D] still does not appear, use the following procedure to re-install the driver.
1 Disconnect the interface cable and uninstall the driver.
2 Re-install the driver.
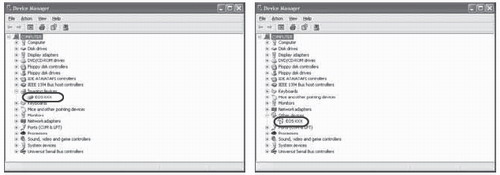
When the [X], [!] or [?] symbol is displayed beside [EOS 10D], part of the driver is missing or corrupted. Use the following procedure to re-install the driver.
1 Delete [EOS 10D] displayed in [Imaging devices].
2 Disconnect the interface cable and uninstall the driver.
3 Re-install the driver.
Is the driver installed correctly?
Connect the camera to your computer with the interface cable and set the camera's main switch to <ON> and open [Device Manager] ( below). Click the plus symbol [+] to the left of [Other devices] or [Unknown devices] and check whether [EOS 10D] or [Canon Digital Camera] is displayed.
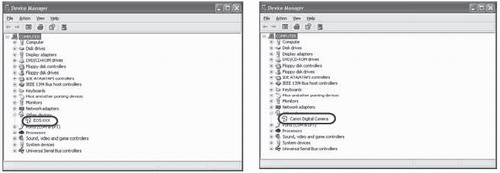
If [EOS 10D] or [Canon Digital Camera] is displayed in [Other devices] or [Unknown devices], the driver was not installed correctly. Use the following procedure to re-install the driver.
1 Delete [EOS 10D] or [Canon Digital Camera] displayed in [Other devices] or [Unknown devices].
2 Disconnect the interface cable and uninstall the driver.
3 Re-install the driver.
To Display the Device Manager
Windows XP
Click the [Start] button and select [Control Panel] > [Performance and Maintenance] > [System]. Then select the [Hardware] tab and click the [Device Manager] button.
Windows 2000
Click the [Start] button and select [Settings] > [Control Panel]. Then double-click the [System] icon to open and select the [Hardware] tab and click the [Device Manager] button.
Windows Me and Windows 98 SE
Click the [Start] button and select [Settings] > [Control Panel]. Then double-click the [System] icon to open and select the [Device Manager] tab.
Uninstallation Procedure
Before beginning the software uninstallation, close all programs you are using and disconnect the interface cable from your computer.
Uninstalling the Software
The following explanation uses the procedures for uninstalling File Viewer Utility as an example for uninstalling other programs as well.
For information on uninstalling the WIA Driver or TWAIN Driver, see "Uninstalling the Driver".
Windows XP Professional or Windows 2000 users should log in using computer Administrator privileges.
To prevent computer malfunctions, always restart your computer after you have uninstalled the software. Re-installing the software without first restarting your computer is particularly likely to result in computer malfunctions.
1 Click the [Start] button and select [All Programs] ([Programs] in other versions of Windows) > [Canon Utilities] > [FileViewerUtility xx] > [FileViewerUtility Uninstall].
File Viewer Utility version information is displayed in xx.
2 Proceed with the uninstallation as directed by the on-screen messages.
- Software is uninstalled.
When uninstallation ends, restart your computer.
Uninstalling the Driver
To uninstall the driver, you must first uninstall the WIA Driver or TWAIN Driver, then remove [EOS 10D] from the [Scanners and Cameras Properties] dialog box or the [Scanners and Cameras] dialog box, and then delete the driver settings files.
Windows XP Professional or Windows 2000 users should log in using computer Administrator privileges.
To prevent computer malfunctions, always restart your computer after you have uninstalled the driver. Re-installing the driver without first restarting your computer is particularly likely to result in computer malfunctions.
The EOS 10D is shown in the operation screens as "EOS XXX".
1 Uninstall [EOS 10D WIA Driver] or [EOS 10D TWAIN Driver].
If you are using Windows XP or Windows Me, click the [Start] button and then select [All Programs] ([Programs] on Windows Me) > [Canon Utilities] > [EOS 10D WIA Driver] > [WIA Driver Uninstall].
If you are using Windows 2000 or Windows 98 SE, click the [Start] button and then select [Programs] > [Canon Utilities] > [EOS 10D TWAIN Driver] > [TWAIN Driver Uninstall].
2 Proceed with the uninstallation as directed by the on-screen messages.
- The driver is uninstalled.
3 Connect the camera to your computer.
If an event dialog box or the [Scanner and Camera Wizard] dialog box appears, click the [Cancel] button to close the dialog box.
4 Click the [Start] button > [Control Panel] > [Printers and other hardware].
In other versions of Windows, click the [Start] button and then select [Settings] > [Control Panel].
5 Click [Scanners and Cameras].
In other versions of Windows, double-click the [Scanners and Cameras] icon.
- If you are using Windows XP or Windows Me, the [Scanners and Cameras] dialog box appears. If you are using Windows 2000 or Windows 98 SE, th6 Delete [EOS 10D].
If you are using Windows XP or Windows Me, select and right-click [EOS 10D] and then select [Delete] from the menu that appears. When the confirmation message appears, click the [Yes] button.
If you are using Windows 2000 or Windows 98 SE, select [EOS 10D] and click the [Remove] button.
Once [EOS 10D] is no longer displayed in the [Scanners and Cameras Properties] dialog box or the [Scanners and Cameras] dialog box, close the dialog box and proceed as follows.
If drivers for other devices such as scanners are already installed, those device names are displayed.
7 Display [Device Manager].
8 Delete [EOS 10D].
For Windows XP and Windows 2000 users:
If [EOS 10D] is displayed when you click the plus symbol [+] to the left of [Imaging devices] or [Other devices], select and right-click [EOS 10D] and select [Uninstall] from the menu that appears.
When the confirmation message appears, click the [OK] button.
Close [Device Manager], and click the [OK] button to close the [System Properties] dialog box.
If [EOS 10D] is displayed in [Imaging devices] and [Other devices], or is displayed more than once in [Other devices], delete all the occurrences.
When [EOS 10D] is not displayed in [Imaging devices] or [Other devices], close the dialog box and proceed as follows.
For Windows Me and Windows 98 SE users:
If [EOS 10D] is displayed when you click the plus symbol [+] to the left of [Imaging devices] or [Other devices], select [EOS 10D] and click the [Remove] button.
When the confirmation message appears, click the [OK] button.
Click the [OK] button to close the [System Properties] dialog box.
If [EOS 10D] is displayed in [Imaging devices] and [Other devices], or is displayed more than once in [Other devices], delete all the occurrences.
When [EOS 10D] is not displayed in [Imaging devices] or [Other devices], close the dialog box and proceed as follows.
9 Delete the driver settings files.
The method for deleting the settings files differs depending on your operating system software. Refer to the information on that follows for deleting the settings files.
Deleting the Driver Settings Files
Mistakenly deleting the wrong files can cause Windows to malfunction. Check the file names carefully before deleting any files.
For Windows XP users:
1 Click the [Start] button and select [Control Panel] s [Appearance and Themes] > the [Folder Options] icon.
- The [Folder Options] dialog box appears.
2 Select the [View] tab.
- The [View] tab sheet appears.
3 Select the [Show hidden files and folders] radio button in [Hidden files and folders] and then deselect the [Hide extensions for known file types] checkbox.
If these settings are already selected, simply proceed to the next step.

4 Click the [OK] button to close the [Folder Options] dialog box.
- Previously hidden folders and files now become visible.
5 Click the [Start] button and then [My Computer].
6 Double-click [C:] drive s the [WINDOWS] folder > the [inf] folder to open.
7 Search for files called [Oem*.inf] or [Oem*.pnf].
Substitute a number such as 0 or 1 for the asterisk (*). Also, because [Oem*.inf] and [Oem*.pnf] files come in pairs, substitute the same number for the asterisk in each pair (e.g. Oem0.inf and Oem0.pnf).
The [Inf] folder may contain multiple pairs of [Oem*] files.
8 Check the contents of the [Oem*.inf] files.
Double-click an [Oem*.inf] file to display the file contents. Check that [; **** Canon Camera Driver Setup File ****] appears on the first line.
If there are multiple [Oem*.inf] files, repeat this procedure.
Once you have identified the target file or files, make a note of the file names.
9 Delete the [Oem*.inf] and [Oem*.pnf] files you identified.
The [Inf] folder contains a large number of files. Deleting the wrong files could, at worst, prevent Windows from starting up. When you delete files, check the file names very carefully before proceeding.
For Windows 2000 users:
1 Click the [Start] button and select [Settings] > [Control Panel].
2 Double-click the [Folder Options] icon.
- The [Folder Options] dialog box appears.
3 Select the [View] tab.
- The [View] tab sheet appears.
4 Select the [Show hidden files and folders] radio button in [Hidden files and folders] and then deselect the [Hide file extensions for known file types] checkbox.
If these settings are already selected, simply proceed to the next step.
5 Click the [OK] button to close the [Folder Options] dialog box.
- Previously hidden folders and files now become visible.
6 In [My Computer] on the desktop, open [C:] > the [WINNT] folder > the [inf] folder.
7 Search for files called [Oem*.inf] or [Oem*.pnf].
Substitute a number such as 0 or 1 for the asterisk (*). Also, because [Oem*.inf] and [Oem*.pnf] files come in pairs, substitute the same number for the asterisk in each pair (e.g. Oem0.inf and Oem0.pnf).
The [Inf] folder may contain multiple pairs of [Oem*] files.
8 Check the contents of the [Oem*.inf] files.
Double-click an [Oem*.inf] file to display the file contents. Check that [; **** Canon Camera Driver Setup File ****] appears on the first line.
If there are multiple [Oem*.inf] files, repeat this procedure.
Once you have identified the target file or files, make a note of the file names.
9 Delete the [Oem*.inf] and [Oem*.pnf] files you identified.
The [Inf] folder contains a large number of files. Deleting the wrong files could, at worst, prevent Windows from starting up. When you delete files, check the file names very carefully before proceeding.
For Windows Me and Windows 98 SE users:
1 Click the [Start] button and select [Settings] s [Control Panel].
Then double-click the [Folder Options] icon.
Windows 98 SE users should click the [Start] button and select [Settings] s [Folder Options].
- The [Folder Options] dialog box appears.
2 Select the [View] tab.
- The [View] tab sheet appears.
3 Select the [Show hidden files and folders] radio button in [Hidden files and folders] and then deselect the [Hide file extensions for known file types] checkbox.
Windows 98 SE users should select the [Show all files] radio button in [Hidden files] and then deselect the [Hide file extensions for known file types] checkbox.
If these settings are already selected, simply proceed to the next step.
4 Click the [OK] button to close the [Folder Options] dialog box.
- Previously hidden folders and files now become visible.
5 In [My Computer] on the desktop, double-click [C:] > the [Windows] folder s the [INF] folder (the [inf] folder on Windows 98) to open.
6 Delete [DRVDATA.BIN] and [DRVIDX.BIN].
7 Double-click the [Other] folder in the [INF] folder to open.
8 Delete the [Canon.IncCAP_10D.inf] file if it exists.
The [Canon.IncCAP_10D.inf] file may not exist depending on your computer system.
"10D" is displayed in place of the "XXX".
The [INF] folder contains a large number of files. Deleting the wrong files could, at worst, prevent Windows from starting up. When you delete files, check the file names very carefully before proceeding.