
Connect the PIXMA MP980 Printer to a Wireless LAN
| Article ID: ART105338 | | | Date published: 05/11/2015 | | | Date last updated: 06/01/2021 |
Description
Solution
Before you begin
 The procedures below are for Wireless LAN setups not using the WPS® (Wi-Fi Protected Setup) or WCN® (Windows Connect Now) setup method.
Prepare the printer for connection
- Use the Easy-Scroll Wheel (A) or the
 or
or button to select Settings, then press the OK button.
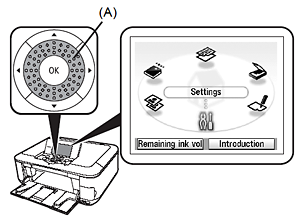
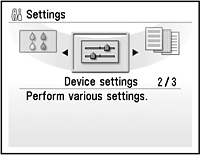
- Select Device settings, then press the OK button.
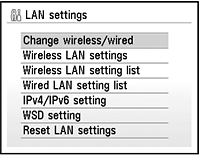
- Select LAN settings, then press the OK button.

- Select Change wireless / wired, then press the OK button.
- Select Wireless LAN active, then press the OK button.
Select here to go to Macintosh setup
Windows setup
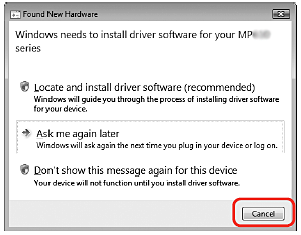
If the Found New Hardware or Found New Hardware Wizard screen appears:-
Remove the USB cable connected to your computer. The screen may close. If it does, go to Step 1.
-
Select Cancel to quit the screen.
-
Go to Step 1.
- Press the Power button (A) to turn off the printer.
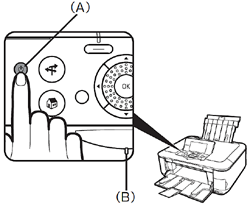
The printer will make some noise for about 30 seconds until the printer turns off. Make sure that the Power lamp (B) stops flashing.
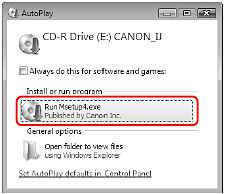
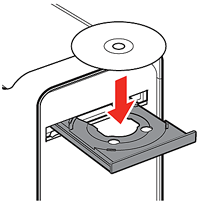
- Turn on the computer, then insert the Setup CD-ROM into the CD-ROM drive.
The setup program should run automatically.
- If you have Windows Vista, go to step 3.
- If you have Windows XP or Windows 2000, go to step 5.
 If the program doesn't start automatically, double-select the CD-ROM icon on the computer.
- When the AutoPlay screen appears, select Run Msetup4.exe.
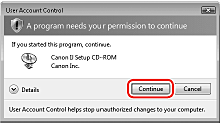
- The User Account Control screen appears. Select Continue. If the same screen reappears in subsequent steps, select Continue.
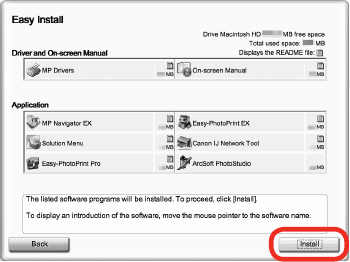
- Select Easy Install. The drivers, application software, and on-screen manuals are installed automatically.
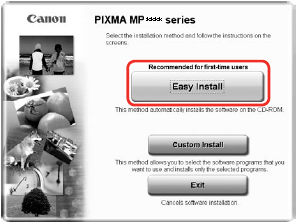
If you want to select particular items to install, select Custom Install and follow the on-screen instructions to proceed with the installation.
- Select Install. Move the cursor over each item to display their description.

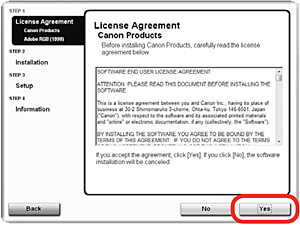
- Read the License Agreement screen carefully and select Yes.
The installation will start. Follow any on-screen instructions to install the software.
Setup the printer and the computer
- On the Setup Method screen, select Connect printer to the network for the first time, then select Next.

When a confirmation screen for the printer's LAN setting appears, select OK.
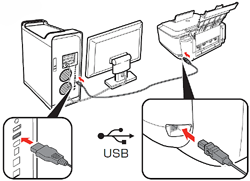
- When the Printer Connection screen appears, connect the printer to the computer with a USB cable, then turn on the printer.
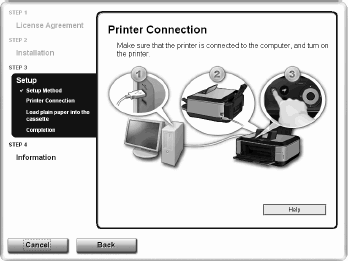
Don't remove the USB cable until the network connection is complete.
-
When the printer is recognized by the computer, a message appears on the screen.
-
If you cannot go to the next procedure after 10 minutes, select Help and confirm the message.
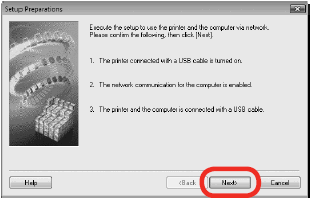
- When the Setup Preparations dialog box appears, confirm that the preparation is complete, then select Next.
- Detect Access Point
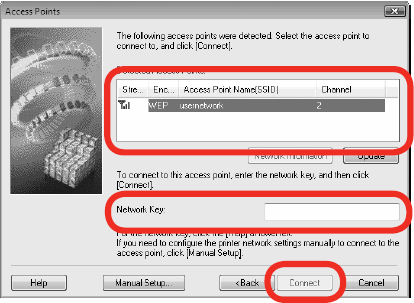
-
If your access point is detected automatically, the Access Points screen doesn't appear. Go to step 5.
-
if you see WEP or WPA displayed in the Encryption column, enter the network key (WEP key or WPA key) in Network Key, then select Connect.
- Detect the printer.
When the Set Printer IP Address screen appears, select Connect.
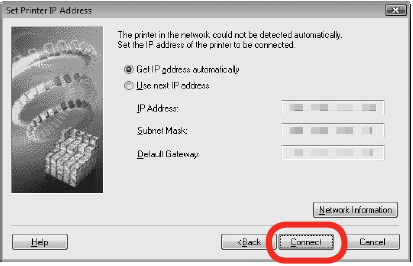
If the printer is detected automatically, the Set Printer IP Address screen doesn't appear. Go to the following procedure
-
If you have Windows Vista, go to step 7.
-
If you have Windows XP/2000, go to step 6.
-
Windows XP/2000
When the Network Setup of the Card Slot dialog box appears, specify the drive letter, then select Next.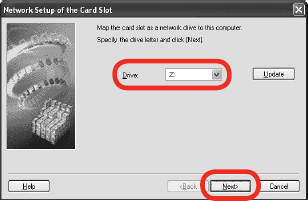
- When the Setup Completion dialog box appears, remove the USB cable, then select Next.
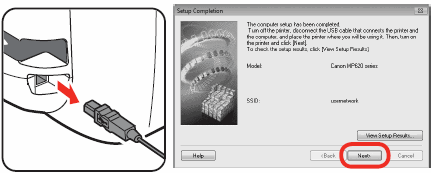
- Turn off the printer, place the printer in the location where you will use it, then turn the printer on.
- On the Connection Performance Measurement screen, select Next
- Measuring of the communication status starts, and the results are displayed.
- Measuring takes a few minutes. You can cancel measuring by selecting Cancel. You also examine the detailed status of the communication link after setup by using the Canon IJ Network Tool.
- Confirm the measurement results, then select Finish.

- Ensure that
 is displayed in Connection performance between the printer and the access poin
-
If any symbol other than
is displayed, refer to displayed comments and Help for improving the status of communication link. -
To check whether the new location is better, select Remeasurement. Measurement of the communication status is performed again
-
When any message on Overall network performance appears in the measurement results, rearrange the printer and other network devices following the instructions on the screen.
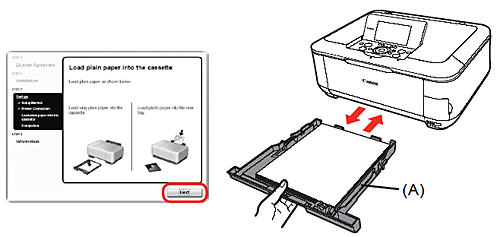
- When the Load plain paper into the cassette screen appears, load plain paper in the Cassette (A) and select Next.
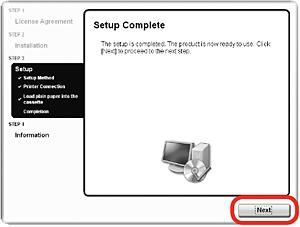
- Select Next. It may take a while for the next screen to appear.
- Select Next.If connected to the Internet, the user registration page appears. Follow the on-screen instructions to register your product.

You will need your product serial number, which is located on the inside of the printer.
-
Internet connection is required. Connection fees apply.
-
To register later, select Cancel. User Registration can be started from the Solution Menu icon.
- When the Extended Survey Program screen appears. Read the message, ans if you agree to the terms select Agree. If you select Do not agree, the Extended Survey Program will not be installed. You can still use the printer.

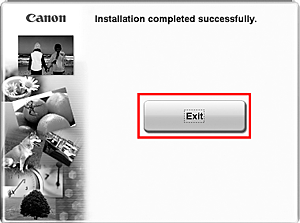
- Select Exit. If Restart is displayed, make sure that the Restart the system now (recommended) check box is selected, then select Restart.After restarting the computer, remove the Setup CD-ROM and keep it in a safe place.
Macintosh setup
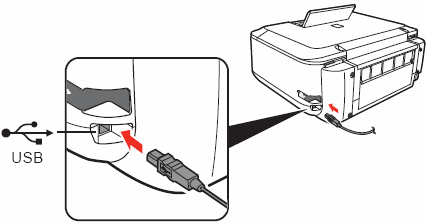
- Connect one end of the USB cable to the computer and the other to the printer, and turn the printer on.
-
The USB port is located on the right side at the back of the printer.
-
If you're using WPS® (Wi-Fi Protected Setup) or connecting an additional computer, make sure that the printer is turned on, then go to step 2. It is not necessary to connect the printer to the computer with a USB cable.
-
The USB port is located on the right side at the back of the printer.When using WPS (Wi-Fi Protected Setup) or connecting an additional computer, make sure that the printer is turned on, then go to step 2. It is not necessary to connect the printer to the computer with a USB cable.
- Turn on the computer, then insert the Setup CD-ROM into the CD-ROM drive.
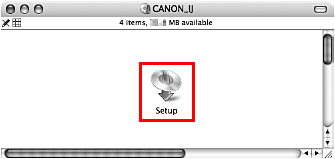
- Double-click the Setup icon.If the CD-ROM folder doesn't open automatically, double-click the CANON_IJ icon on the desktop.
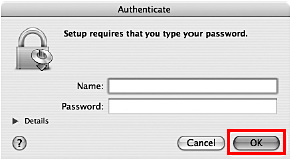
- Enter your administrator name and password. select OK.If you do not know your administrator name or password, select Help, then follow the on-screen instructions.
- select Easy Install.The drivers, application software, and on-screen manuals are installed automatically.
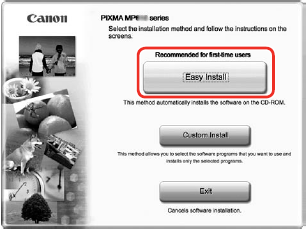
- Select Install. Move the cursor over each item to display its description.
- Read the License Agreement screen carefully and select Yes. The installation will start.
Follow any on-screen instructions to install the software.
- When the Load plain paper into the cassette screen appears, load plain paper in the Cassette (A) and select Next.
- Select Next.
- Select Next.If connected to the Internet, the user registration page appears.Follow the on-screen instructions to register your product.
You will need your product serial number, which is located on the inside of the printer.
-
Internet connection is required. (Connection fees apply.)
-
To register later, select Cancel. User Registration can be started from the Solution Menu icon.
- select Restart.When the computer restarts, Canon IJ Network Tool starts automatically.select Restart to restart the computer.
After restarting the computer, remove the Setup CD-ROM and keep it in a safe place.
First-time Setup for Use over Wireless LAN
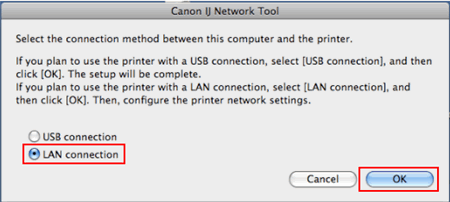
- Select LAN Connection and select OK.
- If the Setup Preparations dialog box appears, confirm that preparation is complete and select OK.
- The Canon IJ Network Tool will start and the following screen will appear.
Select Setup in the pop-up menu, select MP980 series in Printers, then select OK.

- When the Access Points screen appears, select an access point to use, then select Connect.

When an access point is detected automatically, the Access Points screen doesn't appear. Go to step 5.
If you see WEP or WPA displayed in the Encryption column, enter the network key (WEP key or WPA key) in Network Password, then select Connect.
- When the Set Printer IP Address screen appears, confirm the contents, then select Connect.

If the printer is detected automatically, the Set Printer IP Address screen doesn't appear. Go to step 6
- When the Setup Completion dialog box appears, remove the USB cable, then select Next.
- Press the on button to turn off the printer, then place the printer in the location where you will use it, and turn it on.

- On the Connection Performance Measurement dialog box, select Next.

- Measuring takes a few minutes. Measuring can be cancelled by selecting Cancel
- You also examine the detailed status of the communication link after setup by using the Canon IJ Network Tool.
- Confirm the measurement results, then select Finish.

-
Ensure that
is displayed in Connection performance between the printer and the access poin
-
If any symbol other than
is displayed, refer to displayed comments and Help for improving the status of communication link. -
To check whether the new location is better, select Remeasurement. Measurement of the communication status is performed again
-
When any message on Overall network performance appears in the measurement results, rearrange the printer and other network devices following the instructions on the screen.
Add the printer
For Mac OS X v.10.5.x, begin at step 2.
- For Mac OS X v.10.4.x/v.10.3.9

-
For Mac OS X v.10.4.x Go to Step 2.
-
For Mac OS X v.10.3.9 Go to Step 3.
- For Mac OS X v.10.5.x/v.10.4.x
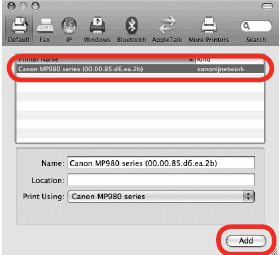
Wait for a while, then select Canon MP980 series and select Add.
In Mac OS X v.10.4.x, select More Printers in the Printer Browser screen.
-
If you have Mac OS X v.10.5.x go to Step 5
-
If you have Mac OS X v.10.4.x go to Step 3.
-
The printer is turned on.
-
The firewall function of any security software is turned off.
-
Wired LAN Connection: The printer is connected to the network device with the LAN cable.
-
Wireless LAN Connection: The computer is connected to the access point.
-
The printer is not set to use access control (MAC address filtering).
- For Mac OS X v.10.4.x/v.10.3.9

Select Canon IJ Network in the pop-up menu, select your printer's name in the list of printers, then select Add .The alphanumeric string after Canon MP980 series is the printer's MAC address.
If the printer has not been detected, make sure of the following.
-
The printer is turned on.
-
The firewall function of any security software is turned off.
-
Wired LAN Connection: The printer is connected to the network device with the LAN cable.
-
Wireless LAN Connection: The computer is connected to the access point.
-
The printer is not set to use access control (MAC address filtering).
- For Mac OS X v.10.4.x/v.10.3.9

Confirm that your MP980 series is added to the list of printers.
- On the Canon IJ Network Scanner Selector screen, select Canon MP980 series Network in TWAIN Data Source Name and the MAC address of the printer in Network Device List, then select Apply to use the printer as a scanner.

With Mac OS X v.10.5.x, the Card Slot is not available when using the printer over a network.
- Confirm that a check mark is displayed, then select Exit to close the dialog box.

The installation is complete.