
Perform a Print Head Alignment - MX870
| Article ID: ART106055 | | | Date published: 05/11/2015 | | | Date last updated: 11/04/2015 |
Description
Solution
Aligning the Print Head
If printed ruled lines are misaligned or print results are otherwise unsatisfactory, adjust the print head position.
-
If the remaining ink level is low, the print head alignment sheet will not be printed correctly. Replace the ink tank whose ink is low.
-
The print head alignment pattern is printed in black and blue only.
-
Make sure that the machine is turned on.
-
Load a sheet of A4 or Letter-sized plain paper in the Cassette.
-
Open the Paper Output Tray gently, and open the Output Tray Extension.
-
Print the print head alignment sheet.
-
Press the Setup button.
-
Select
 Maintenance, then press the OK button.
 -
Use the

 button to select Auto head alignment, then press the OK button.
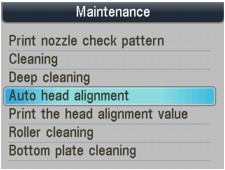
The confirmation screen will be displayed.
-
Confirm the message, use the
button to select Yes, then press the OK button.The print head alignment sheet will be printed.

 Important
- Do not touch any printed part on the print head alignment sheet.
- Be careful not to get the print head alignment sheet dirty. If the sheet is stained or wrinkled, it may not be scanned properly.
- Do not touch any printed part on the print head alignment sheet.
- When Did the patterns print correctly? is displayed, confirm that the pattern is printed correctly, use the button to select Yes, then press the OK button.
-
-
Scan the print head alignment sheet to adjust the print head position.
-
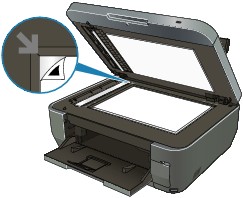
Confirm the message, and load the print head alignment sheet on the Platen Glass.
Load the print head alignment sheet WITH THE PRINTED SIDE FACING DOWN and align the mark
 on the upper left corner of the sheet with the alignment mark (
 ).
).
 Note
Note- The print head alignment sheet cannot be scanned if it is loaded in the ADF.
- The print head alignment sheet cannot be scanned if it is loaded in the ADF.
-
Close the Document Cover gently, then press the OK button.
The machine starts scanning the print head alignment sheet, and the print head position will be adjusted automatically.
Important- Do not open the Document Cover or remove the print head alignment sheet on the Platen Glass until adjusting the print head position is completed.
-
If adjusting the auto print head position has failed, Failed to scan head alignment sheet. is displayed on the LCD.
- Do not open the Document Cover or remove the print head alignment sheet on the Platen Glass until adjusting the print head position is completed.
-
When the completion message is displayed, press the OK button.
The screen will return to the Maintenance screen.
When adjusting the print head position is completed, remove the print head alignment sheet on the Platen Glass.
Note- Press the corresponding mode button to use other functions.
- If the print results are still not satisfactory after adjusting the print head position as described above, adjust the print head position manually from the computer.
-
To print and check the current head position adjustment values, select Print the head alignment value on the Maintenance screen.
- Press the corresponding mode button to use other functions.
-
Confirm the message, and load the print head alignment sheet on the Platen Glass.
Aligning the Print Head Position
Print head alignment corrects the installation positions of the print head and improves deviated colors and lines.
This machine supports two head alignment methods: automatic head alignment and manual head alignment.
The procedure for performing manual print head alignment is as follows:
 Print Head Alignment
Windows:
-
Open the printer driver setup window
-
Click Custom Settings on the Maintenance tab
The Custom Settings dialog box opens.
-
Switch head alignment to manual
Check the Align heads manually check box.
-
Transmit the settings
Click Send, and click OK when the confirmation message appears.
-
Click Print Head Alignment on the Maintenance tab
The Start Print Head Alignment dialog box opens.
-
Load paper in the machine
Load three sheets of A4 size or Letter size plain paper into the cassette.
-
Execute head alignment
Make sure that the machine is on and click Align Print Head.
Follow the instruction in the message. -
Check the printed pattern
Enter the numbers of the patterns with the least amount of streaks in the associated boxes.
Clicking the patterns with the least amount of streaks in the preview window, will automatically set their numbers in the associated boxes.
When you have entered all the necessary values, click OK.
 Note
Note
-
If it is difficult to pick the best pattern, pick the setting that produces the least noticeable vertical white streaks.
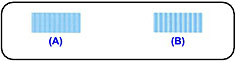
(A) Less noticeable vertical white streaks
(B) More noticeable vertical white streaks
-
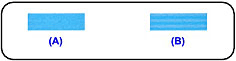
If it is difficult to pick the best pattern, pick the setting that produces the least noticeable horizontal white streaks.
(A) Less noticeable horizontal white streaks
(B) More noticeable horizontal white streaks
-
If it is difficult to pick the best pattern, pick the setting that produces the least noticeable vertical white streaks.
-
Confirm the displayed message and click OK
The second pattern is printed.
 Important
- Do not open the Scanning Unit (Cover) while printing is in progress.
- Do not open the Scanning Unit (Cover) while printing is in progress.
-
Check the printed pattern
Enter the numbers of the patterns with the least amount of streaks in the associated boxes.
Clicking the patterns with the least amount of streaks in the preview window, will automatically set their numbers in the associated boxes.
When you have entered all the necessary values, click OK.
Note
-
If it is difficult to pick the best pattern, pick the setting that produces the least noticeable vertical white streaks.
(A) Less noticeable vertical white streaks
(B) More noticeable vertical white streaks
-
If it is difficult to pick the best pattern, pick the setting that produces the least noticeable vertical white streaks.
-
Confirm the displayed message and click OK
The third pattern is printed.
Important
- Do not open the Scanning Unit (Cover) while printing is in progress.
- Do not open the Scanning Unit (Cover) while printing is in progress.
-
Check the printed pattern
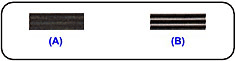
Enter the numbers of the patterns with the least noticeable horizontal stripes in the associated boxes.
Clicking the patterns with the least noticeable horizontal stripes in the preview window, will automatically set their numbers in the associated boxes.
When you have entered all the necessary values, click OK.
Note
-
If it is difficult to pick the best pattern, pick the setting that produces the least noticeable horizontal white stripes.
(A) Less noticeable horizontal white stripes
(B) More noticeable horizontal white stripes
-
If it is difficult to pick the best pattern, pick the setting that produces the least noticeable horizontal white stripes.
-
To print and check the current setting, open the Start Print Head Alignment dialog box, and click Print Alignment Value.
Print Head Alignment
- Select Custom Settings from the pop-up menu on the Canon IJ Printer Utility
-
Switch head alignment to manual
Check the Align heads manually check box.
-
Transmit the settings
Click Send, and click OK when the confirmation message appears.
- Select Test Print from the pop-up menu on the Canon IJ Printer Utility
-
Click the Print Head Alignment icon
A message is displayed.
Return to Step 6 of the Alignment instructions