Install the Ink Cartridge Securely
If the Ink Cartridge Locking Cover is not closed securely, ink may not be ejected correctly.
Open the Front Cover, open the Ink Cartridge Locking Cover, then close the Ink Cartridge Locking Cover.
When you close the Ink Cartridge Locking Cover, push the Ink Cartridge Locking Cover until it clicks into place.
When you need to replace FINE Cartridges, follow the procedure below.
important:
Handling FINE Cartridges
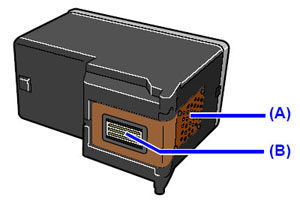
- Do not touch the electrical contacts (A) or print head nozzles (B) on the FINE Cartridge. The printer may not print properly if you touch it.
- If you remove a FINE Cartridge, replace it immediately. Do not leave the printer with FINE Cartridges removed.
- Use new FINE Cartridges for replacement. Installing used FINE Cartridges may cause the nozzles to clog. Furthermore, with such cartridges, the printer will not be able to inform you when to replace the cartridges properly.
- Once a FINE Cartridge has been installed, do not remove it from the printer and leave it out in the open. This will cause the FINE Cartridge to dry out, and the printer may not operate properly when it is reinstalled. To maintain optimal printing quality, use a FINE Cartridge within six months of first use.
note:
- If a FINE Cartridge runs out of ink, you can print with either Color or Black FINE Cartridge, in whichever ink remains, only for a while. However the print quality may be reduced compared to when printing with cartridges. We recommend to use new FINE Cartridges in order to obtain optimum qualities. Even when printing with one ink only, print with leaving the empty FINE Cartridge installed. If either of the Color FINE Cartridge or Black FINE Cartridge is not installed, an error occurs and the printer cannot print.
- Color ink may be consumed even when printing a black-and-white document or when black-and-white printing is specified. color ink and black ink are also consumed in the standard cleaning and deep cleaning of the Print Head, which may be necessary to maintain the printer's performance. When ink runs out, replace the FINE Cartridge immediately with a new one.
1. Make sure that the power is turned on.
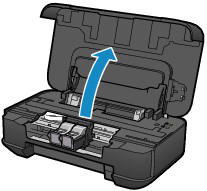
2. Open the Front Cover.
The FINE Cartridge Holder moves to the replacement position.
attention:
Do not hold the FINE Cartridge Holder to stop or move it forcibly. Do not touch the FINE Cartridge Holder until it stops completely.
important:
- The inside of the printer may be stained with ink. Be careful not to stain your hands or clothing when replacing FINE Cartridges. You can easily wipe off the ink from the inside of the printer with tissue paper or the like.
- Do not place any object on the Front Cover. It will fall into the Rear Tray when the Front Cover is opened and cause the printer to malfunction.
- Do not touch the metallic parts or other parts inside the printer.
- If the Front Cover is left open for more than 10 minutes, the FINE Cartridge Holder moves to the right. In this case, close and reopen the Front Cover.
3. Remove the empty FINE Cartridge.
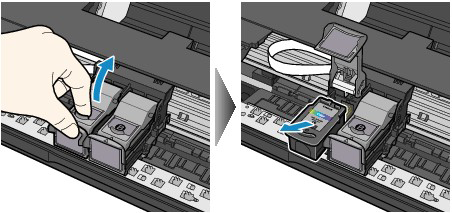
(1) Pinch the tabs and open the Ink Cartridge Locking Cover.
(2) Remove the FINE Cartridge.
note:
- Handle FINE Cartridges carefully to avoid staining of clothing or the surrounding area.
- Discard empty FINE Cartridges according to the local laws and regulations regarding disposal of consumables.
4. Prepare the new FINE Cartridge.
(1) Take a new FINE Cartridge out of its package and remove the orange protective tape (C) gently.

important:
- If you shake a FINE Cartridge, ink may spill out and stain your hands and the surrounding area. Handle a FINE Cartridge carefully.
- Be careful not to stain your hands and the surrounding area with ink on the removed protective tape.
- Do not reattach the protective tape once you have removed it. Discard it according to the local laws and regulations regarding disposal of consumables.
- Do not touch the electrical contacts or print head nozzles on a FINE Cartridge. The printer may not print properly if you touch it.
5. Install the FINE Cartridge.
(1) Put a new FINE Cartridge in the FINE Cartridge Holder.
The Color FINE Cartridge should be installed into the left slot and the Black FINE Cartridge should be installed into the right slot.
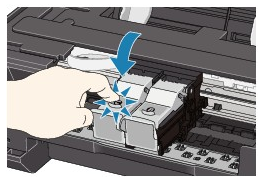
(2) Close the Ink Cartridge Locking Cover to lock the FINE Cartridge into place.
Push down the Ink Cartridge Locking Cover until it clicks.
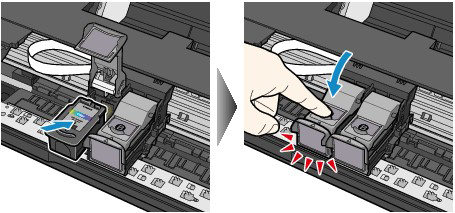
(3) Confirm that the Ink Cartridge Locking Cover is closed correctly.
note:
If the Ink Cartridge Locking Cover is not closed correctly, push down the Ink Cartridge Locking Cover until it clicks.
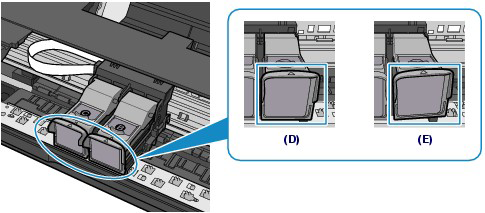
(D) Closed correctly
(E) Not closed correctly (the cover is tilted)
important:
The printer cannot print unless the Color and Black FINE Cartridges are installed. Be sure to install the FINE Cartridges.
6. Close the Front Cover.
note:
- When you start printing after replacing the FINE Cartridge, the printer starts cleaning the Print Head automatically. Do not perform any other operations until the printer completes the cleaning of the Print Head. While cleaning is in progress, the POWER lamp is flashing green.
- If printed ruled lines are misaligned or the print head position is misaligned, adjust the print head position.
