Aligning the Print Head Position
Print head alignment corrects the installation positions of the print head and improves deviated colors and lines.
This machine supports two head alignment methods: automatic head alignment and manual head alignment.
To perform automatic head alignment, refer to "Aligning the Print Head" in the manual: Basic Guide and then execute the function from the operation panel of the machine.
The procedure for performing manual print head alignment is as follows:
 Print Head Alignment
- Open System Preferences, and select Print & Fax.
-
Start the Canon IJ Printer Utility.
- If you are using Mac OS X v.10.6.x, select your model from the Printers list, and click Options & Supplies.
- Click Open Printer Utility in Utility tab.
- If you are using Mac OS X v.10.5.x or Mac OS X v.10.4.11, select your model from the Printers list, and click Open Print Queue (Print Queue).
- Click Utility when a list of print jobs is displayed.
- Canon IJ Printer Utility is launched.
- Select Custom Settings from the pop-up menu on the Canon IJ Printer Utility.
- Check the Align heads manually check box.
- Click Send, and click OK when the confirmation message appears.
- Click Print Head Alignment icon.
-
Load three sheets of A4 size or Letter size plain paper into the rear tray (3).

-
Execute head alignment
Make sure that the machine is on and click Align Print Head.
Follow the instruction in the message.
-
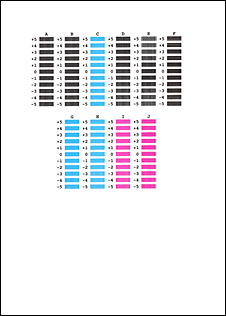
Check the printed pattern
Enter the numbers of the patterns with the least amount of streaks in the associated boxes, and click Send.
Note:
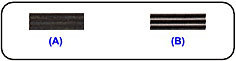
- If it is difficult to pick the best pattern, pick the setting that produces the least noticeable vertical white streaks.
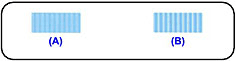
(A) Less noticeable vertical white streaks
(B) More noticeable vertical white streaks
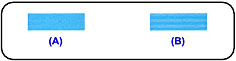
- If it is difficult to pick the best pattern, pick the setting that produces the least noticeable horizontal white streaks.
(A) Less noticeable horizontal white streaks
(B) More noticeable horizontal white streaks
- Confirm the displayed message and click OK.
The second pattern is printed.
Important: Do not open the Scanning Unit (Cover) while printing is in progress.
-
Check the printed pattern
Enter the numbers of the patterns with the least amount of streaks in the associated boxes, and click Send.

Note:
- If it is difficult to pick the best pattern, pick the setting that produces the least noticeable vertical white streaks.
(A) Less noticeable vertical white streaks
(B) More noticeable vertical white streaks
- Confirm the displayed message and click OK.
The third pattern is printed.
Important: Do not open the Scanning Unit (Cover) while printing is in progress.
-
Check the printed pattern
Enter the numbers of the patterns with the least noticeable horizontal stripes in the associated boxes, and click Send.

Note:
- If it is difficult to pick the best pattern, pick the setting that produces the least noticeable horizontal white stripes.
(A) Less noticeable horizontal white stripes
(B) More noticeable horizontal white stripes
Note: To print and check the current setting, open the Start Print Head Alignment dialog box, and click Print Alignment Value.
