
Setting the Machine to Send/Receive E-Mail/I-Fax (MF9200 series)
| Article ID: ART107965 | | | Date published: 05/11/2015 | | | Date last updated: 08/15/2015 |
Description
Solution
Setting the Machine to Send/Receive Email/I-fax
For the settings before sending/receiving e-mail/I-fax (related information), setting the IP address (related information), confirming necessary information for sending/receiving e-mail and I-fax (related information), and setting the machine for sending/receiving e-mail and I-fax are required.
This section describes the machine settings for sending/receiving e-mail and I-fax after setting the IP address and confirming necessary information for sending/receiving e-mail and I-fax.
For some network providers, settings for the SMTP authentication or POP before SMTP authentication may be required. Make the settings as required.
The default settings are as follows:
- <SMTP Receive>: <Off>
- <POP>: <On>
- <POP Interval>: <0>
- <POP Auth. Before Send>: <Off>
- <SMTP Authentication>: <Off>
Setting the Machine to Send E-Mails/I-Faxes
To set up the machine to send e-mails/I-faxes, follow the procedure below.
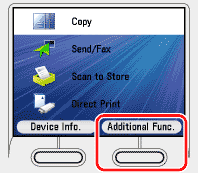
1. Press  (Main Menu).
2. Press the right Any key to select <Additional Func.>.
3. Use [  ] , [
] , [  ] or
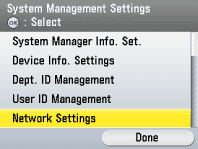
] or  (Scroll Wheel) to select <System Management Set.>, then press [OK].
If the screen appears prompting you to enter the System Manager ID and System Password, enter the System Manager ID and System Password using  -
-  (numeric keys), then press
  (Log In/Out).

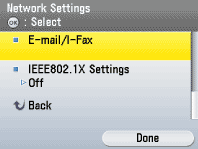
4. Use [ ] , [ ] or (Scroll Wheel) to select <Network Settings>, then press [OK].
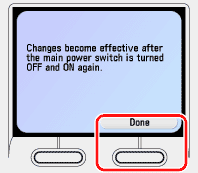
5. Confirm the message shown on the display, then press the right Any key to select <Done>.
6. Use [ ] , [ ] or (Scroll Wheel) to select <E-mail/I-Fax>, then press [OK].

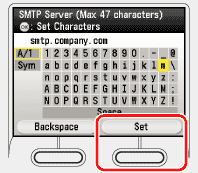
7. Use [ ] , [ ] or (Scroll Wheel) to select <SMTP Server>, then press [OK].
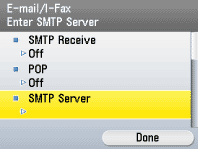
8. Use the software keyboard to enter the SMTP server address, then press the right Any key to select <Set>.
- Enter the SMTP server name if the SMTP server address already registered in the DNS server.
- Enter the IP address of the SMTP server if the SMTP server address is not registered in the DNS server.
9. Use [ ] , [ ] or (Scroll Wheel) to select <E-mail Address>, then press [OK].
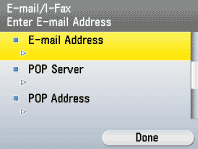
10. Use the software keyboard to enter the e-mail address for this machine, then press the right Any key to select <Set>.
-
If your provider uses SMTP authentication or POP before SMTP authentication, proceed to the next step.
-
If your provider do not use any authentication program, proceed to step 21.

11. Use [ ] , [ ] or (Scroll Wheel) to select <Authentication/Encryption>, then press [OK].
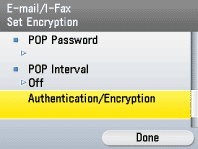
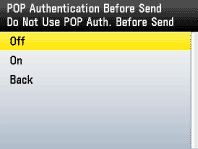
12. Use [ ] , [ ] or (Scroll Wheel) to select <POP Auth. Before Send>, then press [OK].
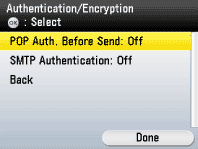
13. Use [ ] , [ ] or (Scroll Wheel) to select <Off> or <On>, then press [OK].
-
<Off>: Does not use an SMTP server that requires POP before SMTP.
-
<On>: Uses an SMTP server that requires POP before SMTP (method for authenticating users who have logged in the POP server before sending e-mails and I-faxes).
note:
If you select <On>, you also need to specify the POP server settings in "Setting the Machine to Receive E-Mails/I-Faxes."
14. Use [ ] , [ ] or (Scroll Wheel) to select <SMTP Authentication>, then press [OK].
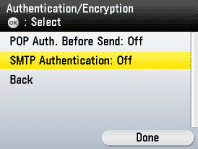
15. Use [ ] , [ ] or (Scroll Wheel) to select <Off> or <On>, then press [OK].
- <Off>: Does not use an SMTP server that requires SMTP Authentication. If you select <Off>, proceed to step 21.
- <On>: Uses an SMTP server that requires SMTP Authentication (method for authenticating users who have logged in the SMTP server before sending e-mails and I-faxes). If you select <On>, proceed to the next step.

16. Use [ ] , [ ] or (Scroll Wheel) to select <User Name>, then press [OK].
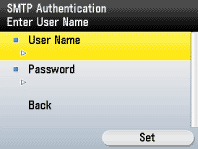
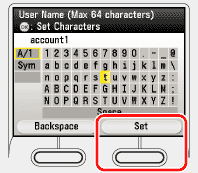
17. Use the software keyboard to enter the SMTP user name for the authentication method, then press the right Any key to select <Set>.
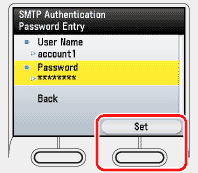
18. Use [ ] , [ ] or (Scroll Wheel) to select <Password>, then press [OK].

19. Use the software keyboard to enter the SMTP password for the authentication method, then press the right Any key to select <Set>.

20. Press the right Any key to select <Set>.
21. Press (Main Menu) to return to the Main Menu screen.
22. Restart the machine.
Turn OFF the machine and wait at least 10 seconds before turning it ON again.
Setting the Machine to Receive E-Mails/I-Faxes
To set up the machine to receive e-mails/I-faxes, follow the procedure below.
note:
The accepted message format and file types are as follows:
- Message format: Plain text
-
File types: TIFF-F (MH, MR, MMR compression), JPEG, Exif JPEG (Exif 2.2)
1. Press (Main Menu).
2. Press the right Any key to select <Additional Func.>.
3. Use [ ] , [ ] or (Scroll Wheel) to select <System Management Set.>, then press [OK].
If the screen appears prompting you to enter the System Manager ID and System Password, enter the System Manager ID and System Password using - (numeric keys), then press (Log In/Out).
4. Use [ ] , [ ] or (Scroll Wheel) to select <Network Settings>, then press [OK].
5. Confirm the message shown on the display, then press the right Any key to select <Done>.
6. Use [ ] , [ ] or (Scroll Wheel) to select <E-mail/I-Fax>, then press [OK].
7. Use [ ] , [ ] or (Scroll Wheel) to select <SMTP Receive>, then press [OK].

8. Use [ ] , [ ] or (Scroll Wheel) to select <Off> or <On>, then press [OK].
- <Off>: Does not receive e-mails and I-faxes using the machine's own SMTP receiving function. If you want to receive e-mails and I-faxes using a POP server, select <Off>.
- <On>: Receives e-mails and I-faxes using the machine's own SMTP receiving function.

note:
You must register the host name of the machine with the DNS server if you want to receive e-mails and I-faxes using the machine's own SMTP receiving function.
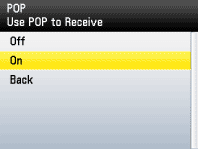
9. Use [ ] , [ ] or (Scroll Wheel) to select <POP>, then press [OK].

10. Use [ ] , [ ] or (Scroll Wheel) to select <Off> or <On>, then press [OK].
- <Off>: Does not receive e-mails and I-faxes using a POP server. If you want to receive e-mails and I-faxes using the machine's own SMTP receiving function, select <Off>, then proceed to step 19.
- <On>: Receives e-mails and I-faxes using a POP server.
11. Use [ ] , [ ] or (Scroll Wheel) to select <POP Server>, then press [OK].
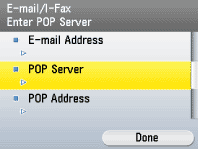
12. Use the software keyboard to enter the POP server address, then press the right Any key to select <Set>.
-
Enter the POP server name if the POP server name is already registered in the DNS server.
-
Enter the IP address of the POP server if the POP server name is not registered in the DNS server.

13. Use [ ] , [ ] or (Scroll Wheel) to select <POP Address>, then press [OK].
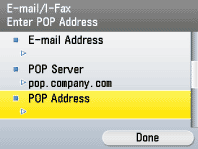
14. Use the software keyboard to enter the POP address, then press the right Any key to select <Set>.

15. Use [ ] , [ ] or (Scroll Wheel) to select <POP Password>, then press [OK].

16. Use the software keyboard to enter the POP password, then press the right Any key to select <Set>.

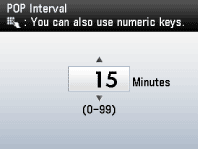
17. Use [ ] , [ ] or (Scroll Wheel) to select <POP Interval>, then press [OK].

18. Use [ ] , [ ] or (Scroll Wheel) to set the interval at which you want to check the POP server for incoming e-mail, then press [OK].
You can also use the numeric keys to enter the interval.
19. Press (Main Menu) to return to the Main Menu screen.
20. Restart the machine.
Turn OFF the machine and wait at least 10 seconds before turning it ON again.