Setting IP v. 6
This section describes the procedure for setting IP v. 6.
Specify the settings for IP v. 6 using the Remote UI after specifying the settings for IP v. 4.
IMPORTANT
- You cannot use only IP v. 6 without using IP v. 4.
- IPsec encryption (Security Architecture for Internet Protocol) is not supported.
NOTE
About the IP v. 6 address
- This printer can have up to seven IP v. 6 addresses of the following types. (Only one address can be registered manually.) IP v. 6 communication allows you to use multiple IP v. 6 addresses simultaneously.
| Type |
Registrable Number |
Overview |
| Link-Local Address |
1 |
A link-local address is automatically set with a combination of the specific prefix "fe80::" (information which indicates the network to which the printer belongs) and the interface identifier created from this printer's MAC address. Because this address is valid only within the same prefix, it cannot traverse the router. One link-local address is specified for this printer whenever IP v. 6 is being used. |
| Manual Address |
0 to 1 |
This is an address that you can enter manually. By setting the IP address manually, you can specify the prefix length and the default router address. |
| Stateless Address |
0 to 6 |
A stateless address is automatically set with a combination of the prefix included in RA (Router Advertisement) sent by the router and this printer's MAC address. |
| Stateful Address |
0 to 1 |
You can obtain a stateful address from the DHCP server using DHCP v. 6. |
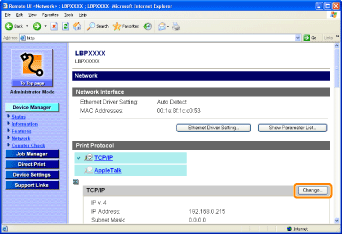
1. Start the Remote UI, and then log in as Administrator.
2. Select [Network] from the [Device Manager] menu.

3. Click [Change] under [TCP/IP].
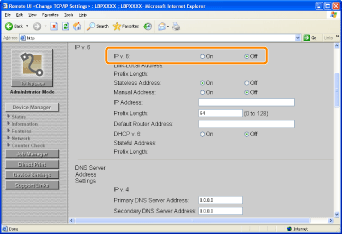
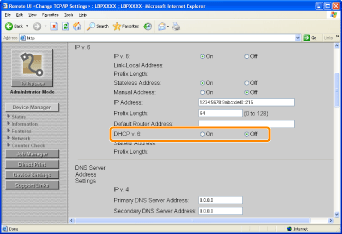
4. Set [IP v. 6] to [On].
5. Specify the stateless address.
Set [Stateless Address] to [Off] when not using the stateless address.
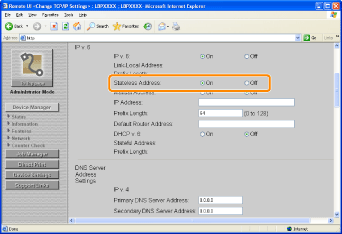
NOTE
About the stateless address
- The stateless address will be discarded when you restart the printer (when you turn it ON).
6. If you want to use a manual address, specify the following settings.
If you do not want to use a manual address, proceed to Step 7.
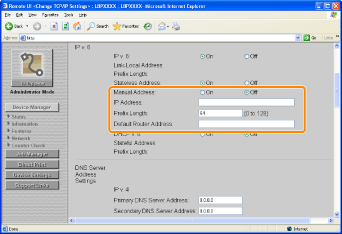
1. Set [Manual Address] to [On].
2. Enter [IP Address].
3. Enter [Prefix Length].
4. Enter [Default Router Address] as needed.
IMPORTANT
Addresses which cannot be entered in [IP Address] and [Default Router Address]
- An address which starts with "ff" (multicast address)
- An address which starts with "0:0:"
7. Specify DHCP v. 6.
Set [DHCP v. 6] to [On] when using the stateful address.
8. If you want to use the DNS server, specify the following settings.
If you do not want to use the DNS server, proceed to Step 9.
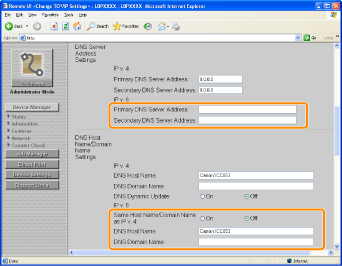
1. Enter the IP address of the primary DNS server in [Primary DNS Server Address] in [IP v. 6].
2. Enter the IP address of the secondary DNS server in [Secondary DNS Server Address] in [IP v. 6].
3. Specify [DNS Host Name] and [DNS Domain Name].
- If you want to use the same name as the one for IP v. 4, set [Same Host Name/Domain Name as IP v. 4] to [On].
- If you want to use a name different from the one for IP v. 4, enter [DNS Host Name] and [DNS Domain Name].
- Input Example of [DNS Domain Name]: "example.com"
9. If you want to use DNS Dynamic Update, specify the following settings.
If you do not want to use the DNS server, proceed to Step 10.

1. Set [DNS Dynamic Update] to [On].
* By specifying [DNS Host Name] and [DNS Domain Name] in LPR using DNS Dynamic Update, you can use the printer without fixing the IP address of the printer.
2. Specify the setting for [Register Stateless Address].
* If you specify [On], the stateless address is registered in the DNS server.
3. Specify the setting for [Register Manual Address].
* If you specify [On], the manual address is registered in the DNS server.
4. Specify the setting for [Register Stateful Address].
* If you specify [On], the stateful address is registered in the DNS server.
IMPORTANT
DNS Dynamic Update
- DNS Dynamic Update is a function that adds the IP address of the device and the names specified as the host name and domain name to the DNS server automatically.
- This function can be used in the environment in which a Dynamic DNS server is being used.
When using the DNS Dynamic Update function
- You need to set the IP address, host name, and domain name of the DNS server.
10. Click [OK].
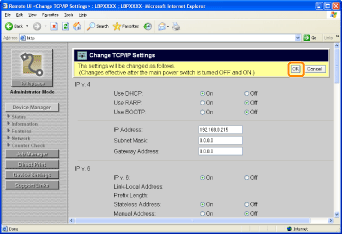
11. Perform a hard reset or restart the printer.
-> After performing a hard reset or restarting the printer, the settings are effective.
NOTE
To perform a hard reset
- You can perform a hard reset using the following procedure.
1. Select [Status] from the [Device Manager] menu.
2. Click [Device Control].
3. Select [Hard Reset], then click [Execute].
