Setting Activity Reports to Print Automatically
This section describes how to set Activity Reports to print automatically.
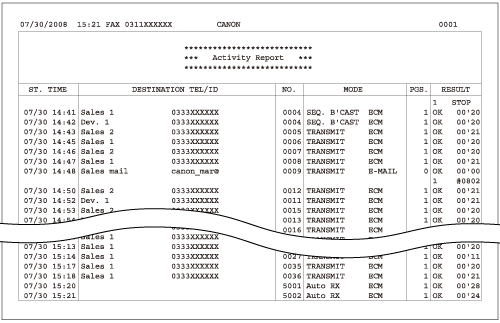
The default settings are as follows:
- DEPT. ID: If Department ID Management is set, the Department ID is printed. All sending and receiving transactions are listed for each Department ID.
- ST. TIME: Transmission or reception start time
- DESTINATION TEL/ID: Name and fax number or address of the sender or recipient. If a job is sent to a file server (FTP or SMB), the path name is printed on the second line.
- NO: Transaction number. Numbers between 0001 and 4999 are for sent jobs, while numbers between 5001 and 9999 are for received jobs.
- MODE: Transaction mode
- PGS.: Number of pages sent or received
- RESULT: Result of transaction and transaction duration
- OK: Transmission or reception successful
- NG: Transmission or reception failed or canceled using [Stop]
- - -: E-mail or I-fax transmission to a mail server has been confirmed as successful.
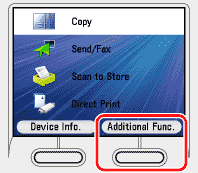
1. Press  (Main Menu).
2. Press the right Any key to select <Additional Func.>.
3. Use [  ] , [
] , [  ] or
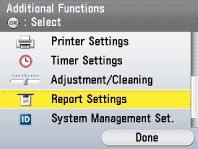
] or  (Scroll Wheel) to select <Report Settings>, then press [OK].
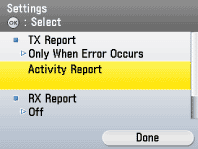
4. Use [ ] , [ ] or (Scroll Wheel) to select <Settings>, then press [OK].

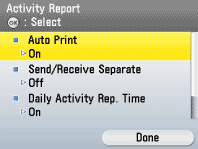
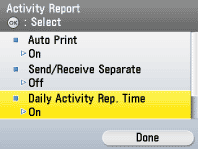
5. Use [ ] , [ ] or (Scroll Wheel) to select <Activity Report>, then press [OK].
6. Use [ ] , [ ] or (Scroll Wheel) to select <Auto Print>, then press [OK].
7. Use [ ] , [ ] or (Scroll Wheel) to select <On> or <Off>, then press [OK].
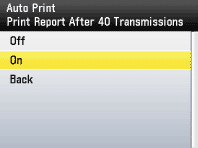
If <Job Log Display> in <System Management Set.> is set to <On>, <Auto Print> automatically switches to <Off>.
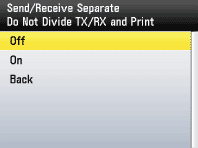
8. Use [ ] , [ ] or (Scroll Wheel) to select <Send/Receive Separate>, then press [OK].
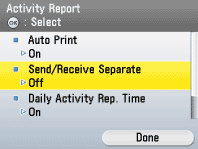
9. Use [ ] , [ ] or (Scroll Wheel) to select <On> or <Off>, then press [OK].
- <Off>: The send and receive logs are not printed separately.
- <On>: The send and receive logs are printed separately.
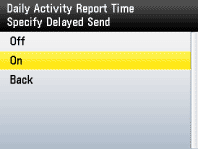
10. Use [ ] , [ ] or (Scroll Wheel) to select <Daily Activity Rep. Time>, then press [OK].
11. Use [ ] , [ ] or (Scroll Wheel) to select <Off> or <On>, then press [OK].
-
<Off>: The time to print the Activity Report is not specified.
-
<On>: The Activity Report is printed at the specified time. Enter all four digits of the time (including zeros) in 24-hour notation, using  -
-  (numeric keys). If you make a mistake when entering the time, press
  (Clear) to clear your entry, then enter another four digit number. If the number of send and receive transactions exceeds 40 before the specified time, an Activity Report of most recent 40 transactions is printed.
12. Press (Main Menu) to return to the Main Menu screen.