Delete documents in Memory
The Message <The memory is full.> appears on the display and the job cannot be started even if the  (Start) is pressed.
The Message <The memory is full.> appears, and scanning originals from the feeder is interrupted.
Is the machine full of jobs?
When the number of stored jobs reached the maximum number of jobs that can be stored, faxing, copying, and printing cannot be performed. (You can use the direct sending function even if the memory is full of jobs.)
Print or send documents stored in memory, or delete unnecessary documents.
If this message appears while sending a document, divide the document stack or data into a few parts and send them one by one, or send the document with lower resolution.
Does the number of stored TX/RX jobs reach the maximum number of jobs that can be stored?
The maximum numbers of jobs that can be stored in memory are as follows (Based on the condition that the other party sends the fax by the Color imageCLASS MF9220Cdn/Color imageCLASS MF9280Cdn with ITU-T No. 1 Chart standard mode);
Up to 70 jobs for sending or 90 jobs for receiving, 95 fax jobs including sending and receiving, or 75 e-mail and I-fax jobs for receiving. Wait for the machine to send any documents in memory. Also print, send, or delete any documents stored in memory.
Does the message appear and the original stop halfway while scanning originals from the feeder?
If this message appears while you are scanning originals from the feeder, scanning is interrupted and the original stops halfway. In this case, press the left Any key to select <Yes> to cancel scanning. Print or send documents stored in memory, or delete unnecessary documents and retry scanning.
Checking/Deleting documents in memory
You can check and delete documents in memory using  (Status Monitor/Cancel).
Press (Status Monitor/Cancel) to check the job status and cancel the jobs.
*You cannot check and cancel network scan jobs from the Status Monitor screen.
 Checking and Canceling Copy Jobs
You can check the status of a copy job while it is printing or waiting to be processed. If the job is unwanted, you can cancel it as necessary.
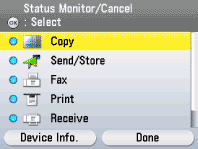
1. Press (Status Monitor/Cancel).
2. Use [  ] , [
] , [  ] or
] or  (Scroll Wheel) to select <Copy>, then press [OK]
A blue icon shows that there is any job you can check or delete.
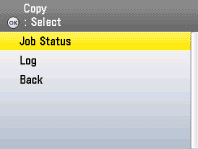
3. Use [ ] , [ ] or (Scroll Wheel) to select <Job Status>, then press [OK].
4. Use [ ] , [ ] or (Scroll Wheel) to select the desired job, then press the left Any key to select <Details>.
If you want to cancel the selected job without checking details, press the right Any key to select <Cancel>, then proceed to step 7.

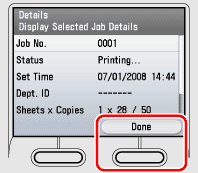
5. Check the copy status, then press the right Any key to select <Done>.
If you want to cancel this copy job, proceed to the next step. If not, proceed to step 8.
6. Make sure that the job you want to cancel is selected, then press the right Any key to select <Cancel>.

7. Use [ ] or (Scroll Wheel) to select <Yes>, then press [OK].

8. Press  (Main Menu) to return to the Main Menu screen.
Checking/Deleting Documents Being Sent or Waiting To Be Sent
You can check the detailed information of documents currently being sent or waiting to be sent. If the documents are unwanted, you can delete them as necessary.
Follow the procedure below to check and delete the documents sent via e-mail, I-fax, and fax, or to a file server or USB memory.
1. Press (Status Monitor/Cancel).
2. Use [ ] , [ ] or (Scroll Wheel) to select <Send/Store>, then press [OK].
A blue icon shows that there is any job you can check or delete.

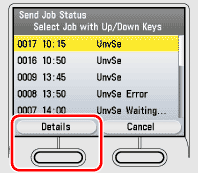
3. Use [ ] , [ ] or (Scroll Wheel) to select <Send Job Status>, then press [OK].

4. Use [ ] , [ ] or (Scroll Wheel) to select the job whose detailed information you want to check, then press the left Any key to select <Details>.
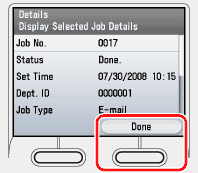
5. Check the details of the selected job.
 If you want to erase the selected job:
 1. Press the right Any key to select <Done>, then go to the next step.
If you complete this procedure:
1. Go to step 8.
6. Make sure that the job you want to erase is selected, then press the right Any key to select <Cancel>.

7. Use [ ] , [ ] or (Scroll Wheel) to select <No> or <Yes>, then press [OK].

8. Press (Main Menu) to return to the Main Menu screen.
Checking/Deleting Documents Being Received or Waiting To Be Printed
You check the detailed information of documents currently being received or documents that have been received in memory. If the documents are unwanted, you can delete them as necessary.
Follow the procedure below to check and delete the documents received via e-mail, I-fax, and fax.
1. Press (Status Monitor/Cancel).
2. Use [ ] , [ ] or (Scroll Wheel) to select <Receive>, then press [OK].
If you want to check the fax documents, select <Fax>.
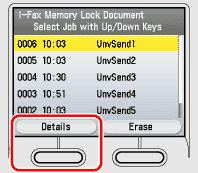
A blue icon shows that there is any job you can check or delete.

3. Use [ ] , [ ] or (Scroll Wheel) to select <I-Fax RX Document>, then press [OK].
If you select <Fax> in step 2, select <Received Job Status>.

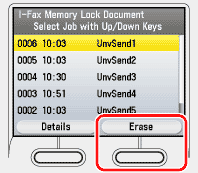
4. Use [ ] , [ ] or (Scroll Wheel) to select the job whose detailed information you want to check, then press the left Any key to select <Details>.
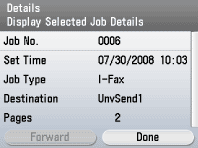
5. Check the details of the selected job.
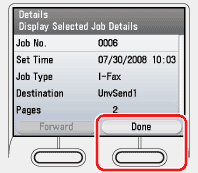
If you want to erase the selected job:
1. Press the right Any key to select <Done>, then go to the next step.
If you complete this procedure:
1. Go to step 8.
note:
You can forward the selected job to another destination by pressing the left Any key to select <Forward>.
6. Make sure that the job you want to erase is selected, then press the right Any key to select <Erase>.
note:
- To erase multiple documents from memory, select and erase one document at a time.
- You cannot erase a document that is being printed.
- If you select a document that is being received, <Erase> changes to <Cancel>, enabling you to cancel receiving the document.
7. Use [ ] , [ ] or (Scroll Wheel) to select <No> or <Yes>, then press [OK].

8. Press (Main Menu) to return to the Main Menu screen.
Checking and Canceling Print Jobs
note:
Make sure that the Processing/Data indicator is on or blinking. When the Processing/Data indicator is off, there are no jobs in the memory of the print job status.
1. Press (Status Monitor/Cancel).
2. Use [ ] , [ ] or (Scroll Wheel) to select <Print>, then press [OK].
A blue icon shows that there is any job you can check or delete.

3. Use [ ] , [ ] or (Scroll Wheel) to select <Job Status>, then press [OK].

4. Use [ ] , [ ] or (Scroll Wheel) to select the desired job, then press the left Any key to select <Details>.
If you want to cancel the selected job without checking details, press the right Any key to select <Cancel>, then proceed to step 7.

5. Check the print job status, then press the right Any key to select <Done>.
If you want to cancel this print job, proceed to the next step. If not, proceed to step 8.

6. Make sure that the job you want to cancel is selected, then press the right Any key to select <Cancel>.

7. Use [ ] , [ ] or (Scroll Wheel) to select <Yes>.

8. Press (Main Menu) to return to the Main Menu screen.
