Basic Methods for Scanning Documents to a File Server (SMB)
This section describes the basic procedure for sending scanned documents to a computer that acts as a file server on a network. For information on the required settings to be made beforehand, refer to the related information.
note:
If you select a file format for color from the <Color/File Format Settings>, you will not be able to consecutively scan multiple-page originals from the platen glass. If you want to consecutively scan multiple-page originals using a file format for color, use the feeder instead.
1. Place your originals.

2. Press  (Main Menu).
3. Use [  ] , [
] , [  ] or
] or  (Scroll Wheel) to select <Send/Fax> or <Scan to Store>, then press [OK].
If you select <Scan to Store>, use [ ] , [ ] or (Scroll Wheel) to select <Store on File Server>, then press [OK].

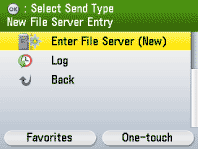
4. Use [ ] , [ ] or (Scroll Wheel) to select <Enter File Server (New)>, then press [OK].
note:
You can specify the address using the Address Book or One-touch registered beforehand. For instructions on how to register the Address Book and One-touch, refer to the related information.
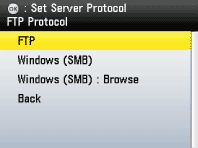
5. Use [ ] , [ ] or (Scroll Wheel) to select <Windows (SMB)> or <Windows (SMB) : Browse>, then specify the file server's address.
- Select <Windows (SMB)> if you want to enter the file server address directly.
- Select <Windows (SMB) : Browse> if you want to browse and specify the file server on a network.
6. Make the scan settings you require.

7. Press  (Start).
- Scanning starts if the original is placed in the feeder, and the scanned data is sent to the specified destination when scanning is complete.
- To cancel scanning, press the left Any key to select <Cancel> or press
 (Stop).

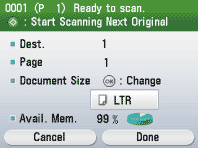
8. Use [ ] , [ ] or (Scroll Wheel) to select the original size, then press [OK].

9. Press (Start).
- Scanning starts.
- To cancel scanning, press the left Any key to select <Cancel> or press (Stop).

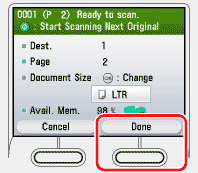
10. Follow the instructions on the display, then press (Start) once for each original.
11. When scanning is complete, press the right Any key to select <Done>.
The scanned data is sent to the specified destination.