
Set the receive mode properly to receive faxes - MX410
| Article ID: ART108178 | | | Date published: 05/11/2015 | | | Date last updated: 08/15/2015 |
Description
Solution
Check the receive mode setting and change it to a mode suited to your connection if necessary.
This section describes the preparation necessary for receiving a fax and how to receive a fax. This section also describes the operation to print documents stored in the machine's memory such as when ink or paper runs out.
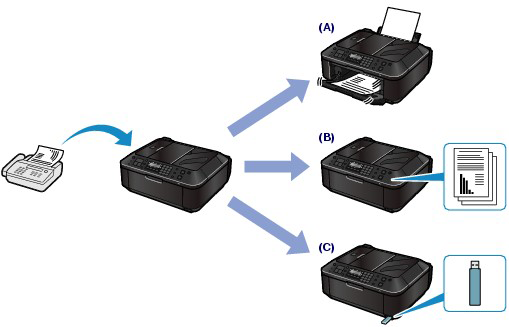
(A) Prints a received fax.
See [ Receiving a Fax ].
(B) Stores a received fax in the machine's memory without printing it.
See [ Receiving a Fax Temporarily in the Machine's Memory (Memory Receiving) ].
(C) Automatically saves a received fax on the USB flash drive.
Preparing for Receiving a Fax
Prepare for receiving a fax according to the following procedure.
1. Make sure that the power is turned on.
2. Make sure of the receive mode setting.
(1) Press the FAX button.
(2) Confirm the receive mode.

3. Load paper.
Here we make sure that the plain paper is loaded in the Rear Tray.
4. Specify the paper settings as necessary.
(1) Press the Settings button.
The Page size screen will appear.

(2) Use the  (-) or
  (+) button to specify Page size, and press the OK button.
You can specify A4, Letter, or Legal.
(3) Confirm that Plain paper is selected for Media type, and press the OK button.
- If a media type other than Plain paper is selected, select Plain paper.

- The paper settings are shared among the copy mode, fax mode, and template print. After printing in other modes, confirm or change the paper settings. If a page size other than A4, Letter, or Legal, or a media type other than Plain paper is selected, faxes or reports cannot be printed.
See [ Receiving a Fax Temporarily in the Machine's Memory (Memory Receiving) ].
- Set ECM RX in Adv. communication to ON to receive a color fax.
Receiving a Fax
Depending on the selected receive mode, the receive operation varies.
- When TEL priority mode is selected:
When the call is a fax:
The telephone will ring when a call incomes.


(1) Pick up the handset. If you hear the fax tone, wait for at least 5 seconds after it stops, then hang up the handset.
The machine will receive the fax.


- If the machine will not switch to fax reception, press the FAX button, then the Color or Black button to receive the fax.
- To receive a fax without picking up the handset, set Manual/auto switch to ON. RX start time allows you to specify the number of seconds until the machine switches to fax reception.
- If you have subscribed to Duplex Ringing service in Hong Kong, the telephone will ring a specified number of times when there is an incoming call with a fax distinctive ring pattern. Then, the machine will switch to fax reception automatically without the handset being picked up. The number of times to ring the telephone until switching to fax reception can be changed.
Other options
- Set the machine to enable you to initiate fax reception from a connected telephone (remote reception).
When the answering machine is connected to the machine
- If the answering machine is set to the answering mode, set User-friendly RX to ON. If the call is a fax, the machine will receive the fax automatically.
- If the answering mode is turned off on the answering machine, follow step (1) above.
- If Manual/auto switch is set to ON, set RX start time to longer than the time before the answering machine starts playing the answering message. After making this setting, we recommend that you call the answering machine using a mobile phone, etc. to confirm that messages are recorded successfully in the answering machine.
- Set your answering machine to answering mode and adjust it as follows:
- The entire message should be no longer than 15 seconds.
- In the message, tell your callers how to send a fax.
When the call is a voice call:
The telephone will ring when a call incomes.
(1) Pick up the handset, and talk on the telephone.
- If the machine unexpectedly switches to fax reception during telephone calls, set User-friendly RX to OFF.
- If Manual/auto switch is set to ON, you must answer an incoming call by picking up the handset within the time specified in RX start time. Otherwise the machine will switch to fax reception.
- When Fax only mode is selected:
When the call is a fax.
The machine will receive the fax automatically.

- If a telephone is connected to the machine, the telephone will ring when a call incomes.
Other options
- Change the number of times to ring the telephone.
- When DRPD or Network switch is selected:
When the call is a fax:
The telephone will ring when a call incomes.
The machine will receive the fax automatically when the fax ring pattern is detected.
Other options
- Change the number of times to ring the telephone.
When the call is a voice call:
The telephone will ring when a call incomes.
When the machine does not detect the fax ring pattern, the telephone will continue ringing.
(1) Pick up the handset, and talk on the telephone.
- To use this feature, you need to subscribe to a compatible service provided by your telephone company. Contact your telephone company for details.
For DRPD
- You need to select the appropriate ring pattern on the machine.
For Network switch
- The name of this service varies depending on the country or region of purchase. This setting may not be also available depending on the country or region of purchase.
Receiving a Fax Temporarily in the Machine's Memory (Memory Receiving)
If the machine was not able to print a received fax, the machine stores the unprinted fax temporarily in its memory (memory receiving).
When a fax is stored in the memory, the FAX Memory lamp lights and the message "Received in memory" appears on the LCD.
- If the power plug is disconnected, all faxes stored in the machine's memory will be lost. The next time you turn on the power, a confirmation screen will appear. Press the OK button on the screen to print a list of the lost faxes.
If the machine receives a fax under one of the following conditions, the machine will automatically store the received fax in its memory.
- The Machine Is Set to Store Received Documents in its Memory
To store received documents in the machine's memory, select Do not print for Received documents in Auto print settings.
You can print the documents stored in the machine's memory from the Memory reference screen.
See [ Printing Documents in the Machine's Memory].
- An Error Has Occurred on the Machine
If you select Print for Received documents in Auto print settings, a received fax will be printed automatically. However, if any of the following errors occurs, the received fax will not be printed. It will instead be stored in the machine's memory.
- The amount of remaining ink is insufficient to print a fax.
The fax in the machine's memory will be automatically printed when a new FINE Cartridge is installed.
Print when out of ink
- If you select Do not print for Print when out of ink in Auto print settings, the machine stops printing when it detects insufficient ink and stores received faxes in its memory.
- If you select Print for Print when out of ink, the machine prints received faxes or reports even if there is insufficient ink. In this case, part or all of the fax may not be printed and it will not be stored in the machine's memory. If you notice that there is insufficient ink for printing faxes, select Do not print for Received documents in Auto print settings to store received faxes in the machine's memory until you replace the FINE Cartridge. After replacement, set Received documents back to Print. The received faxes in the machine's memory will then be printed automatically.
- Paper has run out.
Load the paper and press the OK button. The fax in memory will be automatically printed.
- Paper of a size other than selected for Page size is loaded.
Load paper of the same size as selected for Page size, and press the OK button. The fax in memory will be automatically printed.
- A page size other than A4, Letter, or Legal is selected for Page size.
Select A4, Letter, or Legal for Page size.
See [ Preparing for Receiving a Fax ].
- A media type other than Plain paper is selected for Media type.
Select Plain paper for Media type.
See [ Preparing for Receiving a Fax ].
- You Pressed the Stop Button to Cancel Printing of a Fax
Press the FAX button to resume printing of the fax.
- The machine can store up to approximately 50 pages* (max. 20 documents) of faxes in memory.
* When using ITU-T No.1 chart (Standard mode)
- If the machine's memory becomes full, the machine cannot receive any more faxes. Print or delete the documents stored in memory, then have the sender resend the faxes.
See [ Printing Documents in the Machine's Memory ].
Printing Documents in the Machine's Memory
You can print all documents received in the machine's memory at once or select a document for printing on the Memory reference screen. You can also save the documents on the USB flash drive.
This section describes the procedure to print all the received documents in the memory.
- For the conditions of the faxes to be received in the memory, see [ Receiving a Fax Temporarily in the Machine's Memory (Memory Receiving) ].
1. Load paper.
Here we make sure that plain paper is loaded in the Rear Tray.
2. Specify the paper settings as necessary.
If a page size other than A4, Letter, or Legal, or a media type other than Plain paper is selected, faxes or reports cannot be printed. Confirm or change the paper settings.
See [ Preparing for Receiving a Fax ].
3. Display the Memory reference screen.
(1) Press the FAX button, and press the Menu button.
(2) Use the (-) or (+) button to select Memory reference in the Fax settings menu, and press the OK button.
4. Print all the received documents in the memory.
(1) Use the (-) or (+) button to select Print all RX docs, and press the OK button.

- Select Print memory list to print the list of documents in the memory.
- Select Print specified doc. to print a specified document.
- Select Delete specified doc. to delete a specified document.
- Select Print all RX docs to print all documents in the memory at the same time.
- Select Delete all documents to delete all documents in the memory at the same time.
- Select Save specified doc. to save a specified document on the USB flash drive.
- Select Save all documents to save all documents in the memory on the USB flash drive.
(2) Use the (-) or (+) button to select Yes, and press the OK button.
The machine starts printing documents in the memory one by one.

(3) To delete the printed document, use the (-) or (+) button to select Yes.

To keep the document in the memory, select No.
(4) Press the OK button.
- The deletion confirmation screen will appear each time after one document is printed. Repeat the same procedure until all documents are printed.